Build your online store with Rosun
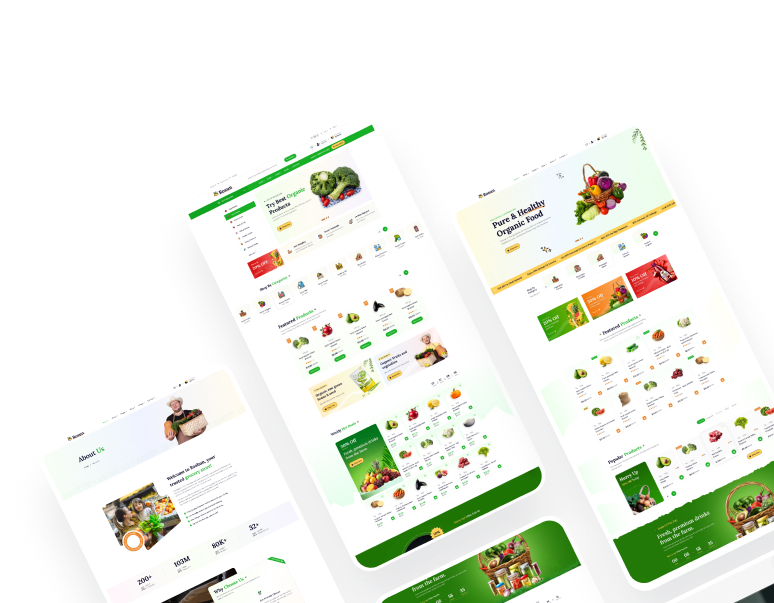
Create a grocery market, food delivery, meal-ordering or organic food shop. Follow this guide to install Rosun, set up WooCommerce, import a demo and customize your site.
- 1 InstallUpload rosun.zip
- 2 Add pluginsActivate the essentials
- 3 Import a demoPick a ready-made site
- 4 Make it yoursLogo, colors and menus
Overview
Theme: Rosun - Grocery Store & Food Delivery WooCommerce Elementor Theme
Introduction
Rosun is a WordPress theme for grocery stores, food shops, meal ordering and delivery. It combines WooCommerce with Elementor page building, ready-made home layouts, product-focused widgets, and theme options for headers, footers, popups and store presentation. This guide explains how to set it up, import a starter demo and manage your store.
For help with Rosun, consult the Rosun documentation or visit the Togra Studio website.
Choose where to begin
Jump to the part you need, or open search with Ctrl K (⌘ K on Mac) and type what you are looking for.
Setup & Install
Check the requirements, install Rosun and activate its recommended plugins.
Start installingDemo Import
Choose one of the included Rosun layouts and import its starter content.
Import a demoSite Design
Logo, colors, fonts, menus, header, footer, breadcrumb and the offcanvas panel.
Design your siteProducts & Store
Use WooCommerce to manage products, categories, prices, stock, cart and checkout.
Set up your storeElementor Widgets
Build pages with Rosun Core Elementor widgets for products, categories and site content.
Explore widgetsHelp & Fixes
Translating the theme, fixes for common errors, the changelog and how to reach us.
Find a fixRequirements
Use a current, supported WordPress release and keep WordPress, Rosun and its plugins updated. Rosun requires PHP 7.4 or newer; PHP 8.1 or newer is recommended. WooCommerce and Elementor are needed for the store and page-building features.
| Requirement | Minimum | Recommended |
|---|---|---|
| WordPress | 6.0+ |
Latest stable |
| PHP | 7.4+ |
8.1+ |
| MySQL | 5.6 / MariaDB 10.0 |
Latest stable |
| Memory Limit | 256 MB | 256 MB or more |
Recommended PHP configuration limits
        max_execution_time = 180
        memory_limit = 256M
        post_max_size = 64M
        upload_max_filesize = 32M
        max_input_time = 60
        max_input_vars = 3000
For detailed server requirements, visit: https://make.wordpress.org/hosting/handbook/handbook/server-environment
What's Included
Download the product files from the marketplace account where you purchased Rosun. The Installable WordPress file only download is the theme ZIP; it does not contain the separate documentation site or the full-download sample data. Extract the complete product download when you need the manual-import files.
| File / Folder | Description |
|---|---|
rosun.zip |
The installable WordPress Theme zip file. This is the file you need to upload to WordPress. |
sample-data/content.xml, sample-data/widget.json, and
sample-data/customizer.dat |
Bundled WordPress content, widget, and Customizer export files for manual import when the predefined demo import cannot retrieve its files. |
| Rosun Core | Install the companion plugin from Appearance → Install Plugins. It is separate from the installable theme ZIP. |
| Online documentation | Read this guide at wptheme.moontelict.com/rosun/docs/. It is not located inside the installable theme ZIP. |
licensing.txt |
Third-party asset notices and license references included with the Rosun theme. |
Installation
Install WordPress, upload the Rosun theme, activate its required plugins and optionally import a starter demo.
WordPress Installation
Please follow the instructions in the videos below to see how you can install WordPress on your hosting:
| For localhost: | https://www.youtube.com/watch?v=snFzbPm_RUE |
| For cPanel: | https://www.youtube.com/watch?v=t-YBqV2ReR0 |
Installing the Theme
If you download the full product archive and try to upload it directly to WordPress, you may
receive the error: "Theme is missing the style.css stylesheet." Extract the
archive first, then upload only the installable rosun.zip theme file.
When you are ready to install the theme, you must first upload the theme files and then activate the theme. The theme files can be uploaded in two ways:
1. Using Theme Uploader
Follow the steps below:
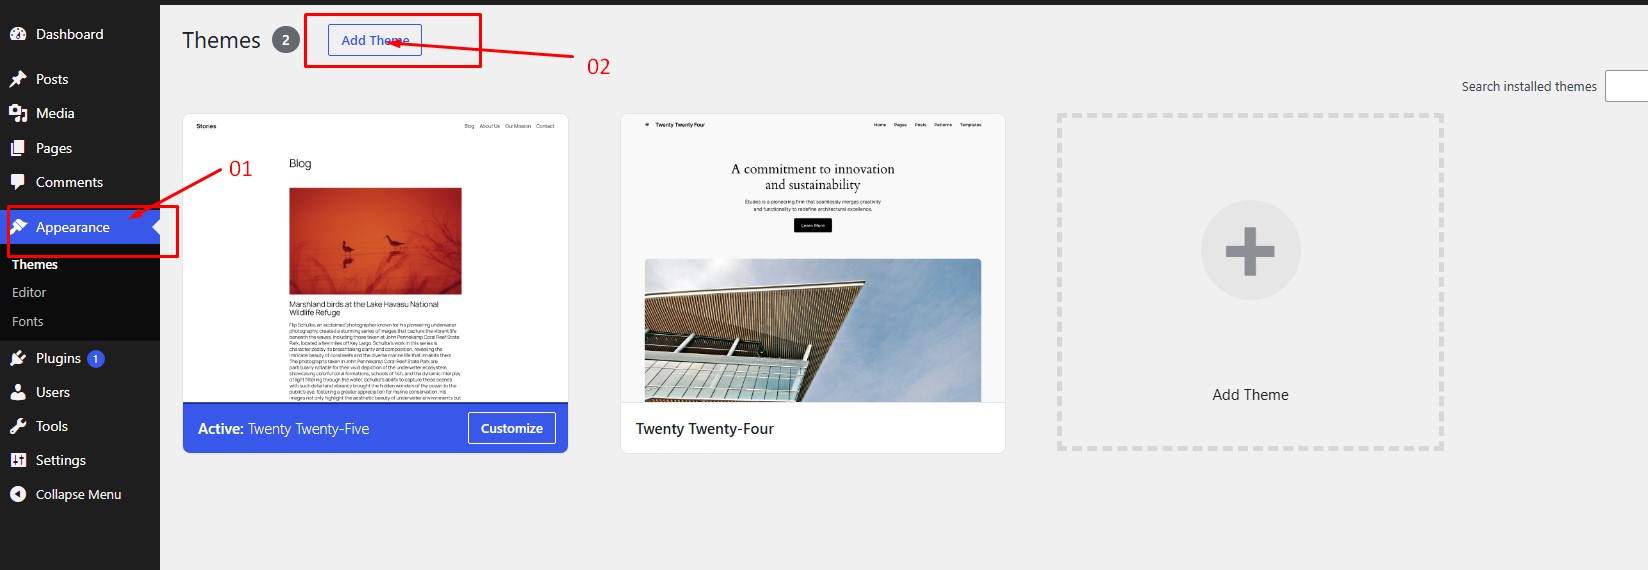
Go to Appearance → Themes → Add New → Upload Theme
From the WordPress dashboard navigate to Appearance → Themes → Add New → Upload Theme.
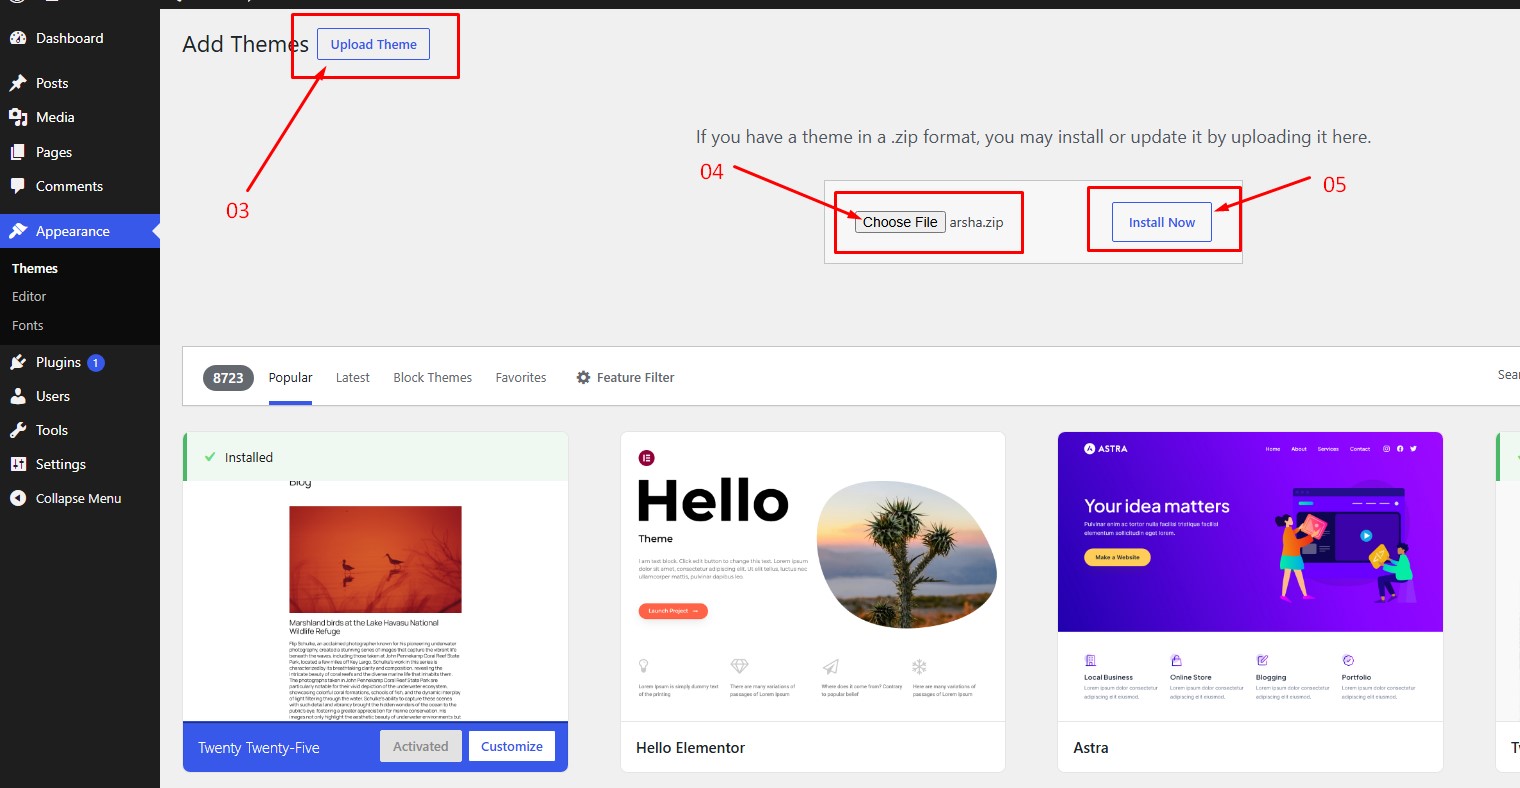
Choose File and Install
Click on "Choose File" and select rosun.zip, then click "Install Now".
rosun.zip and click
Install Now
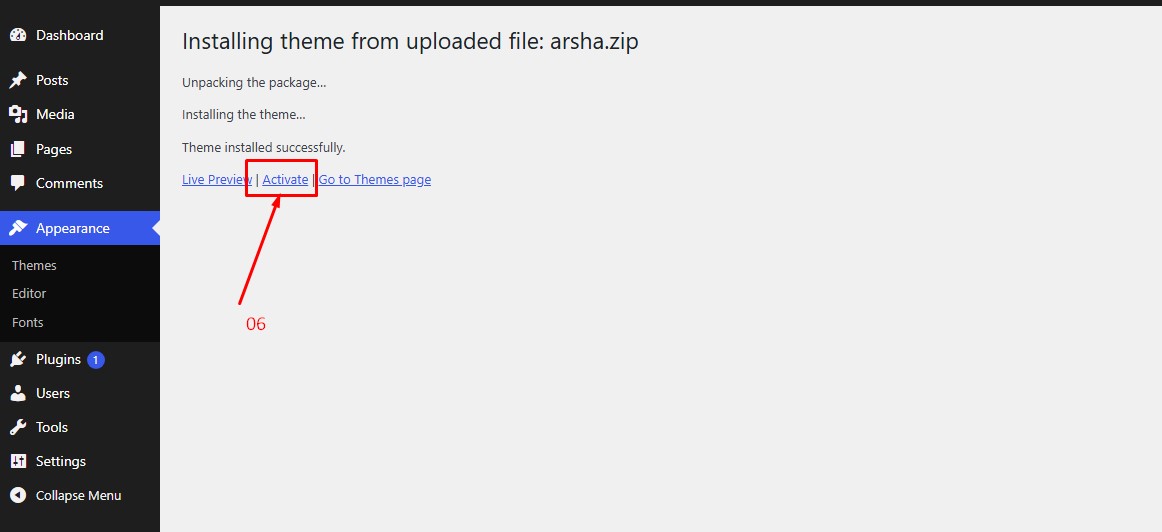
Activate the Theme
After the upload completes, click "Activate" to activate the Rosun theme.
All plugins must be installed and activated if you want your site to look exactly like the demo.
2. Using FTP Clients
Follow these steps to upload the theme using an FTP client (e.g. FileZilla):
- Use an FTP client such as FileZilla and connect to your WordPress installation directory.
- Navigate to the
/wp-content/themes/folder and upload the unzipped rosun theme folder there. - Log in to your WP Admin Dashboard and open the Appearance → Themes menu.
- You will now see the Rosun theme listed among the other themes. Click "Activate" and you're done!
3. Updating Theme
Occasionally we provide updates which include new features and bug fixes. Updating a WordPress theme is standard WordPress functionality.
Before updating, please make sure to keep a backup of your installed theme and plugins (e.g. Rosun Core) to be on the safe side. You can use your hosting backup tool or a trusted backup plugin before continuing.
There are a few ways to update the WordPress theme:
- Download the latest installable Rosun theme archive from your purchase account.
- Use your marketplace's supported update method, or upload the new theme version through WordPress Appearance → Themes.
- Update Rosun Core and the bundled/recommended plugins when prompted.
After updating the theme, please also update all plugins that come with the theme.
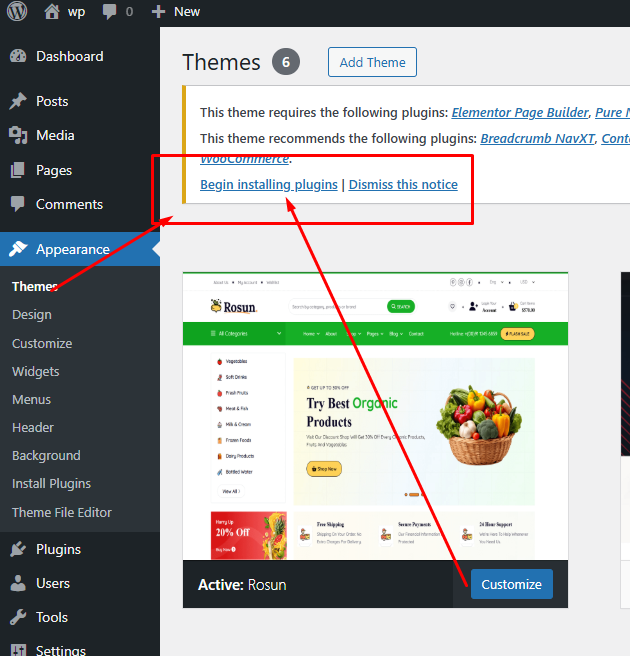
4. Installing Required Plugins
Click Begin installing plugins
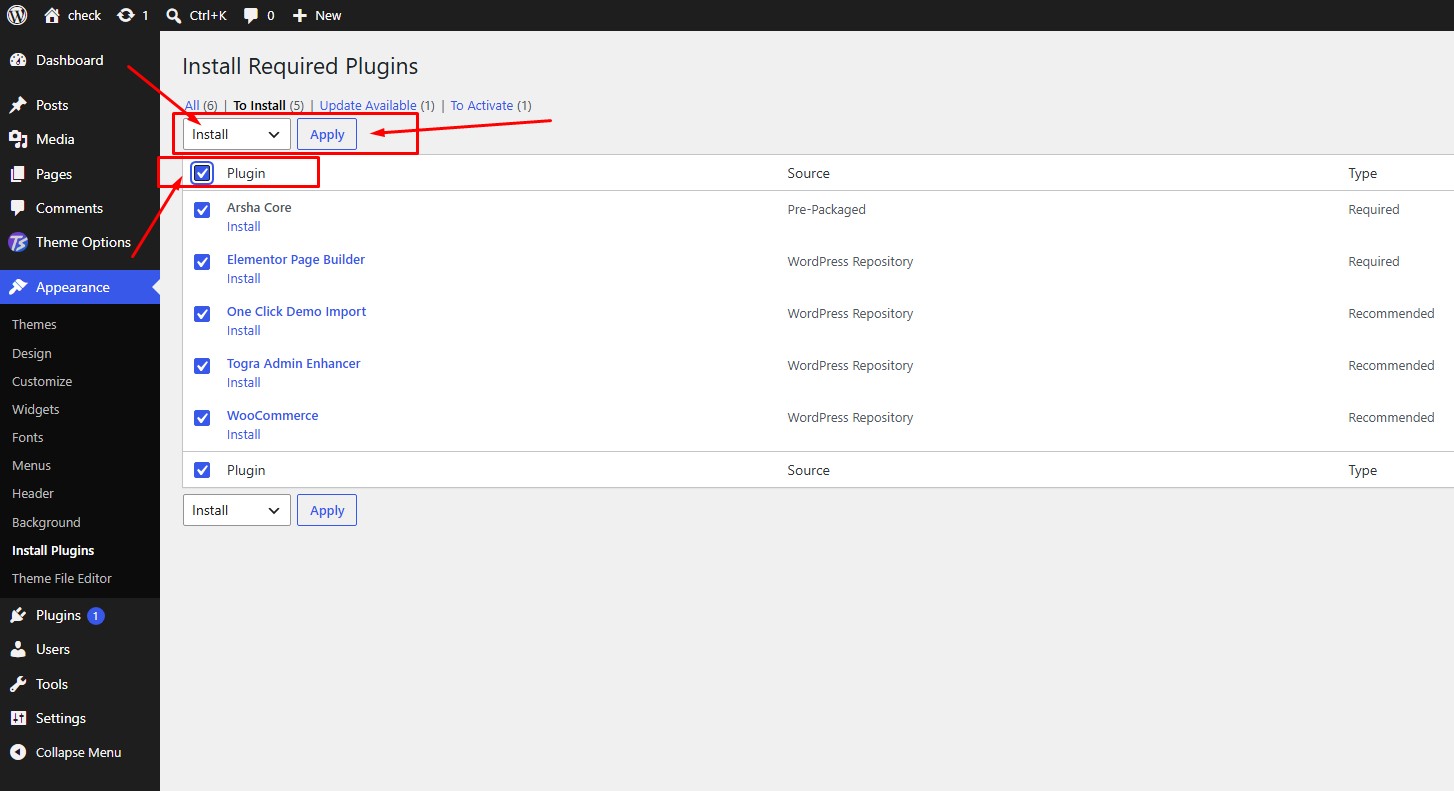
Select Install, then hit Apply
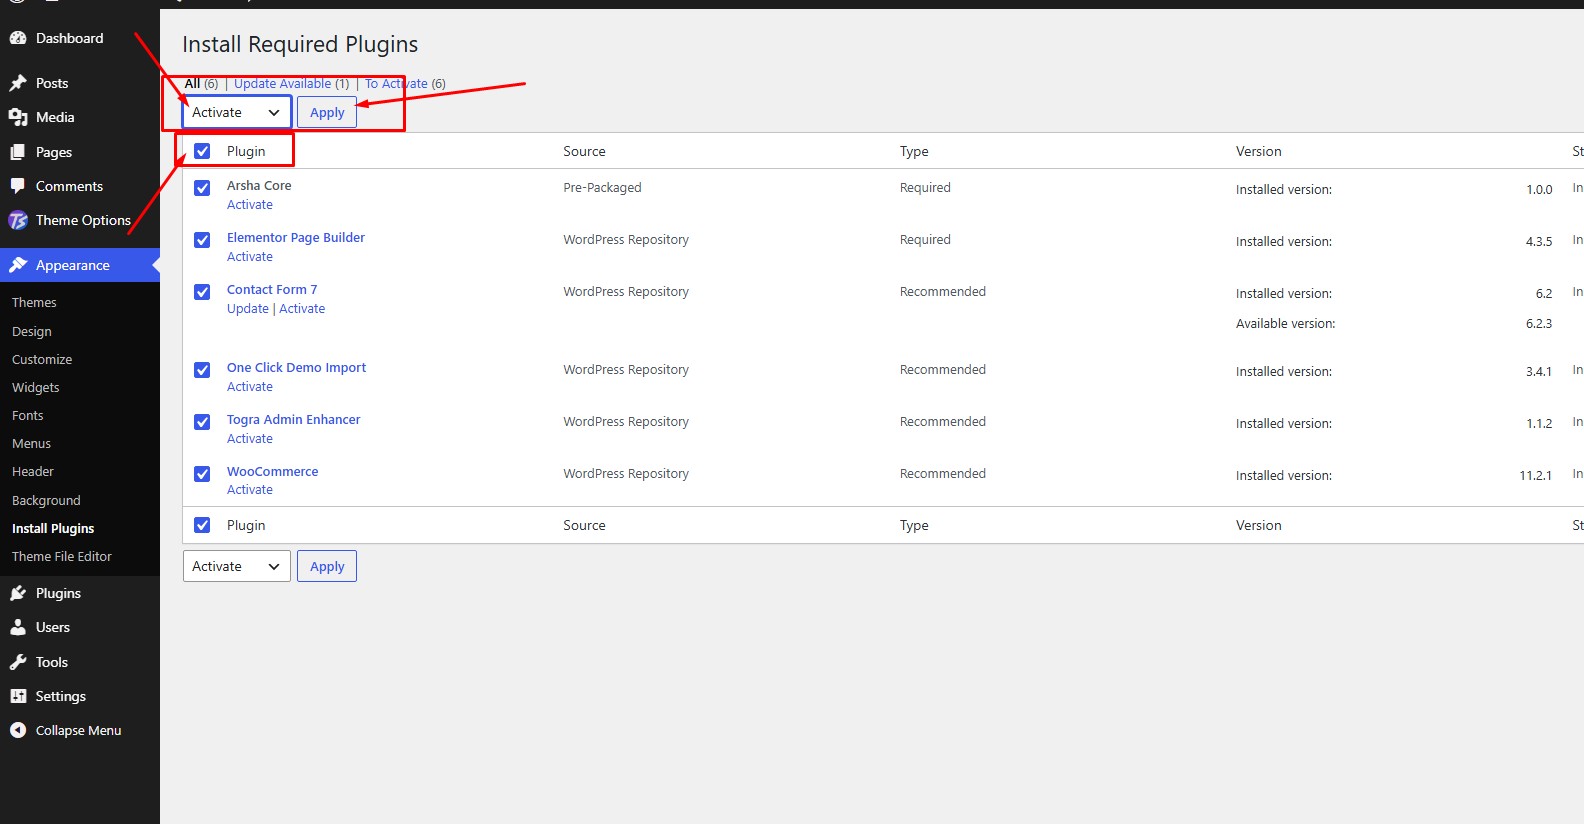
Select Activate plugins Then hit Apply
Import a Demo
Rosun includes two starter layouts. Importing adds demo content and applies demo settings so you have a working starting point.
Importing Demo Contents
Install and activate One Click Demo Import, Rosun Core, Elementor and WooCommerce first. Then open the demo importer and choose Home or Home 2.
Both predefined demos use the same content export, which includes the Home 1, Home 2 and Blog pages. The selected demo assigns its own homepage and menu. Import one demo per site. The predefined importer also requests the widget and Customizer exports and then attempts to import Elementor site settings from the demo server. Your WordPress host must allow outbound requests for this automatic workflow.
| Method | When to Use |
|---|---|
| One-click import Recommended |
Imports the selected starter content, widgets and theme settings, then assigns the matching home page and blog page. Use a fresh WordPress install or staging site for the closest demo match. |
| Manual import Fallback |
Use the bundled XML, JSON and DAT exports from the complete product download if the predefined importer cannot retrieve its files. The XML references media on the Rosun demo site, so media downloads still require access to that site. |
Before you start: take a complete database and files backup. Demo import is not a reset, but it can add pages, products, media and templates, and replace selected theme, widget, menu and Elementor settings. Do not run it on a live store unless you have tested on staging and have a restorable backup. Existing orders and customer data should be backed up and checked separately.
Import Theme Demos
Continue to import
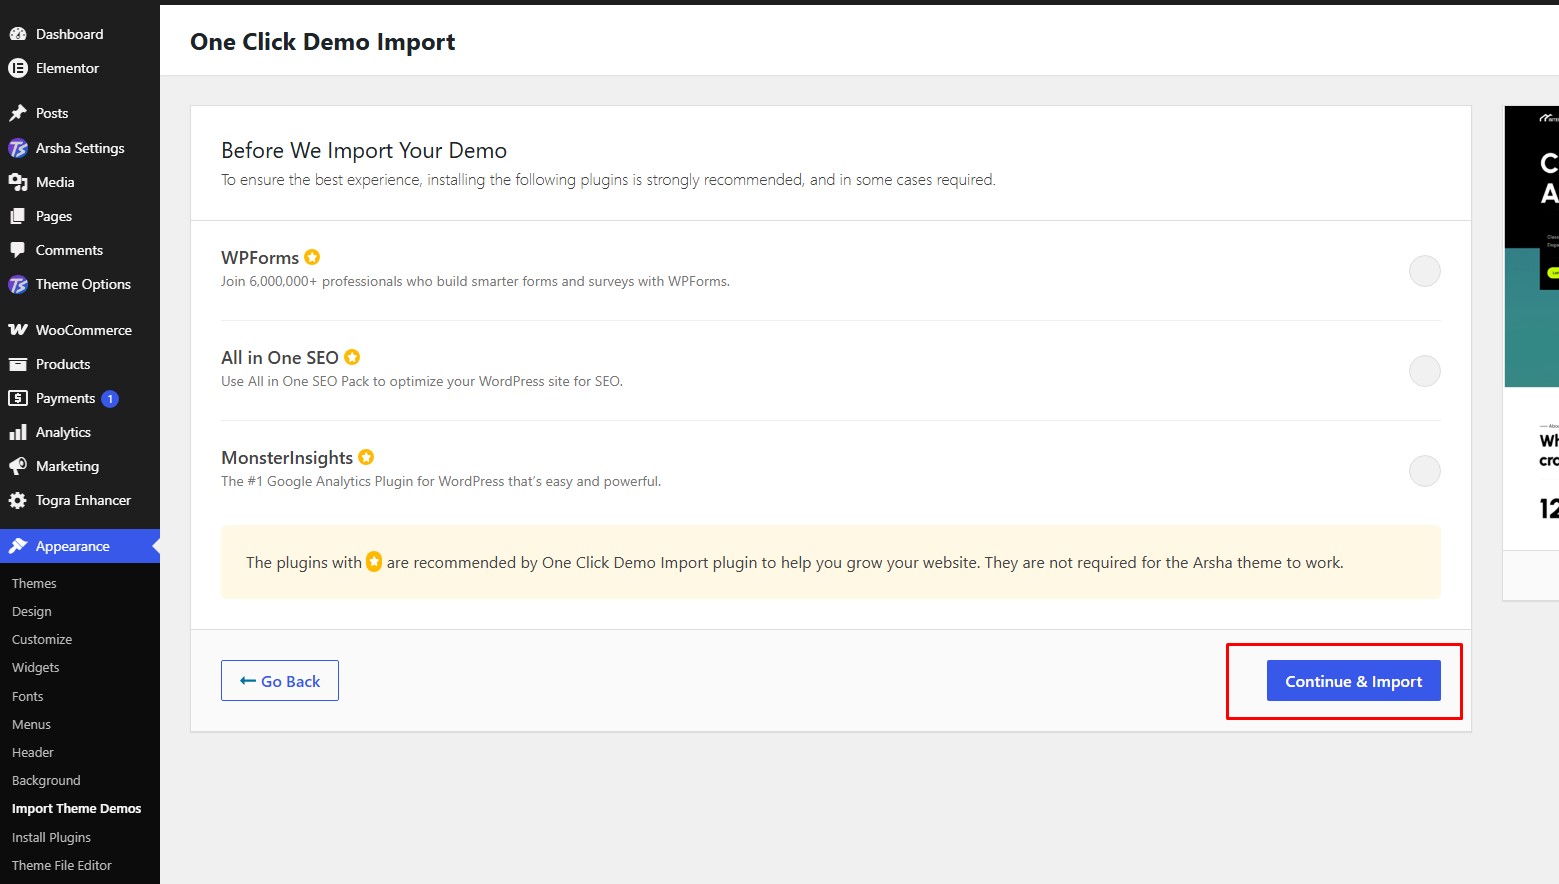
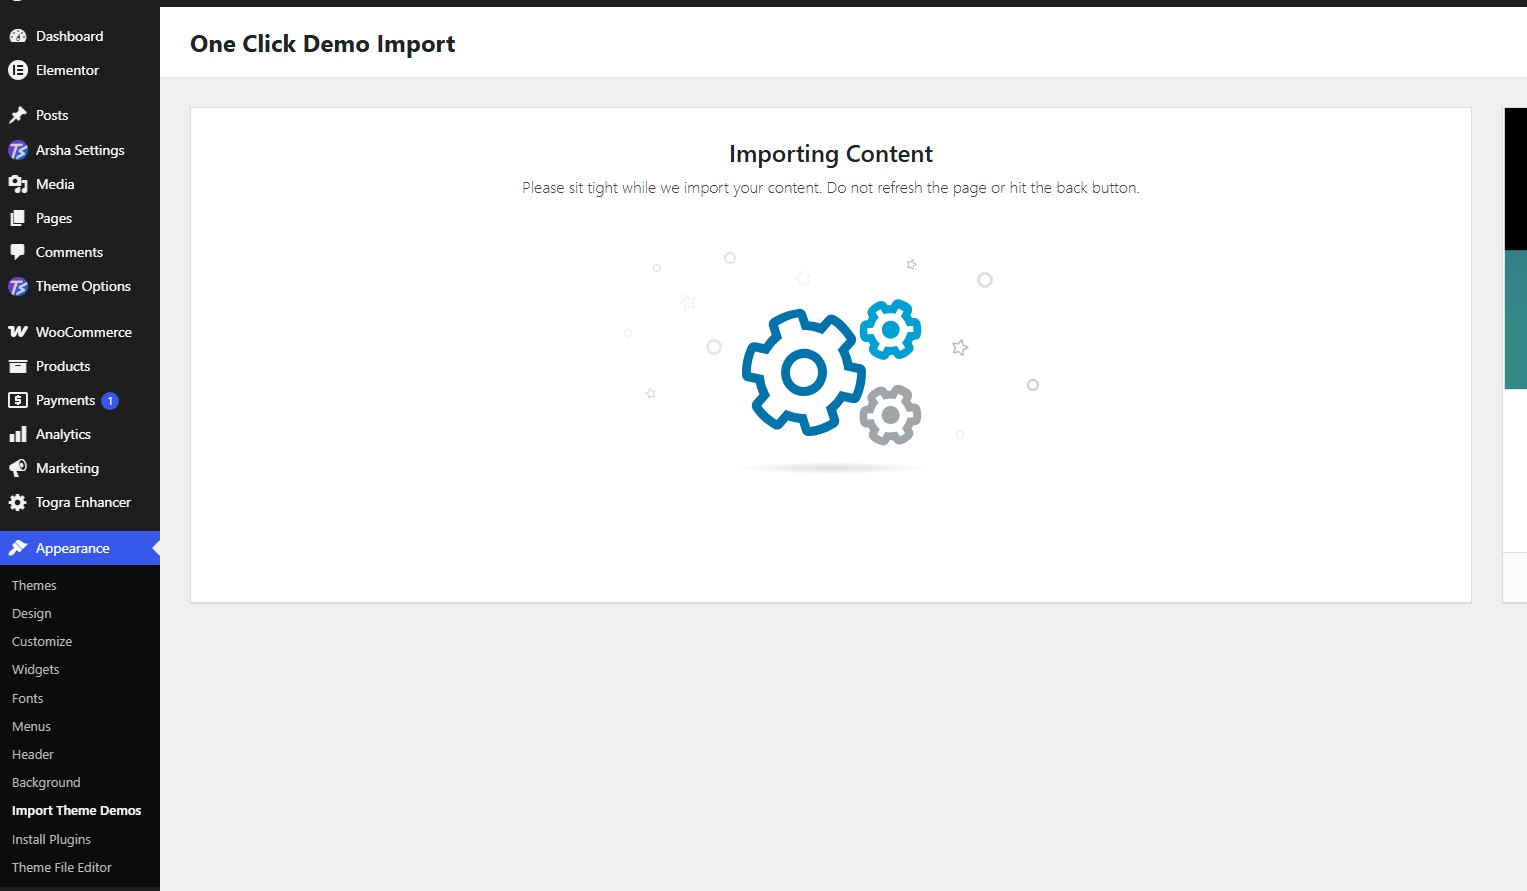
Importing Content
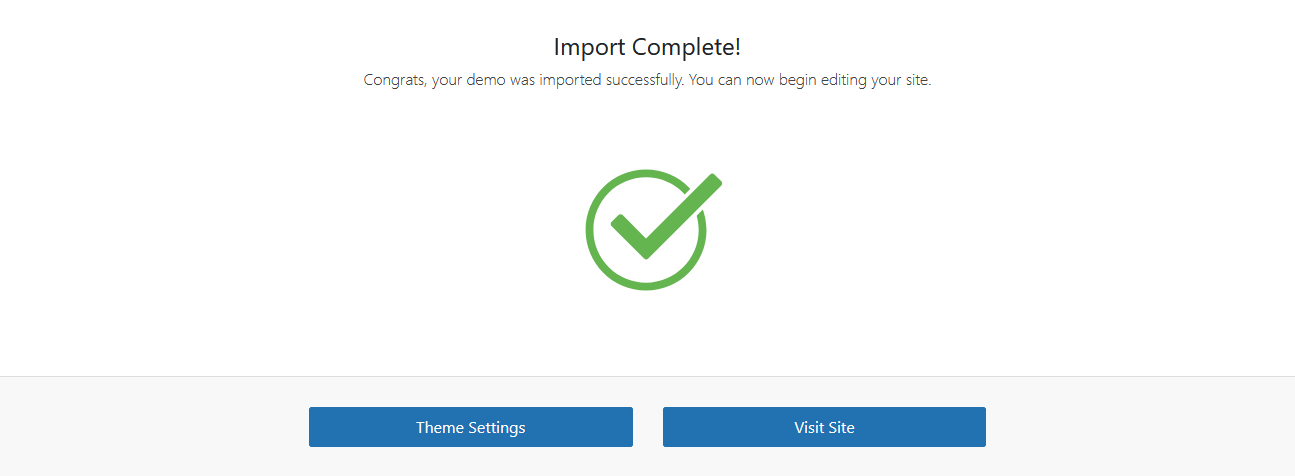
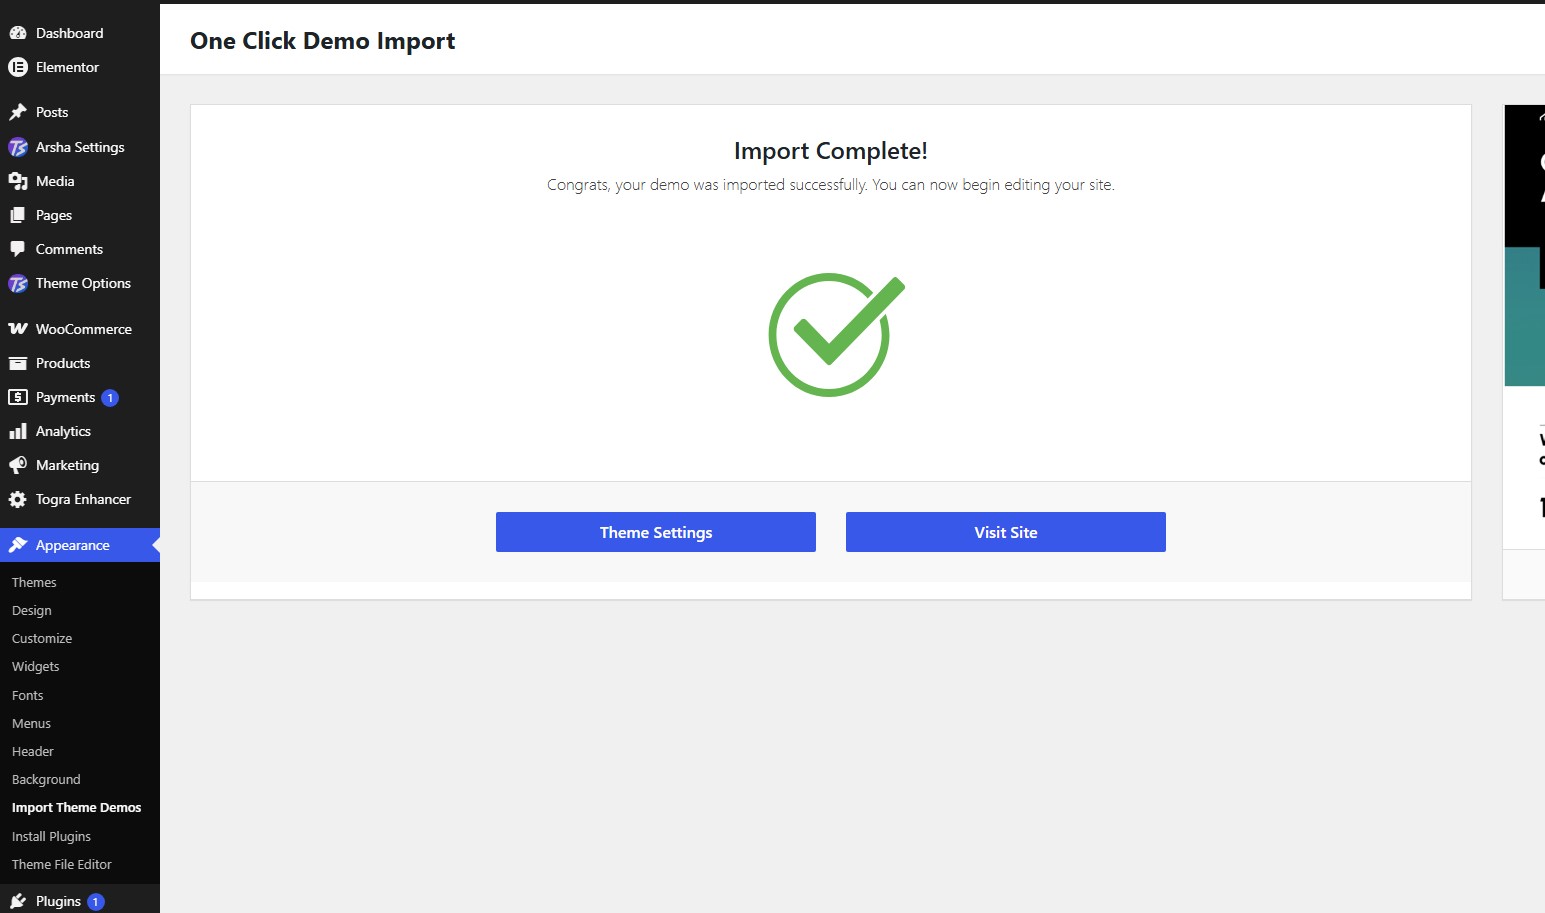
Import Complete
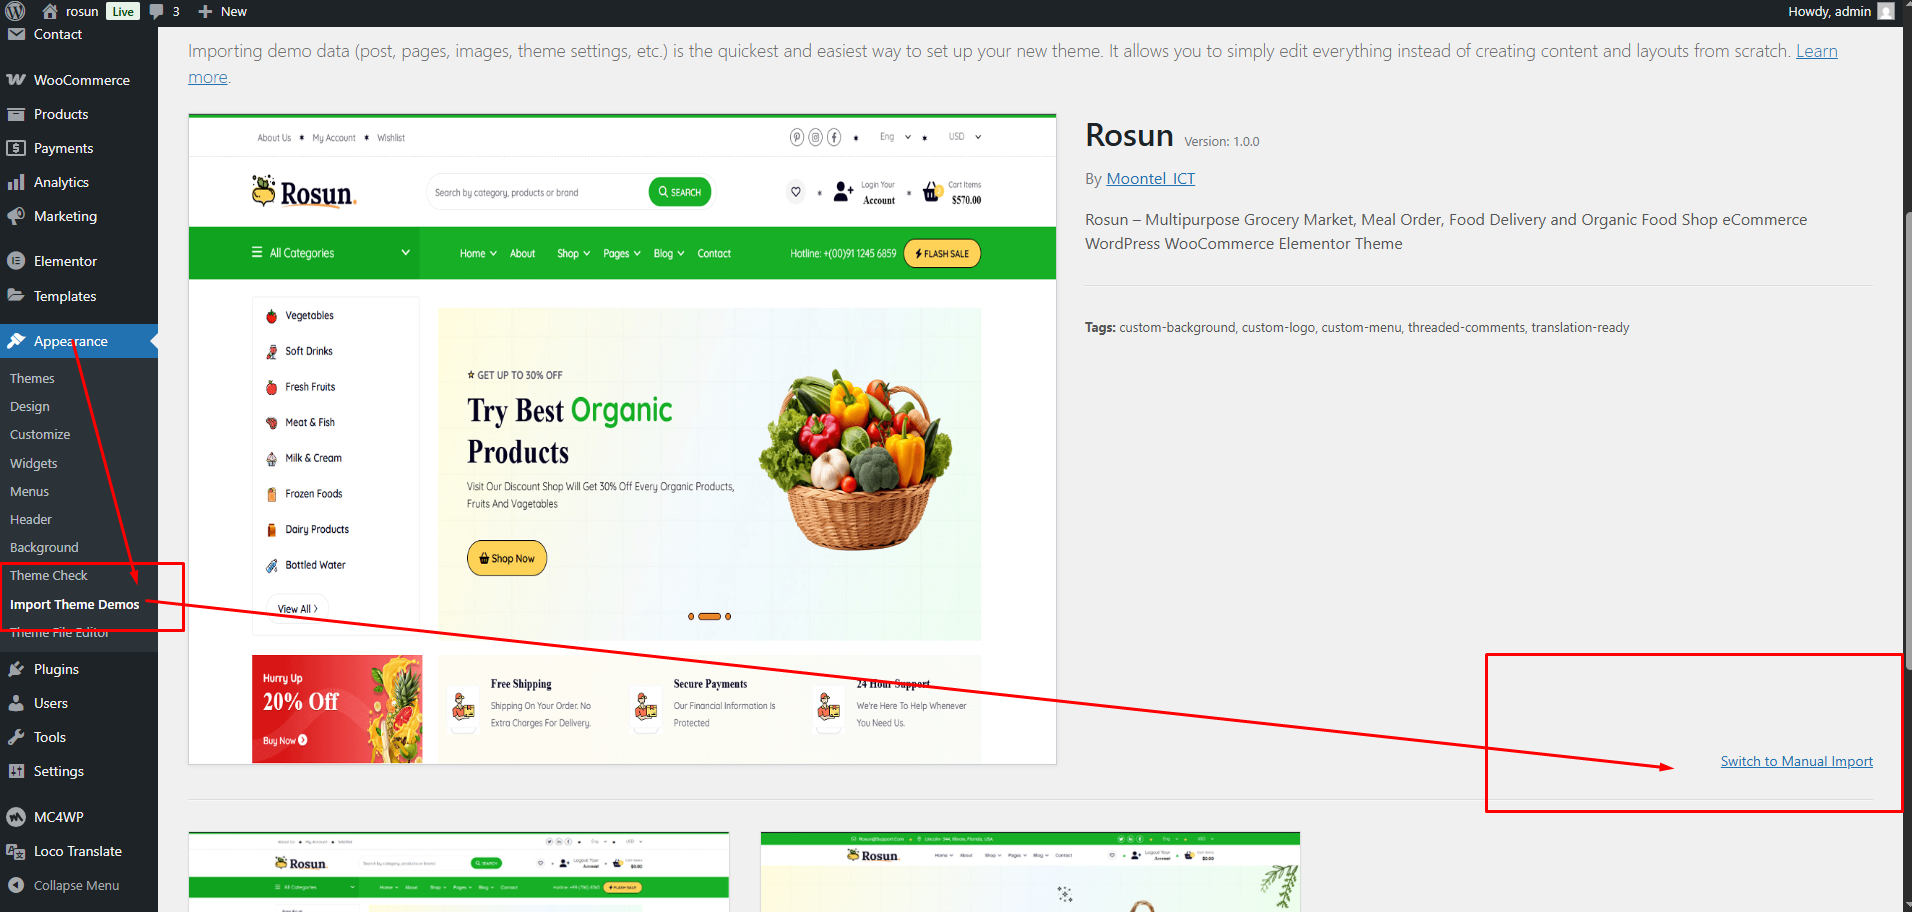
Manual import from the bundled files
If the predefined importer cannot retrieve its files, extract the complete product download and locate
sample-data/content.xml, sample-data/widget.json, and
sample-data/customizer.dat. Make a backup and use a fresh WordPress install or staging
site before importing.
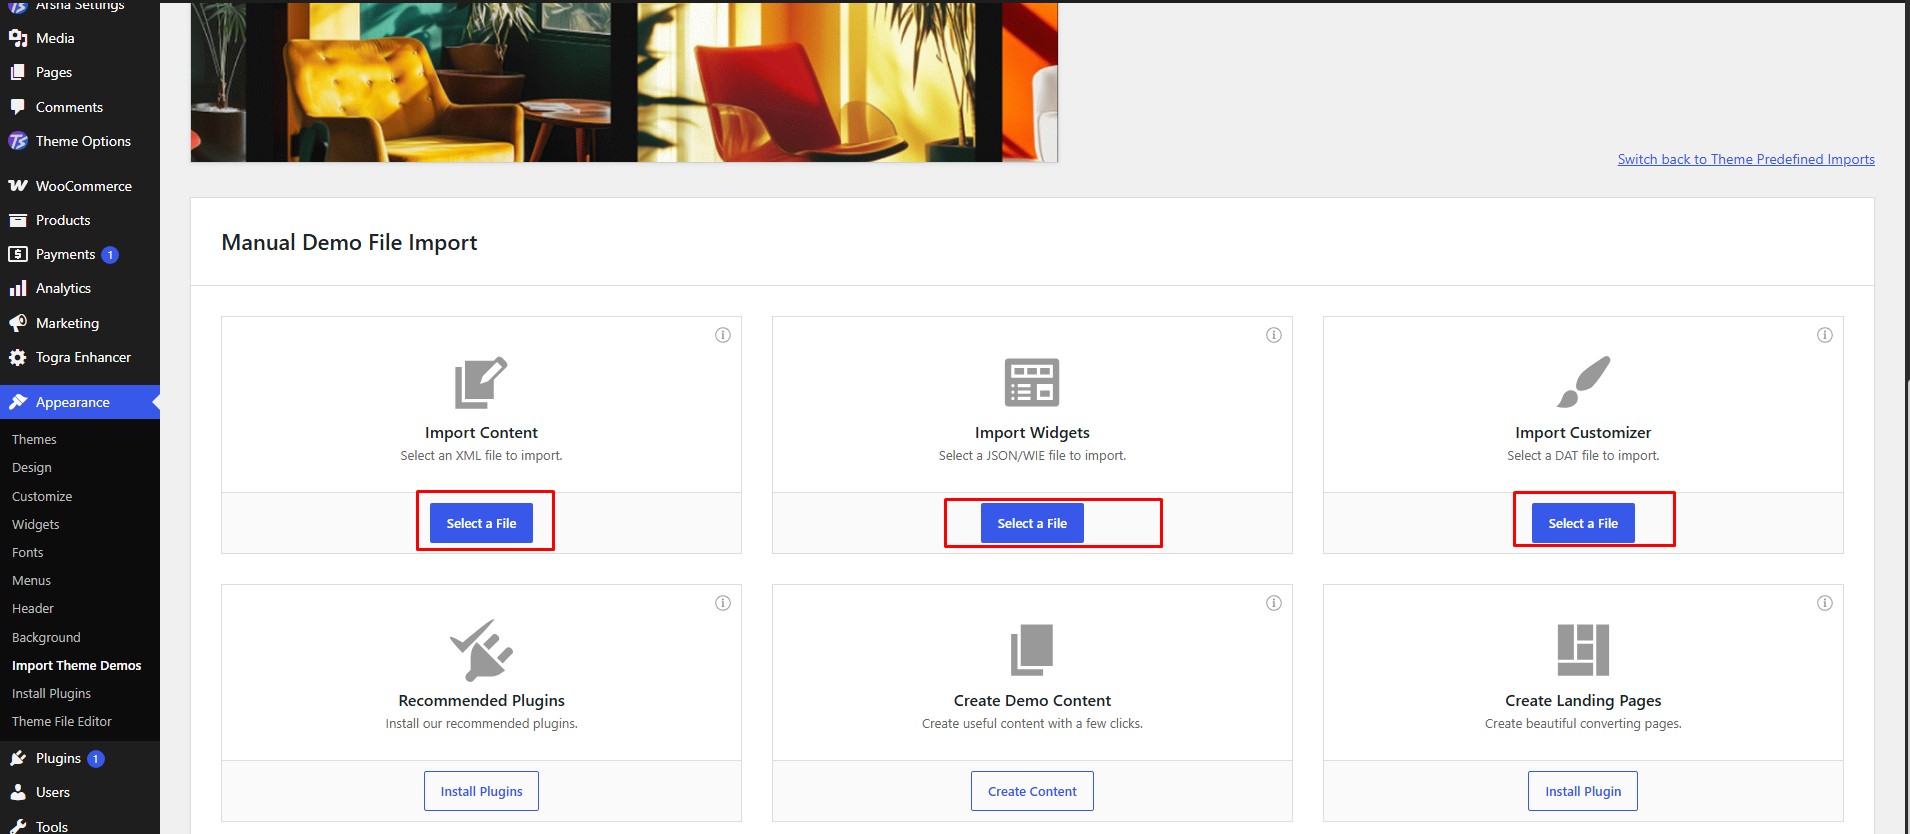
- Open Appearance → Import Demo Data and select Switch to Manual Import.
- Use the Import Content card to select
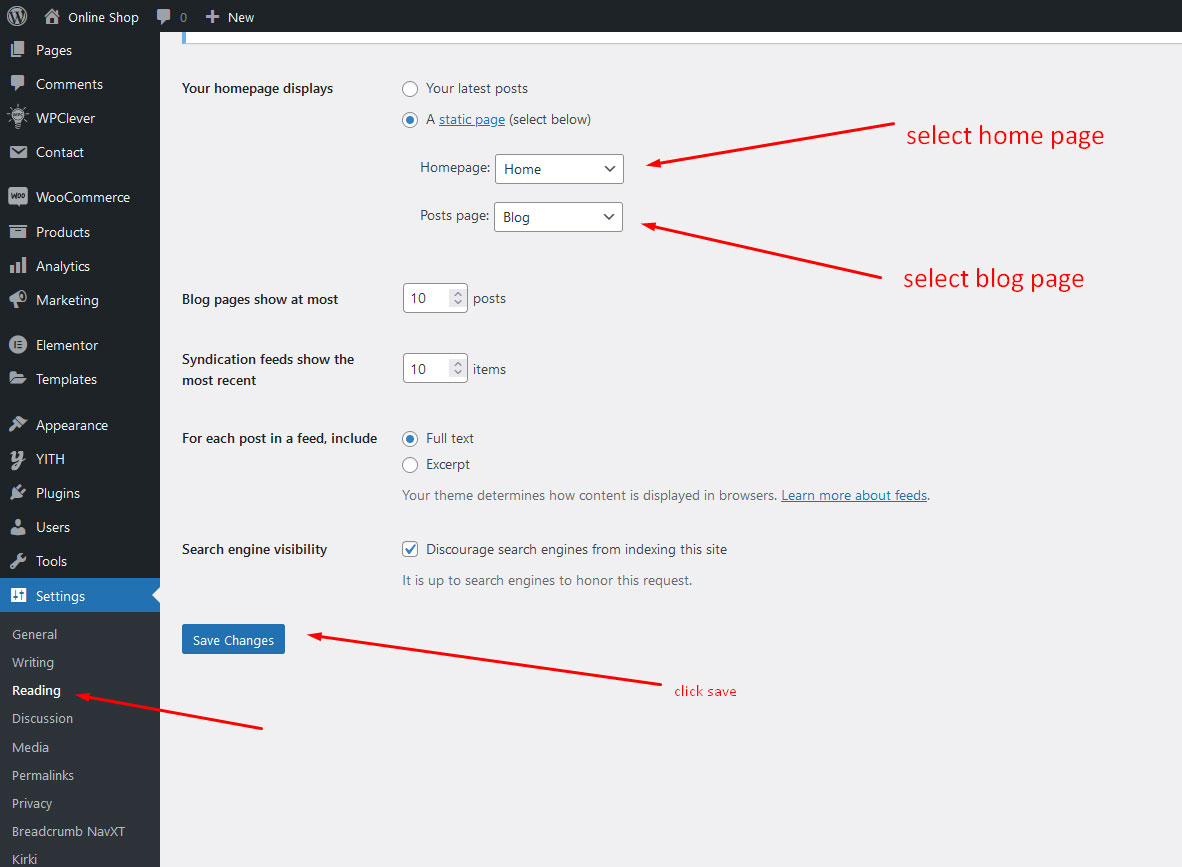
content.xml, the Import Widgets card to selectwidget.json, and the Import Customizer card to selectcustomizer.dat. Complete each import and wait for its result before moving to the next. - After content import, open Settings → Reading. Choose Home 1 or Home 2 as the static homepage and Blog as the posts page.
- Open Appearance → Menus and assign the imported main menu to the theme's Main Menu location. Check WooCommerce page assignments and save Settings → Permalinks once.
The manual importer does not run every predefined-demo setup step. The content export's image attachments are downloaded from the Rosun demo server, so the bundled XML does not make those media files available offline. Elementor's global site settings are also fetched separately during the predefined import; configure Elementor's global colors and typography manually if that request is unavailable.
Take a backup, try the import on a clean staging site, and review the importer log for the failing step. If the bundled manual import also reports errors, send the log and your WordPress, PHP, WooCommerce and Elementor versions to theme support.
Review the import screen
Wait for the import to finish
Marketplace License and Updates
Use the marketplace account where you purchased Rosun to access your product license, downloads and updates. Rosun does not request an Envato purchase code in the WordPress dashboard. For account or license questions, follow that marketplace's instructions or contact theme support.
Customization
Set up your Rosun site identity, menus, headers, footers, store, blog and visual options using the controls included with the theme and Rosun Core.
Basic Site Settings
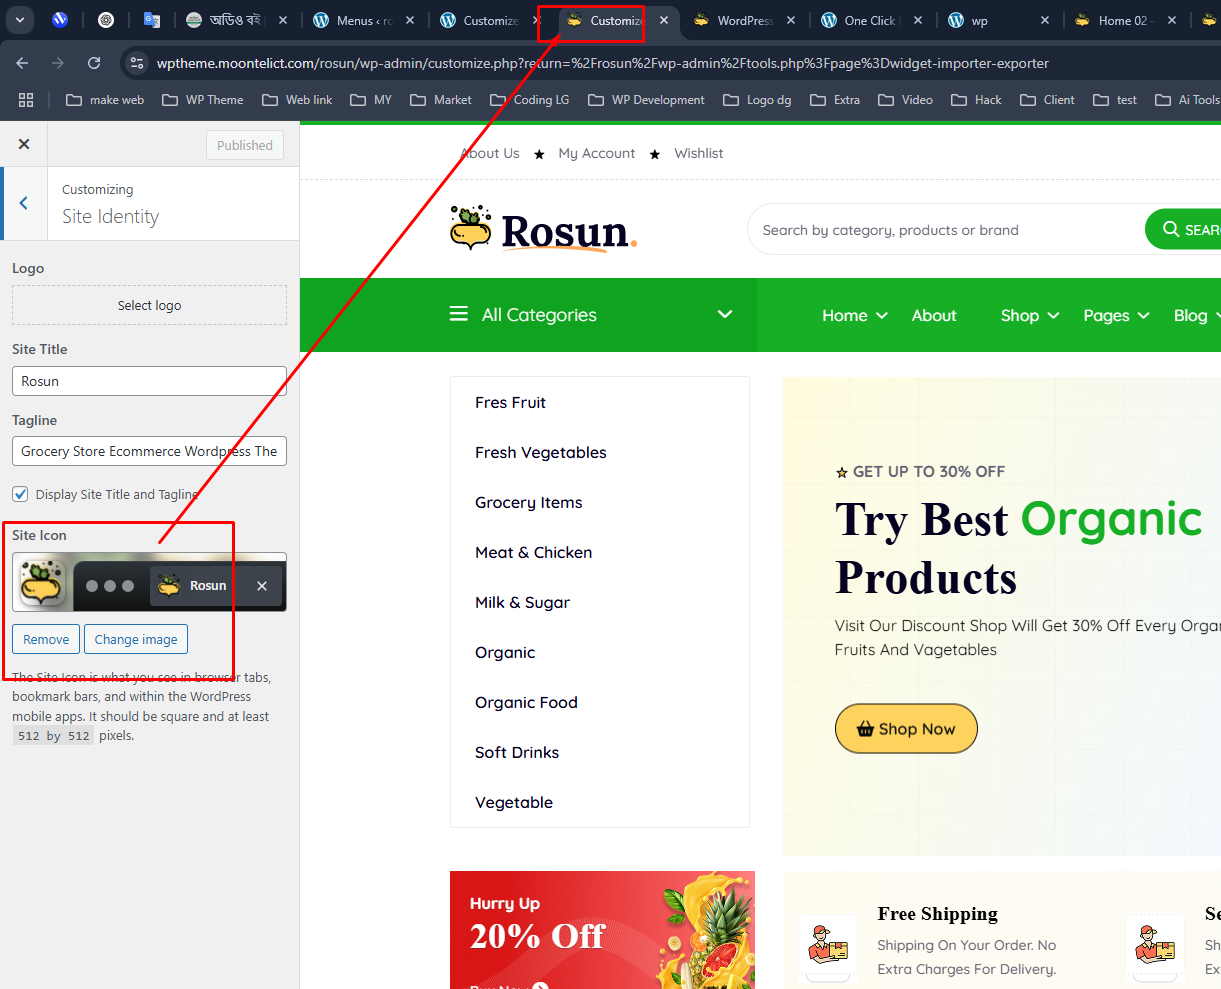
Change Site Title and Favicon
To change your Site Title and Favicon, navigate to Dashboard → Appearance → Customize → Site Identity.
Change Global Colors
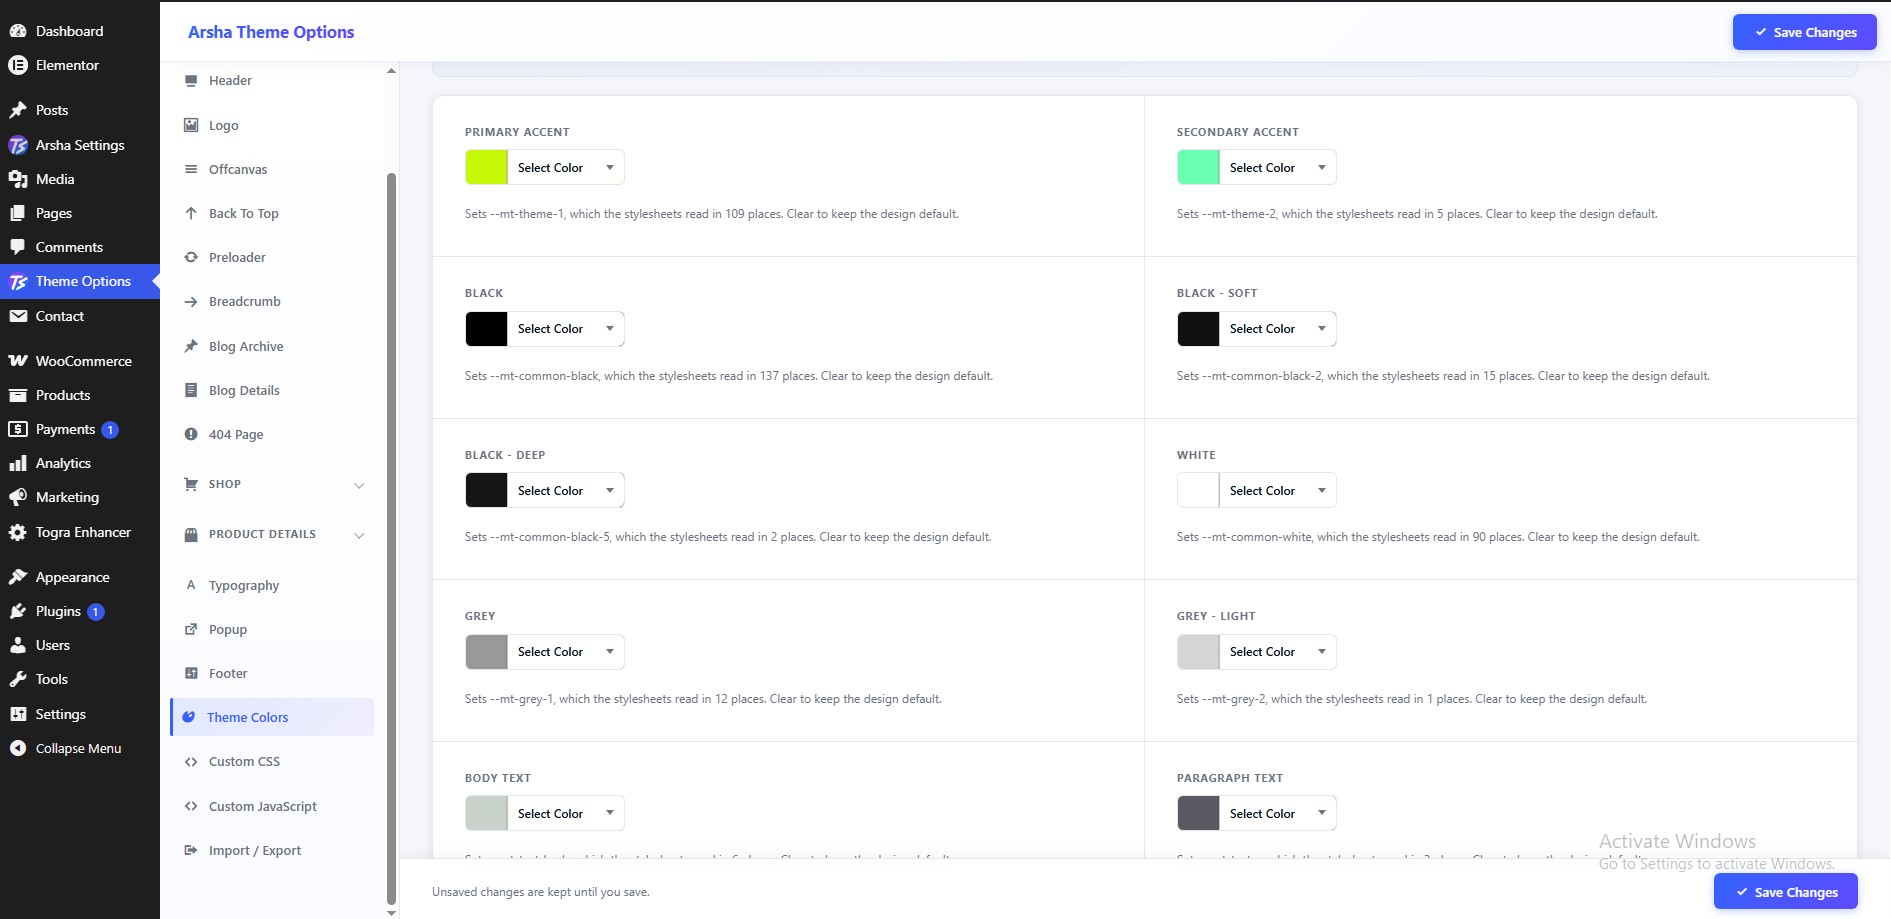
To change all global colors, navigate to Dashboard → Theme Options → Theme Colors.
Change Typography
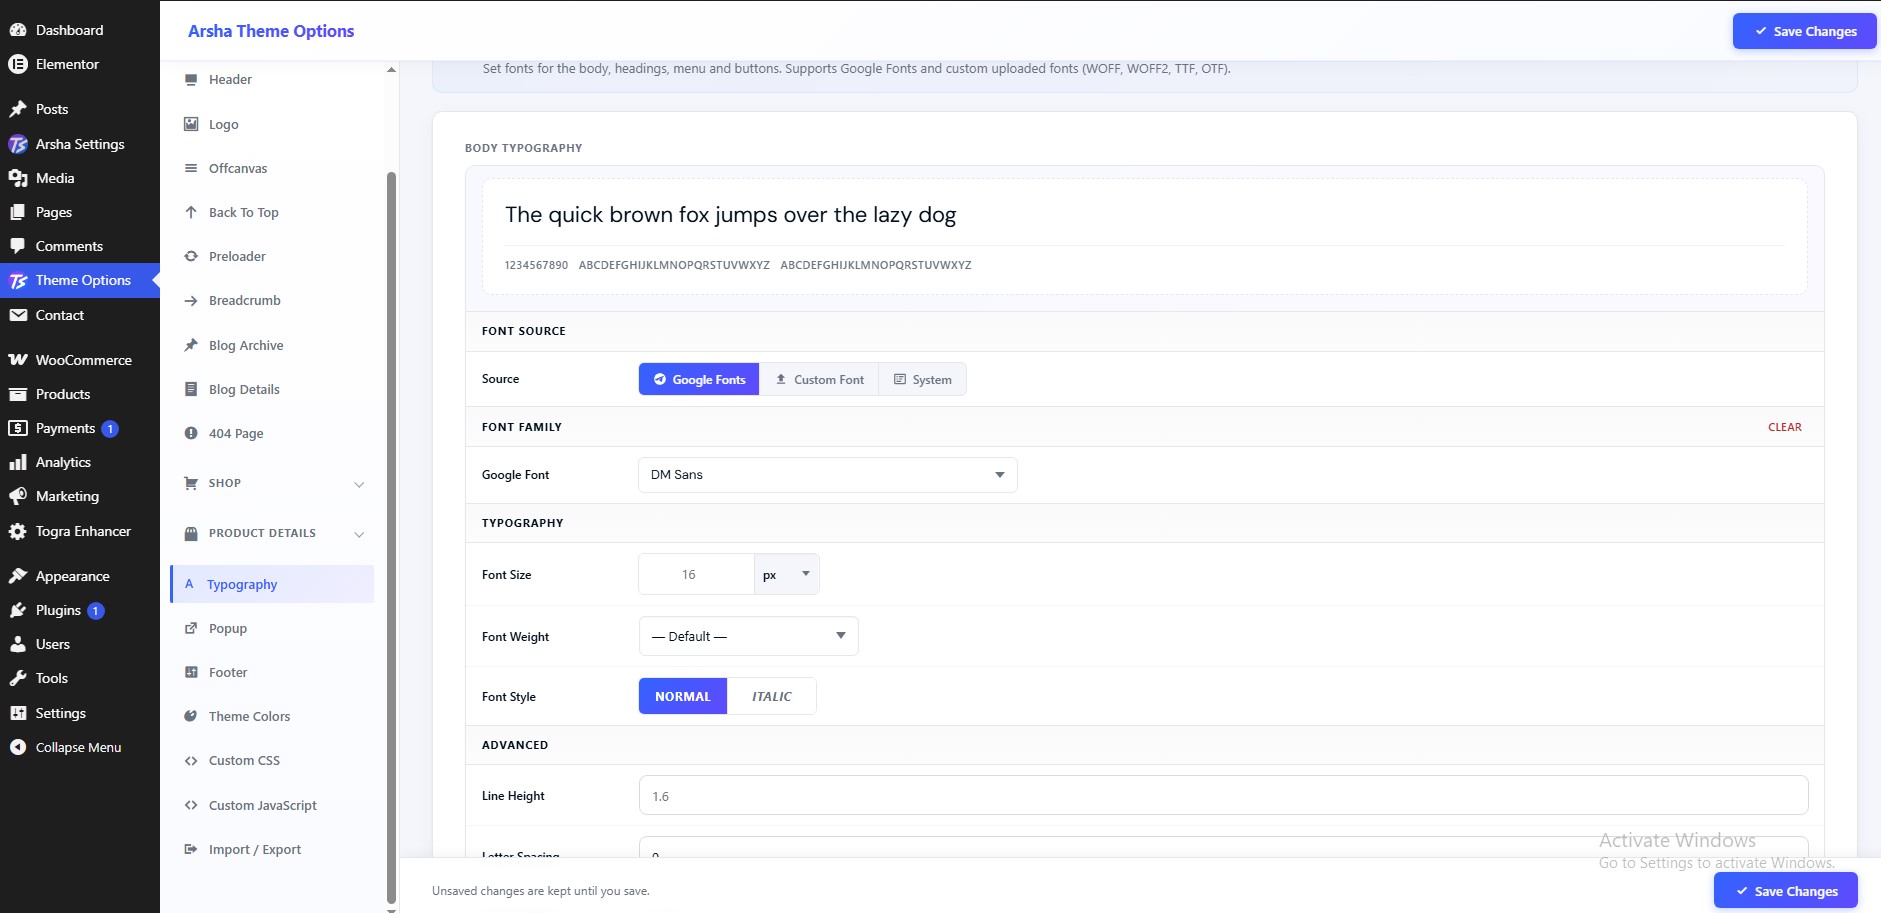
To change the typography of your site, navigate to Dashboard → Theme Options → Typography.
Customize Menu
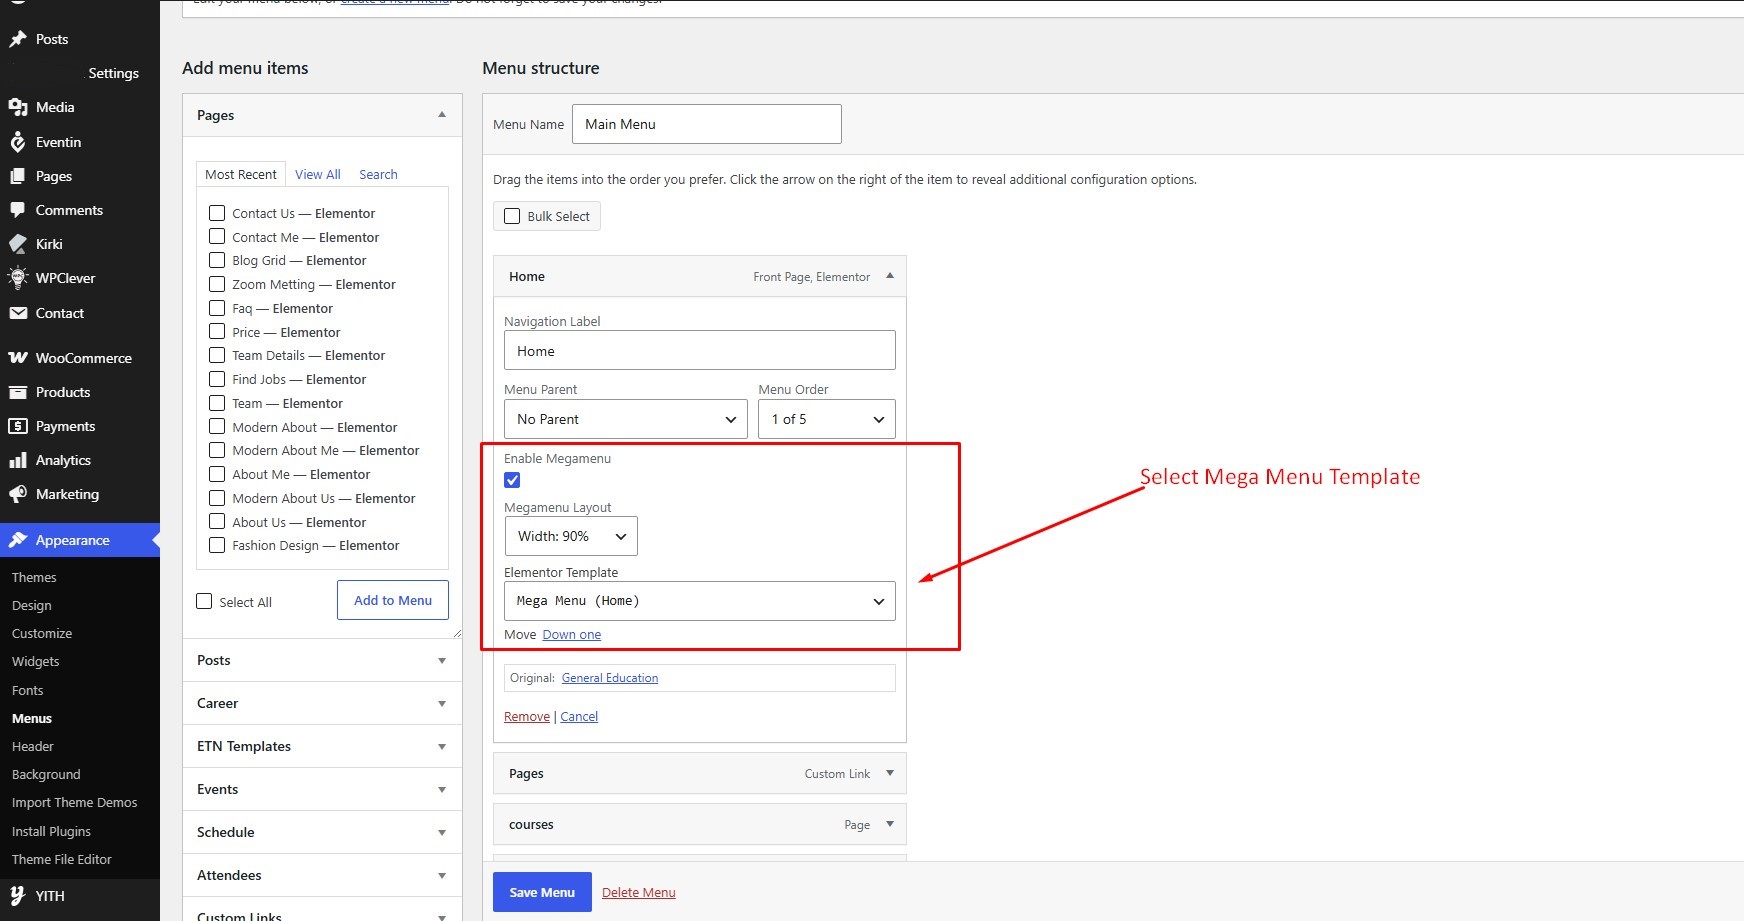
To create or edit a navigation menu, open Dashboard → Appearance → Menus. Add pages, product categories or custom links, then assign the menu to a theme location.
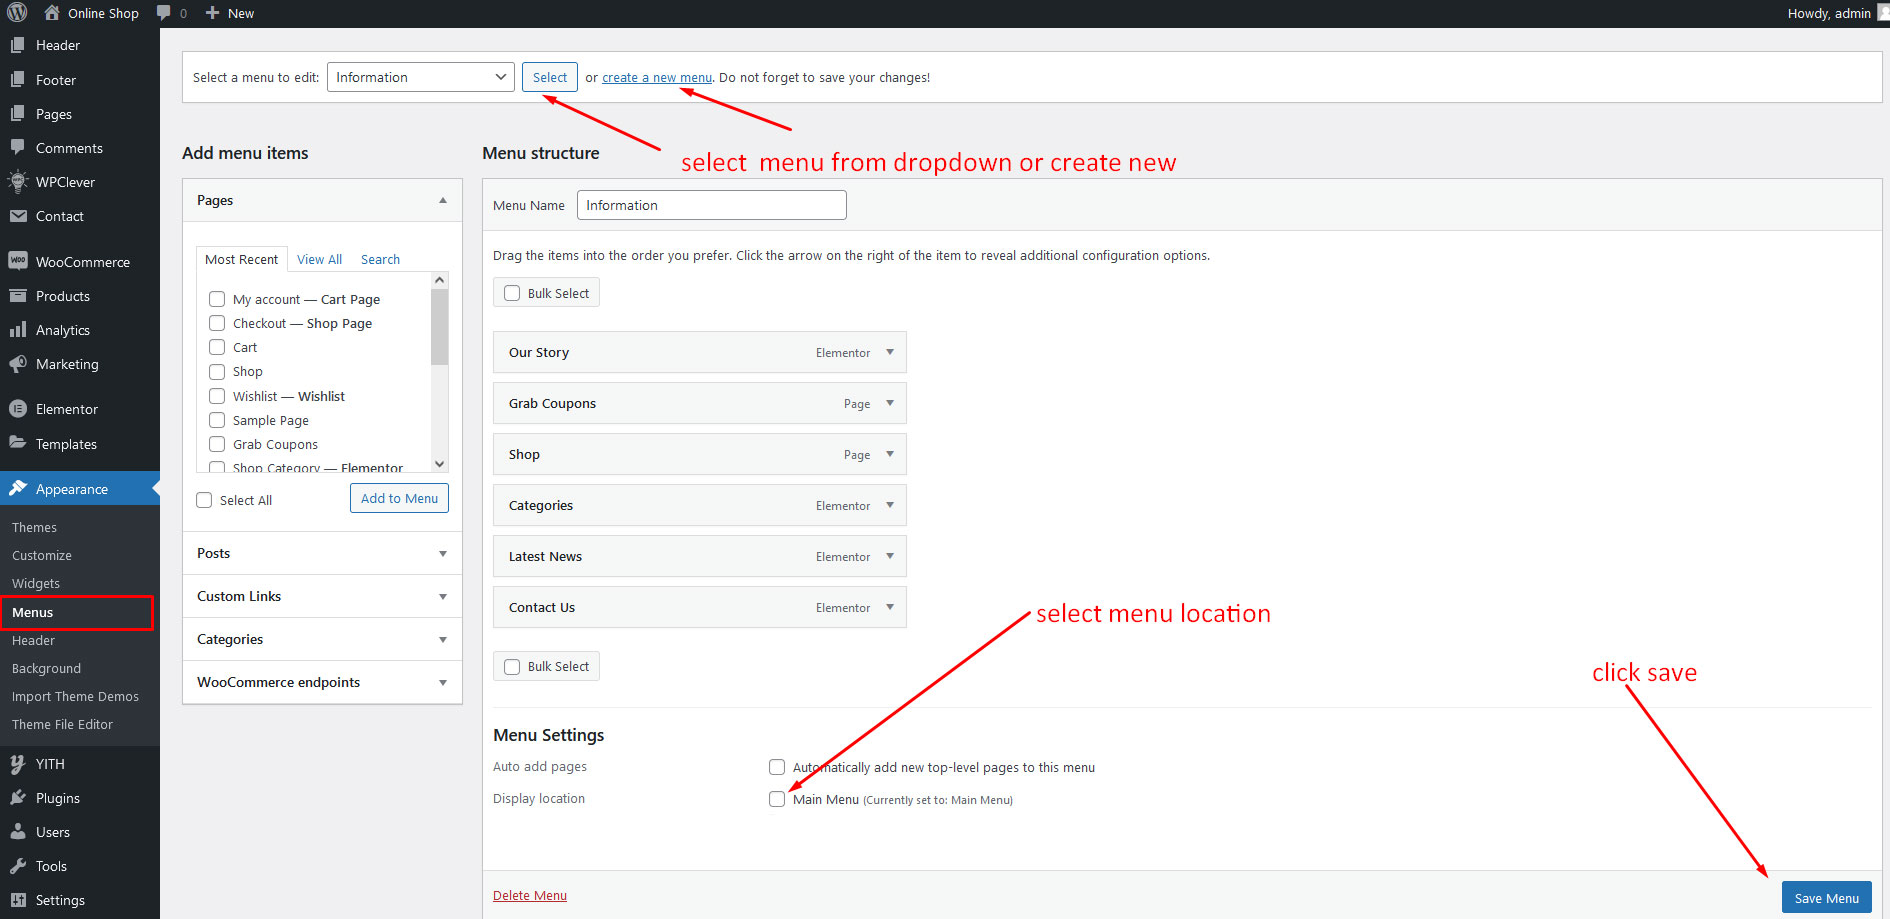
Organize menu items
Drag menu items to change their order or create nested links, then save the menu. Check the storefront on desktop and mobile to confirm the navigation works as expected.
Set Home and Blog Page
To set the home and blog page, navigate to Dashboard → Settings → Reading.
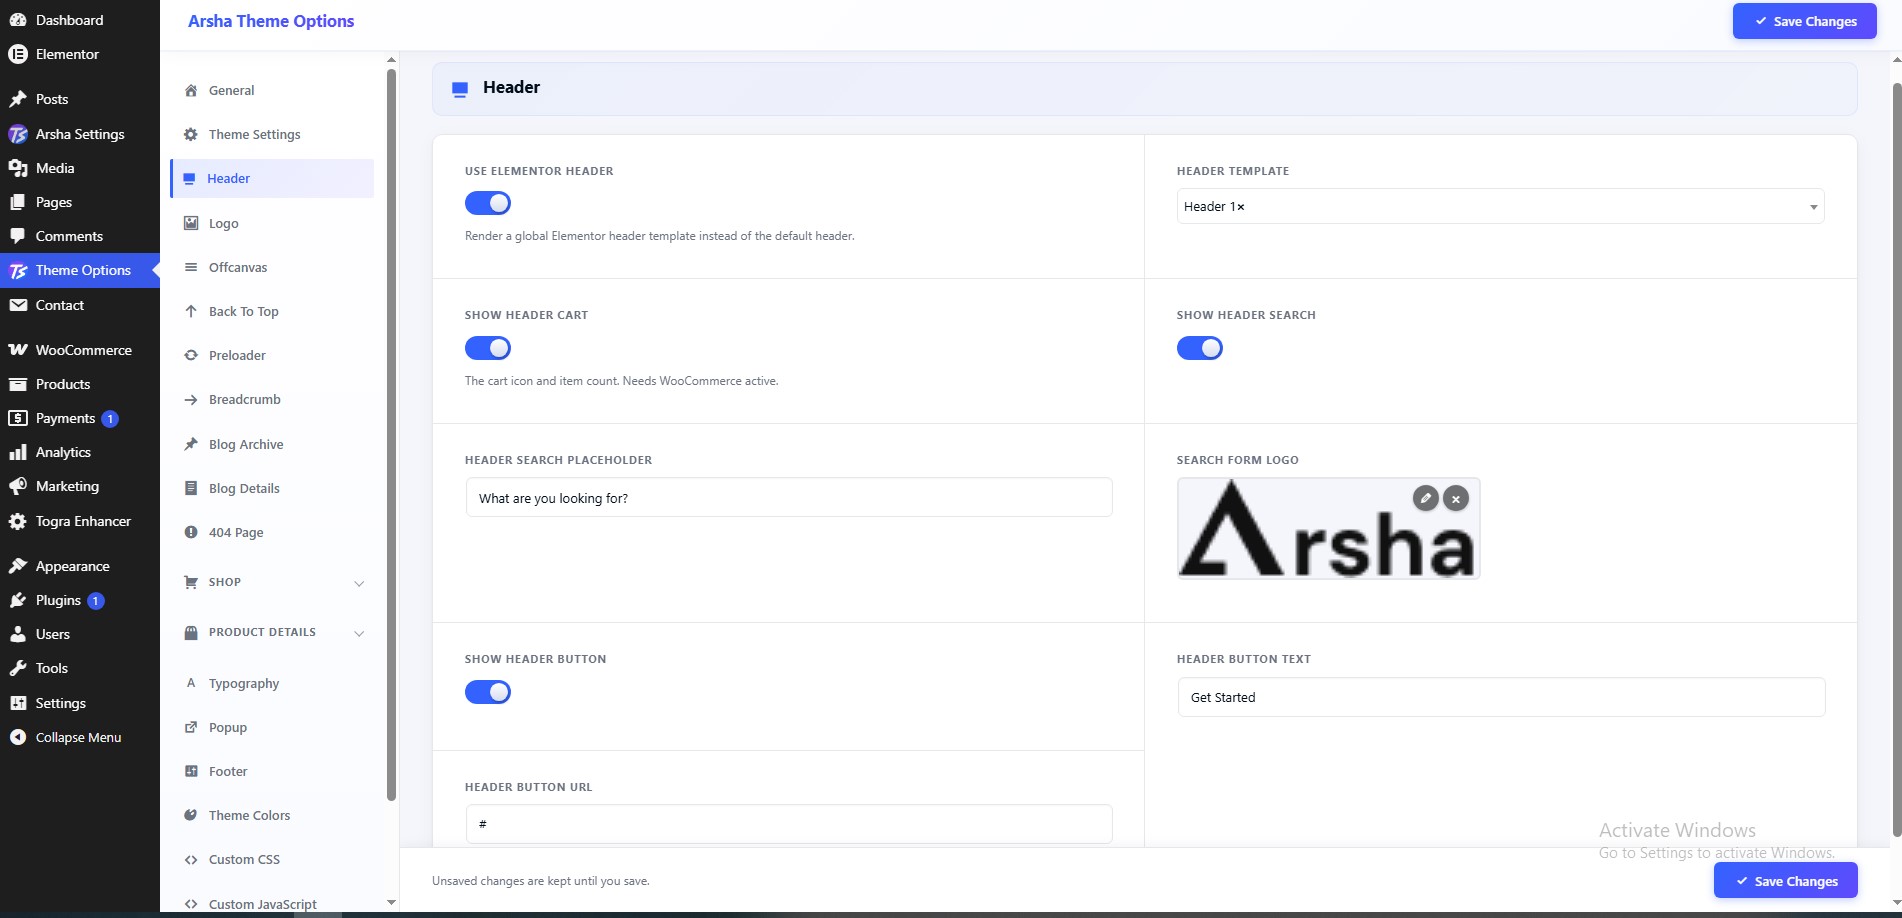
Header
Header Default Setting
To Customize Default header, navigate to Dashboard → Theme Options → Header and Customize logo and width".
Header Default Layout
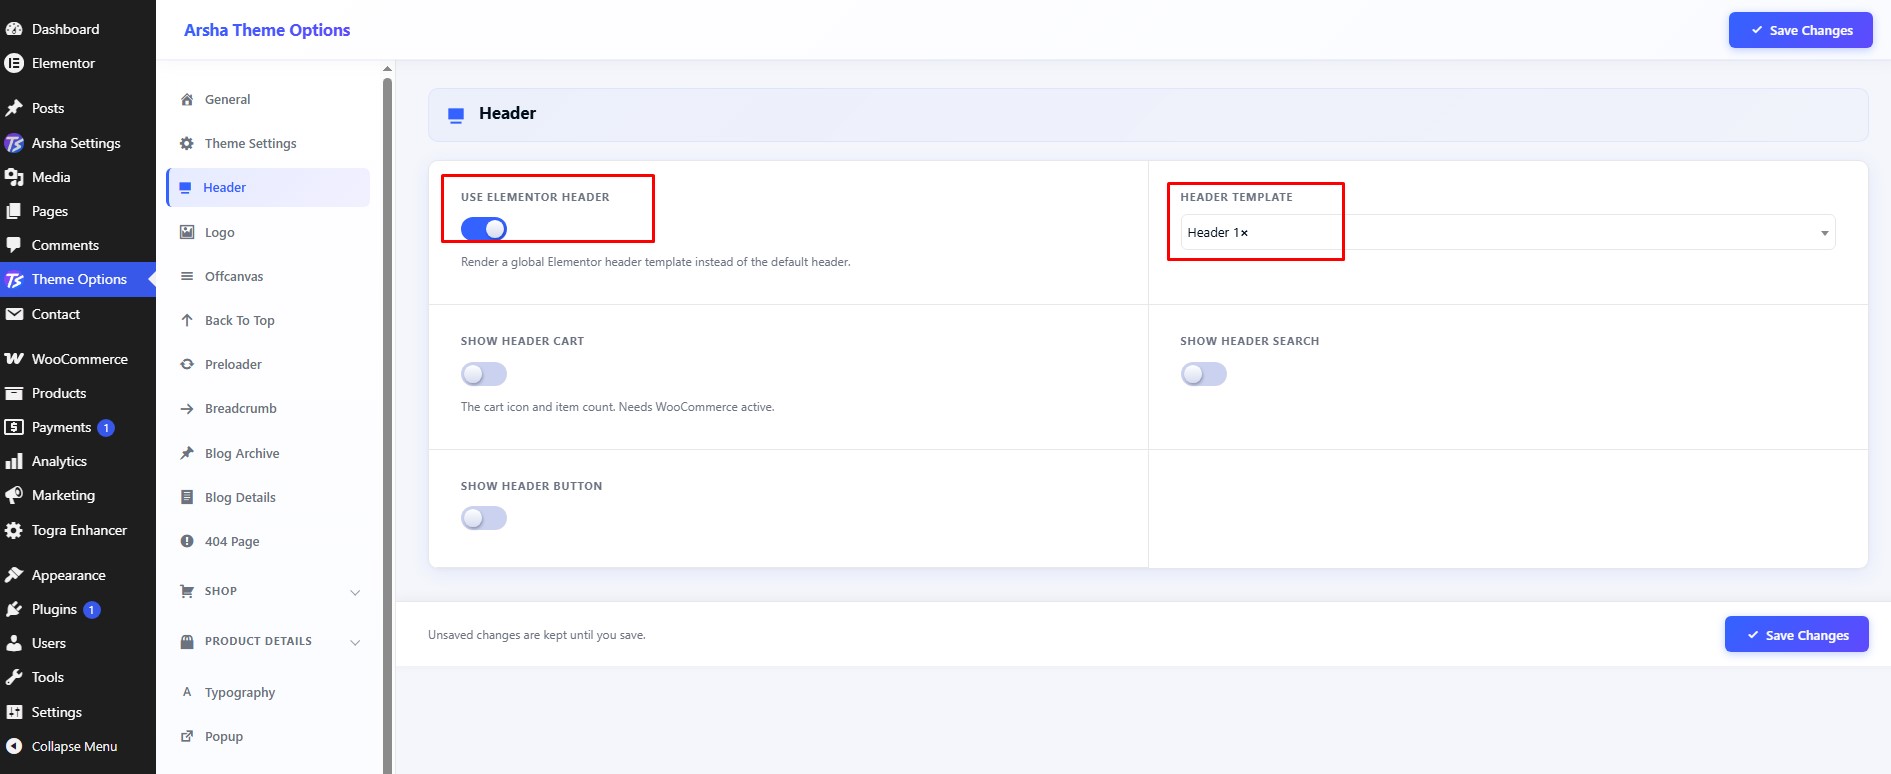
To use the default header, navigate to Dashboard → Theme Options → Header then Switch OFF "Header From Elementor? ".
Header Elementor Layout
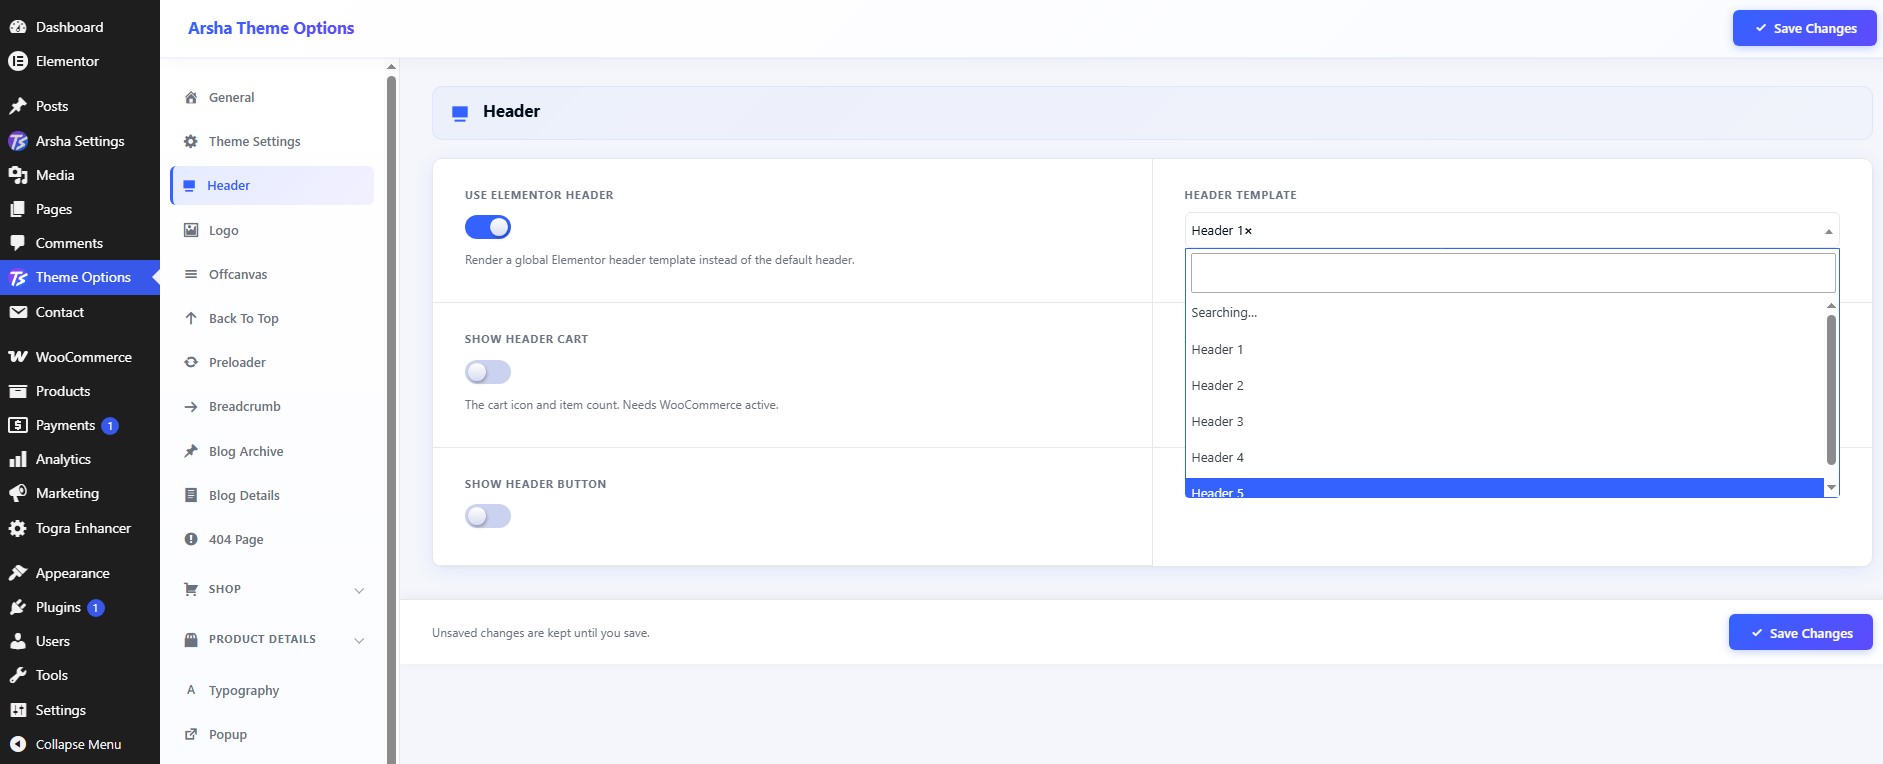
To use the Elementor header, navigate to Dashboard → Theme Options → Header then Switch ON "Header From Elementor? ". And Select Elementor Header
Header Elementor Create
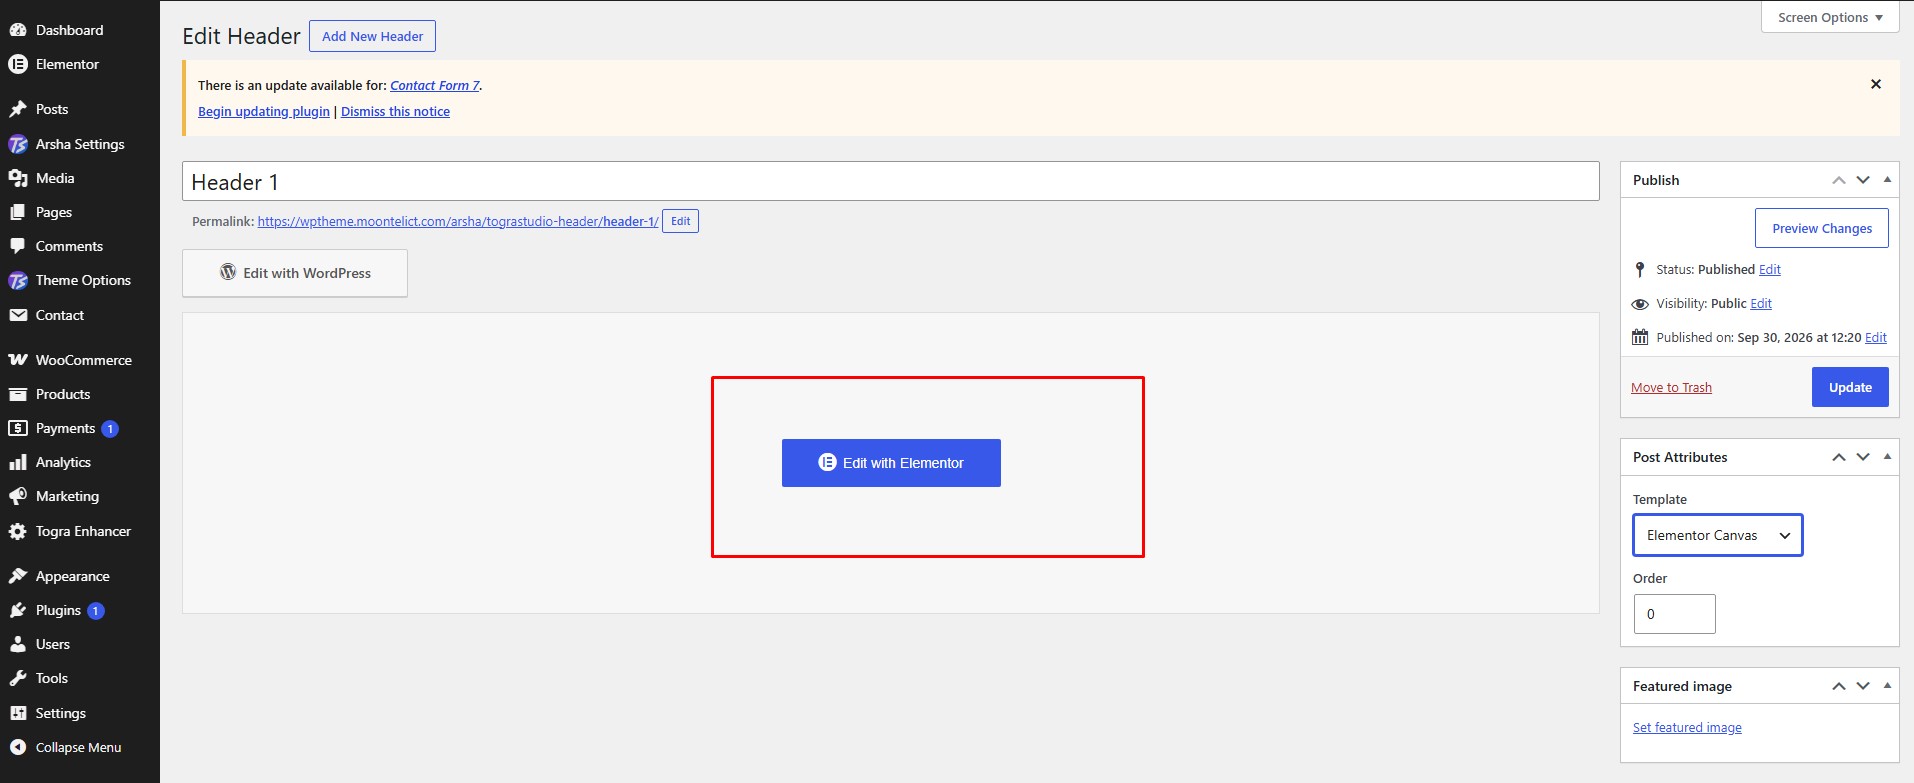
To create an Elementor header, navigate to Dashboard → Rosun Settings → Header → Add New.
Create a new Header
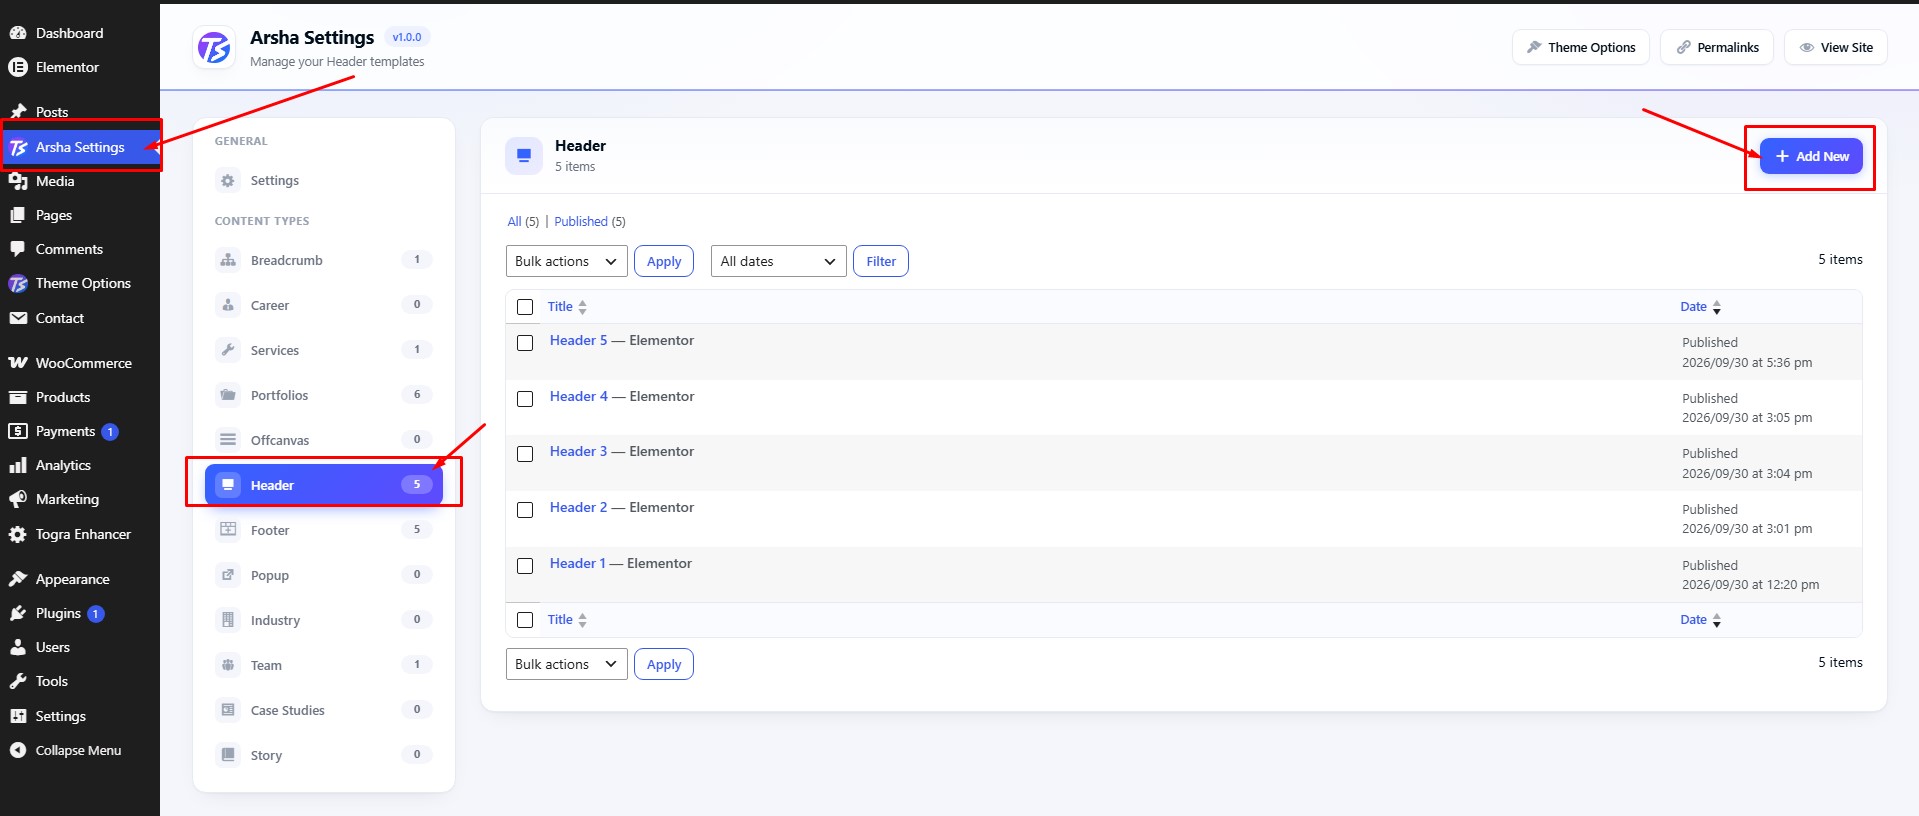
- Insert a Header Title
- Select Page Template as Elementor Canvas
- Click Publish
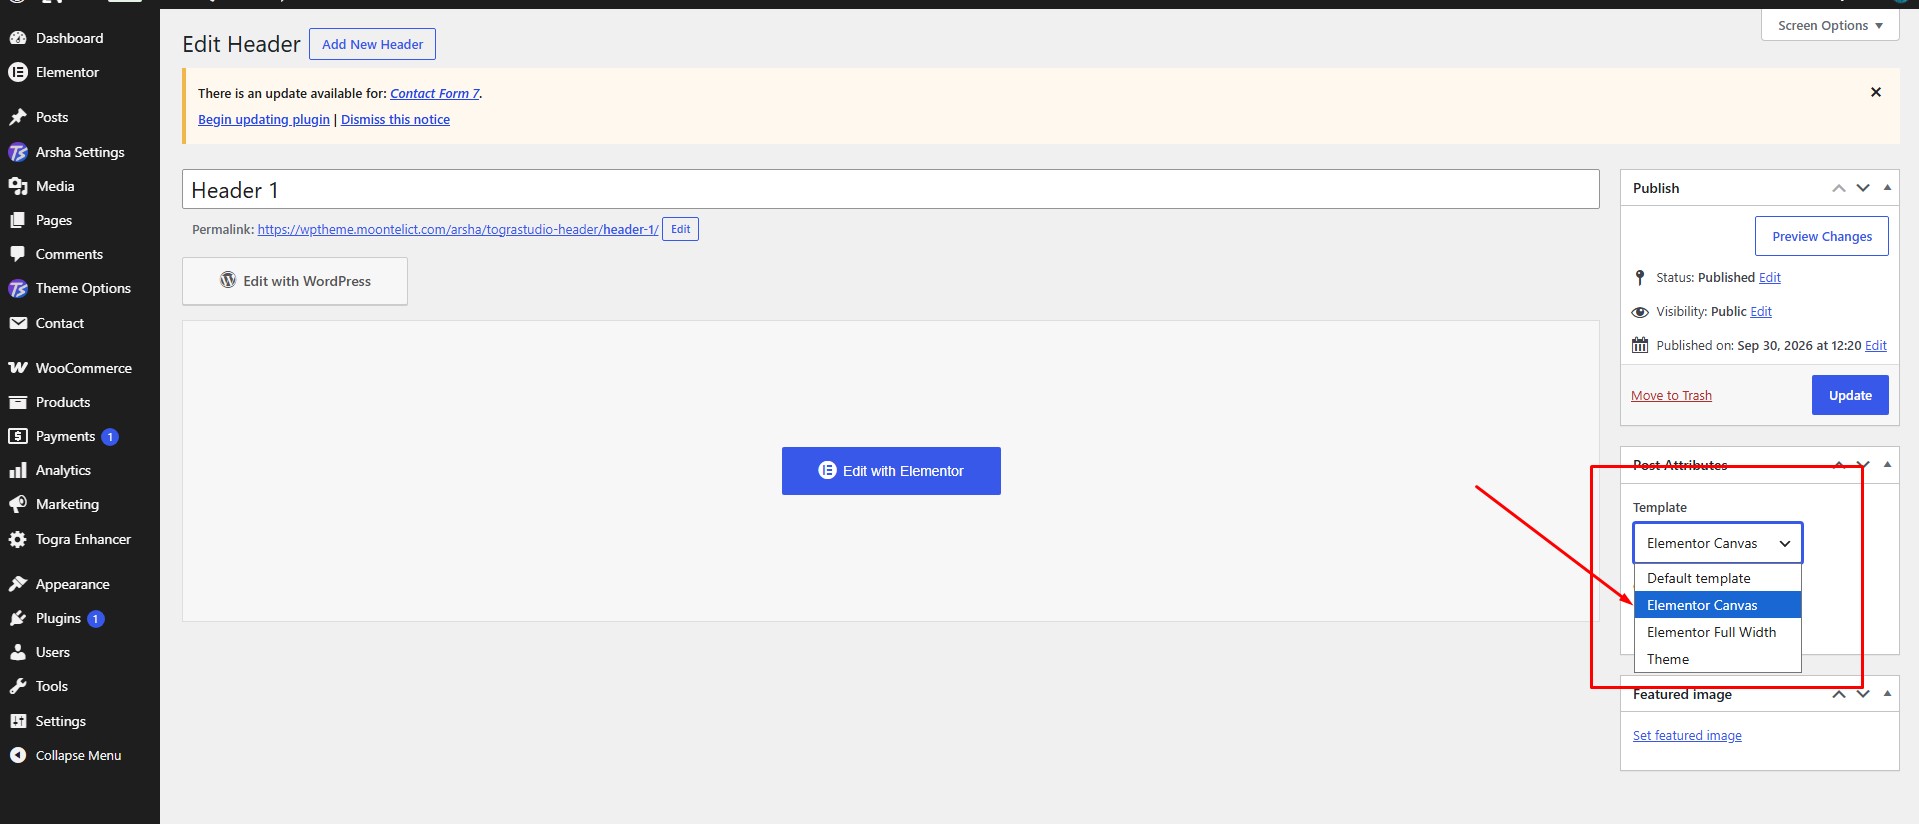
Edit with Elementor
Click "Edit With Elementor" and build the header layout.
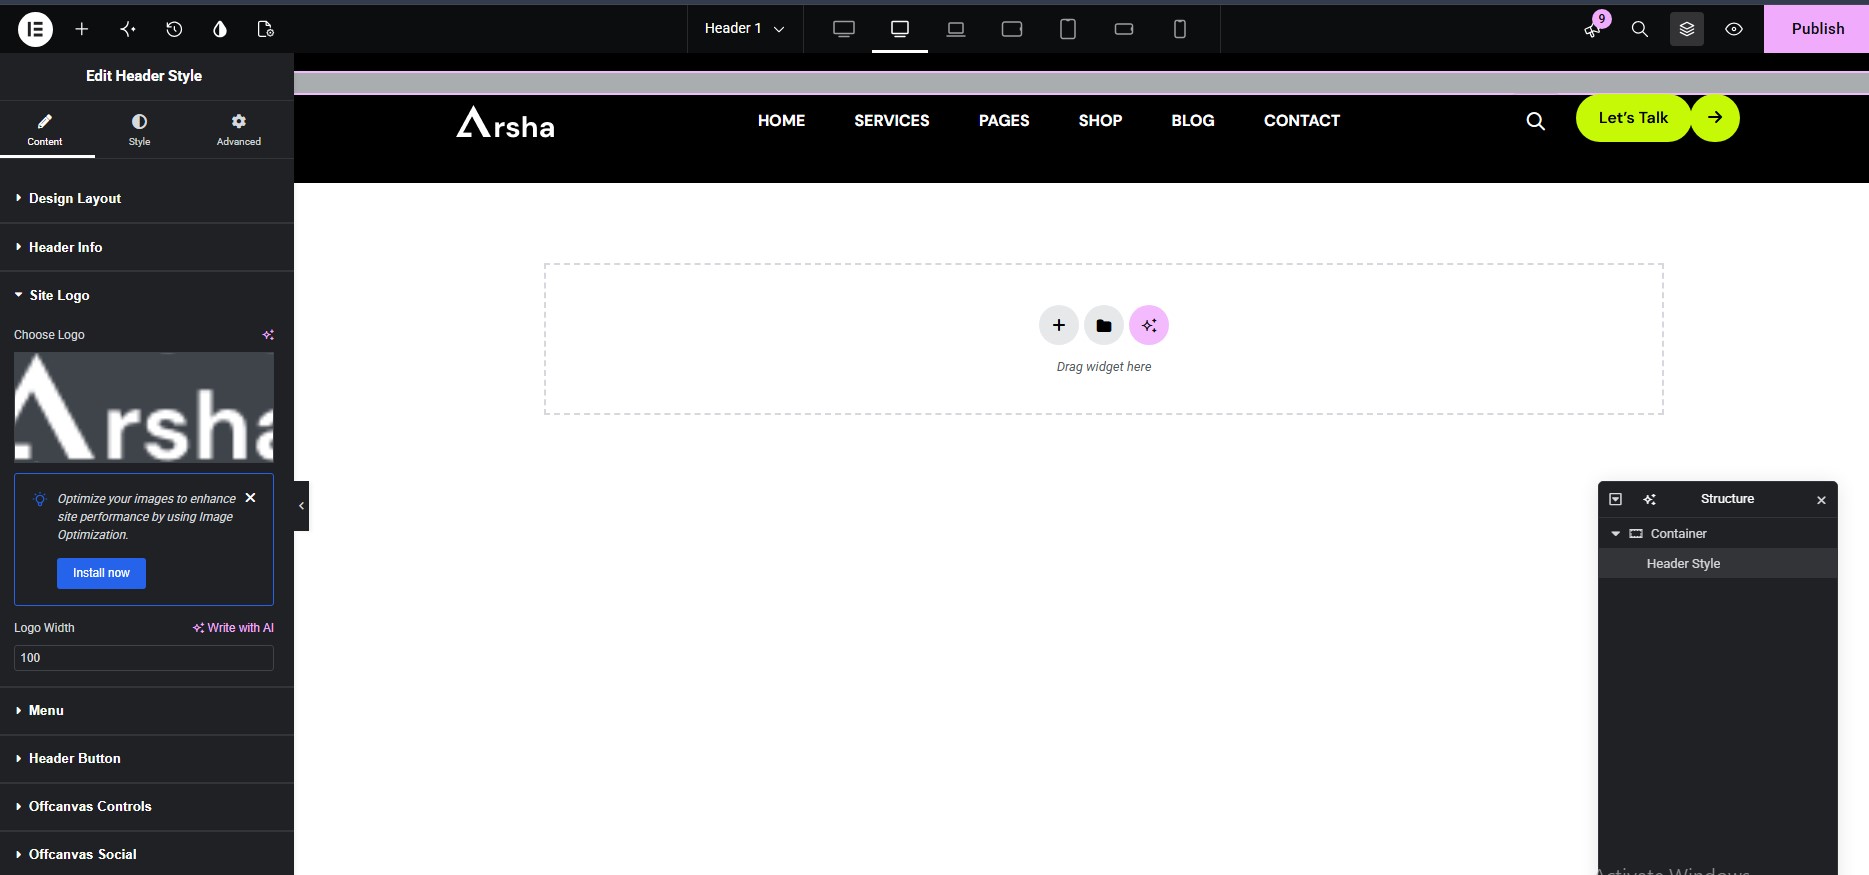
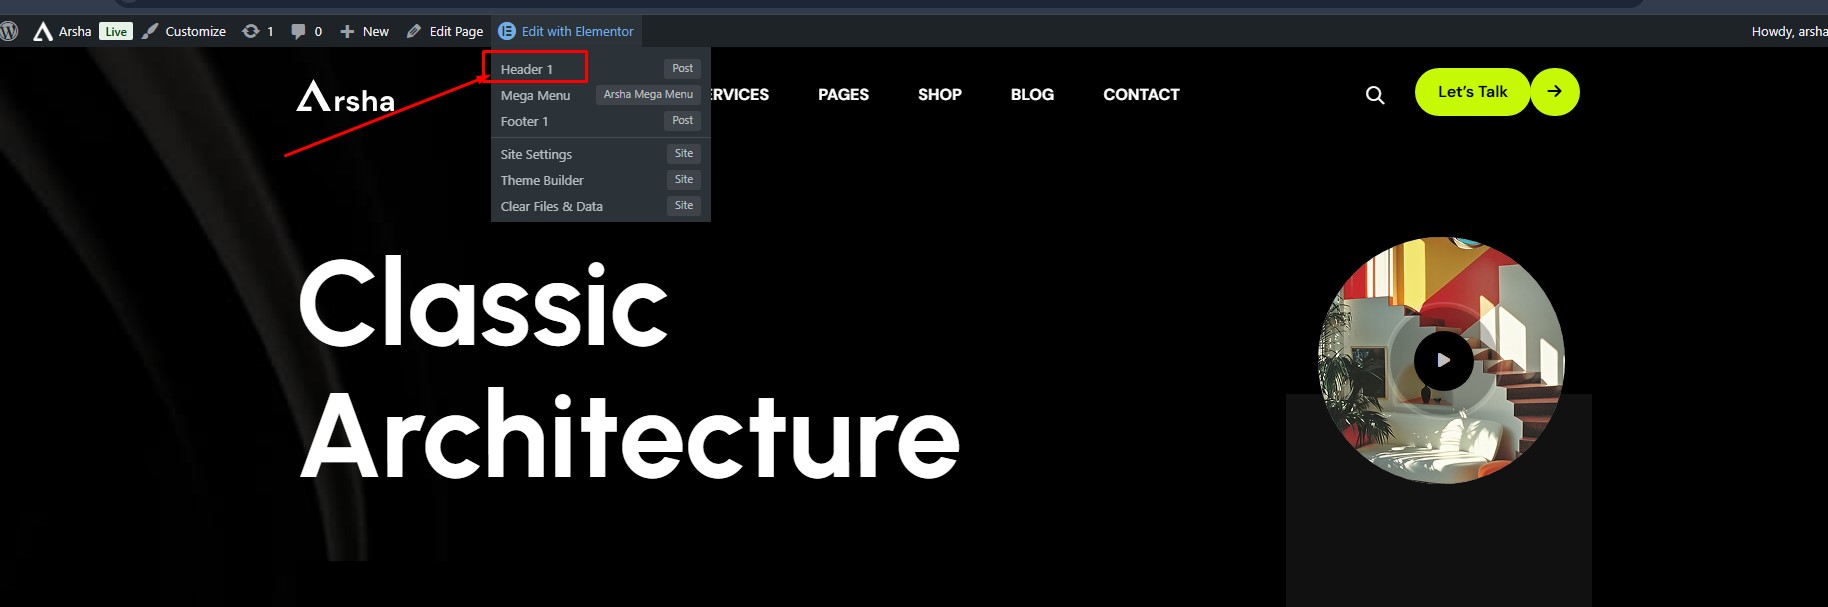
Header Style Options
To edit a specific page's header, identify the Elementor header used by that page:
Footer
Footer Default Layout
To use the Elementor Footer, navigate to Dashboard → Theme Options → Footer Then Switch Off "Footer From Elementor? "
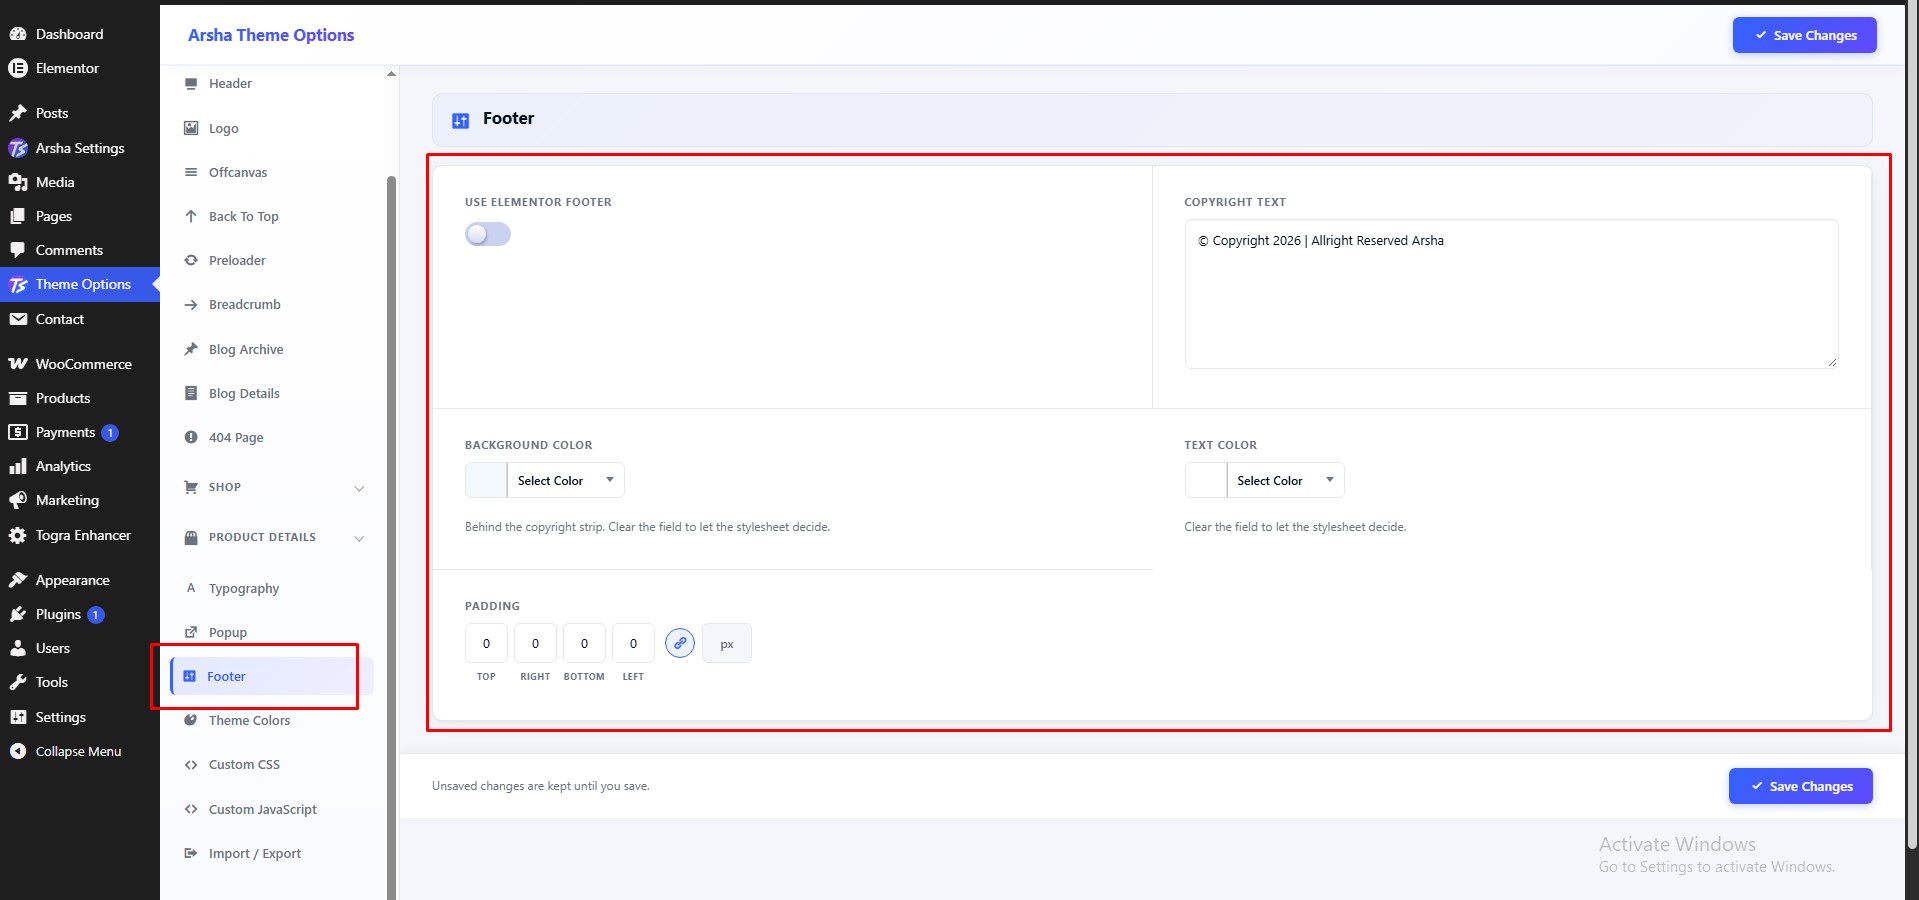
Footer Elementor Layout
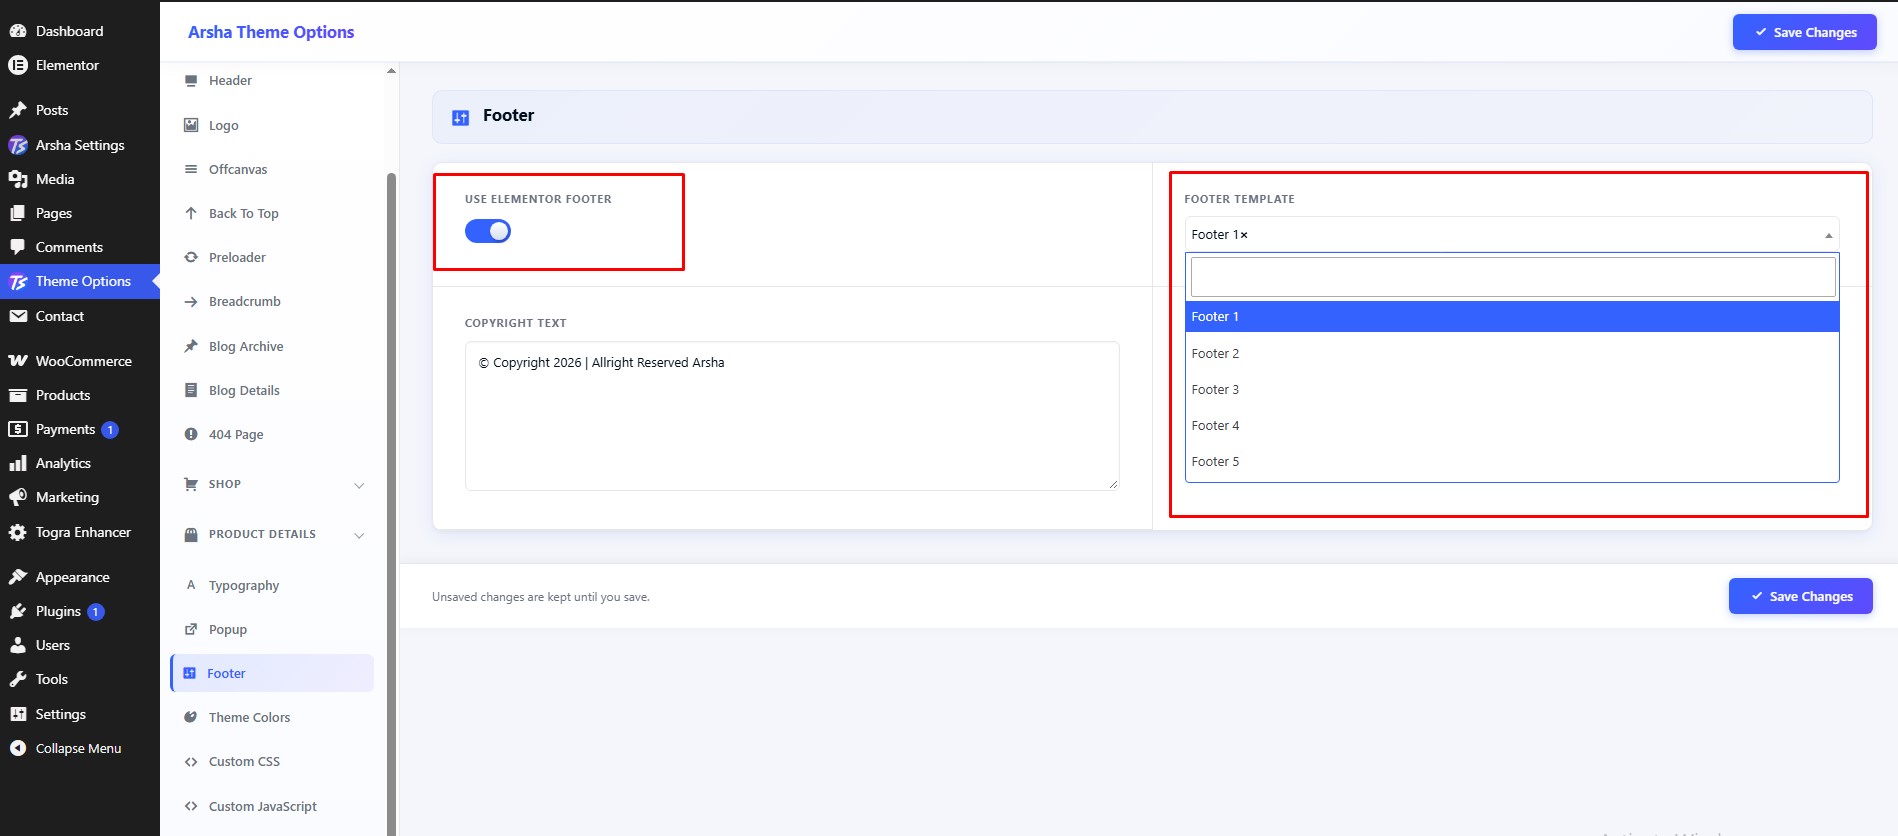
To use the Elementor Footer, navigate to Dashboard → Theme Options → Footer Then Switch On "Footer From Elementor? ". And Select Elementor Footer
Footer Elementor Create
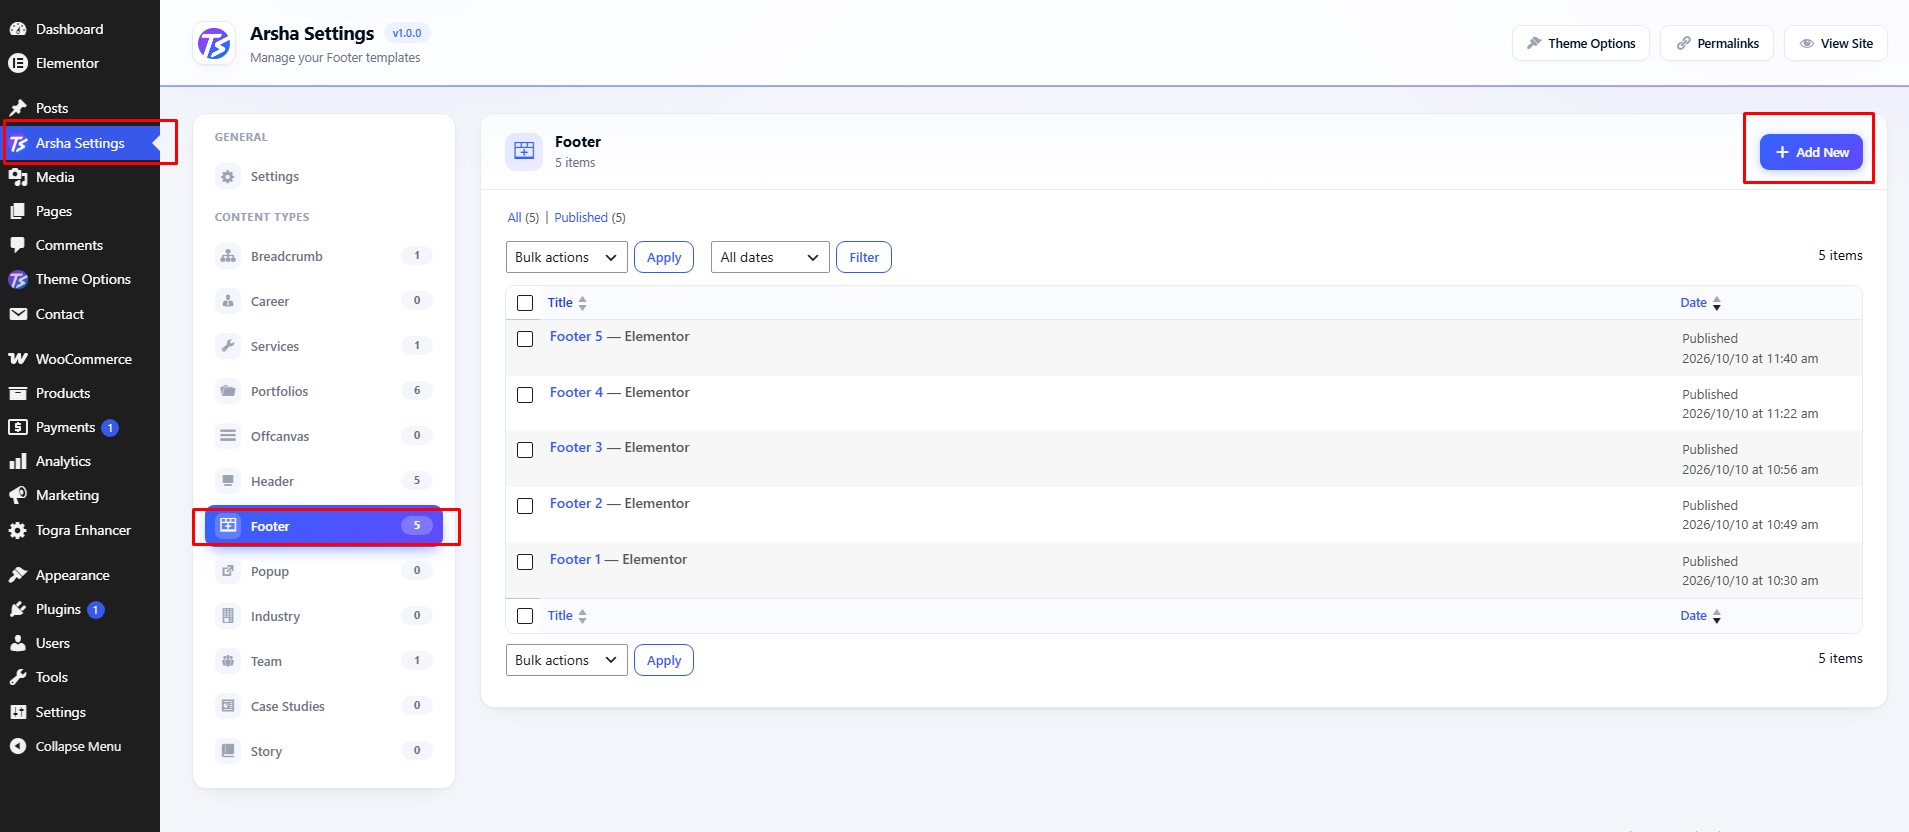
To create an Elementor footer, navigate to Dashboard → Rosun Settings → Footer → Add New.
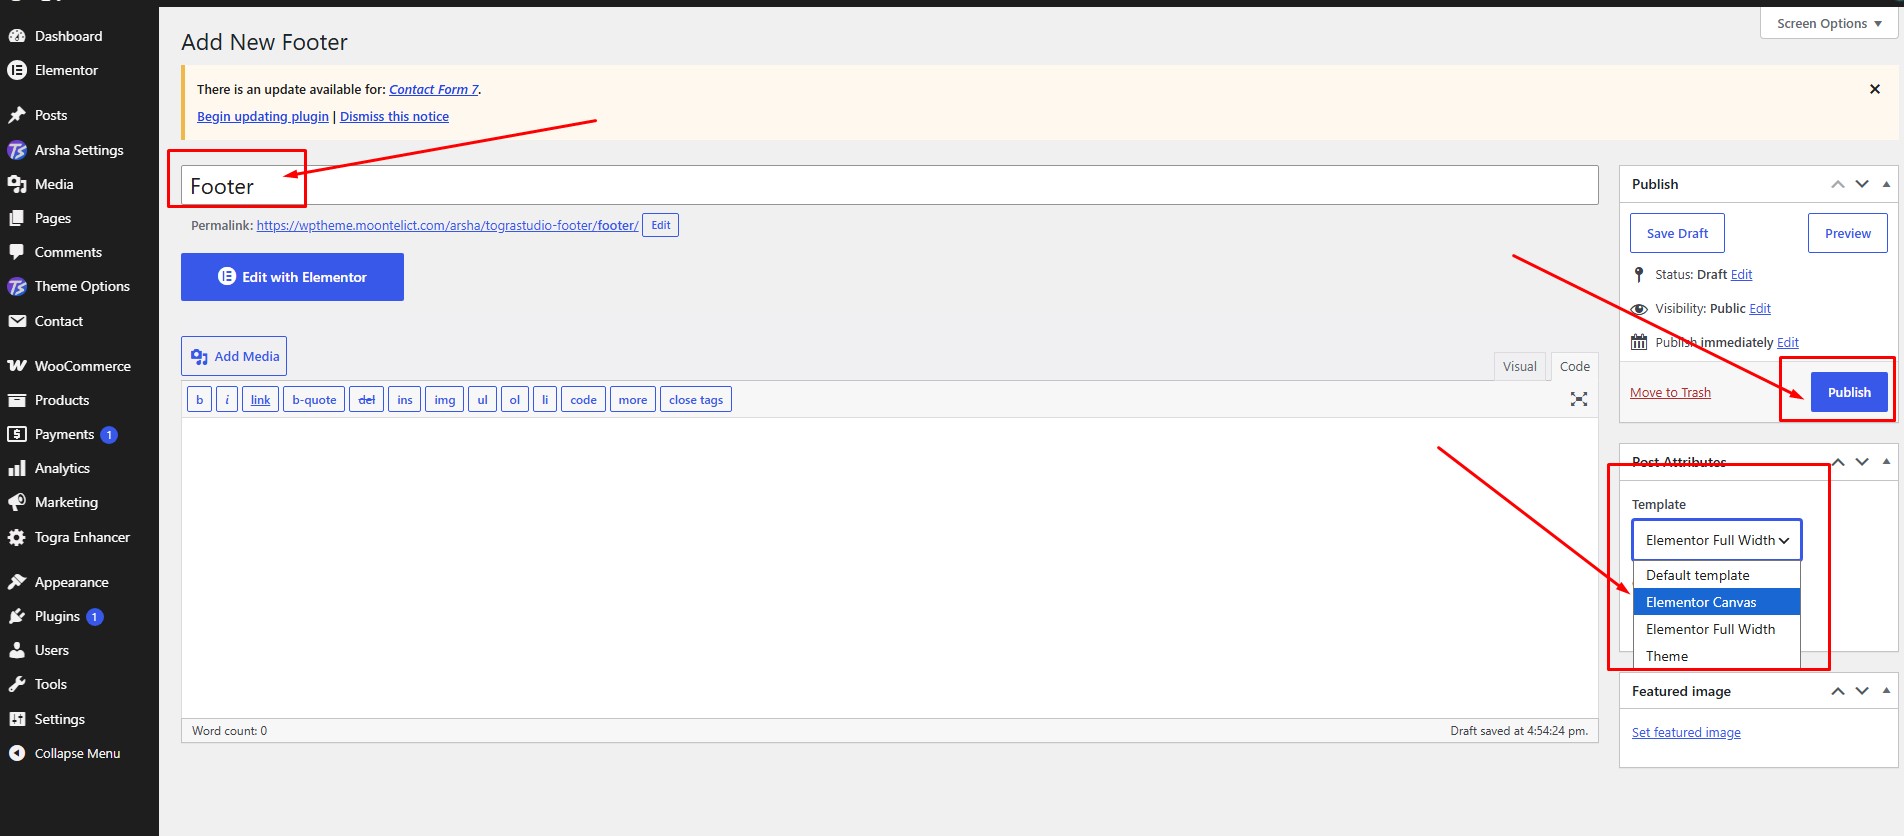
Create a new Footer post
- Insert a Footer Title
- Select Page Template as Elementor Canvas
- Click Publish
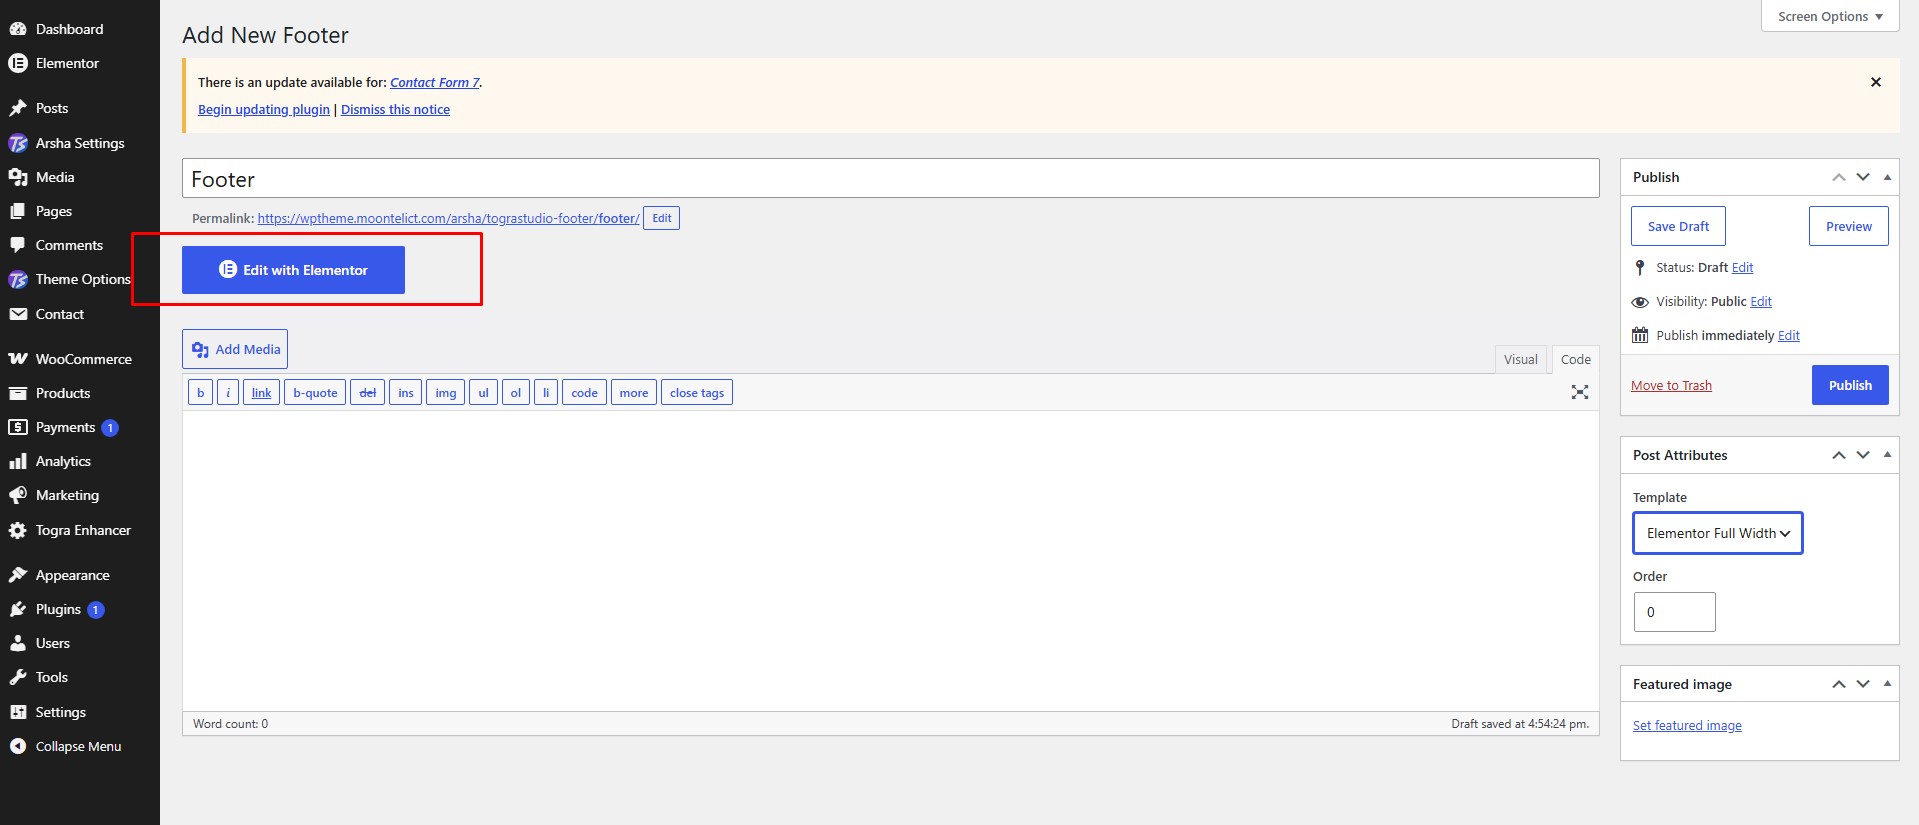
Edit with Elementor
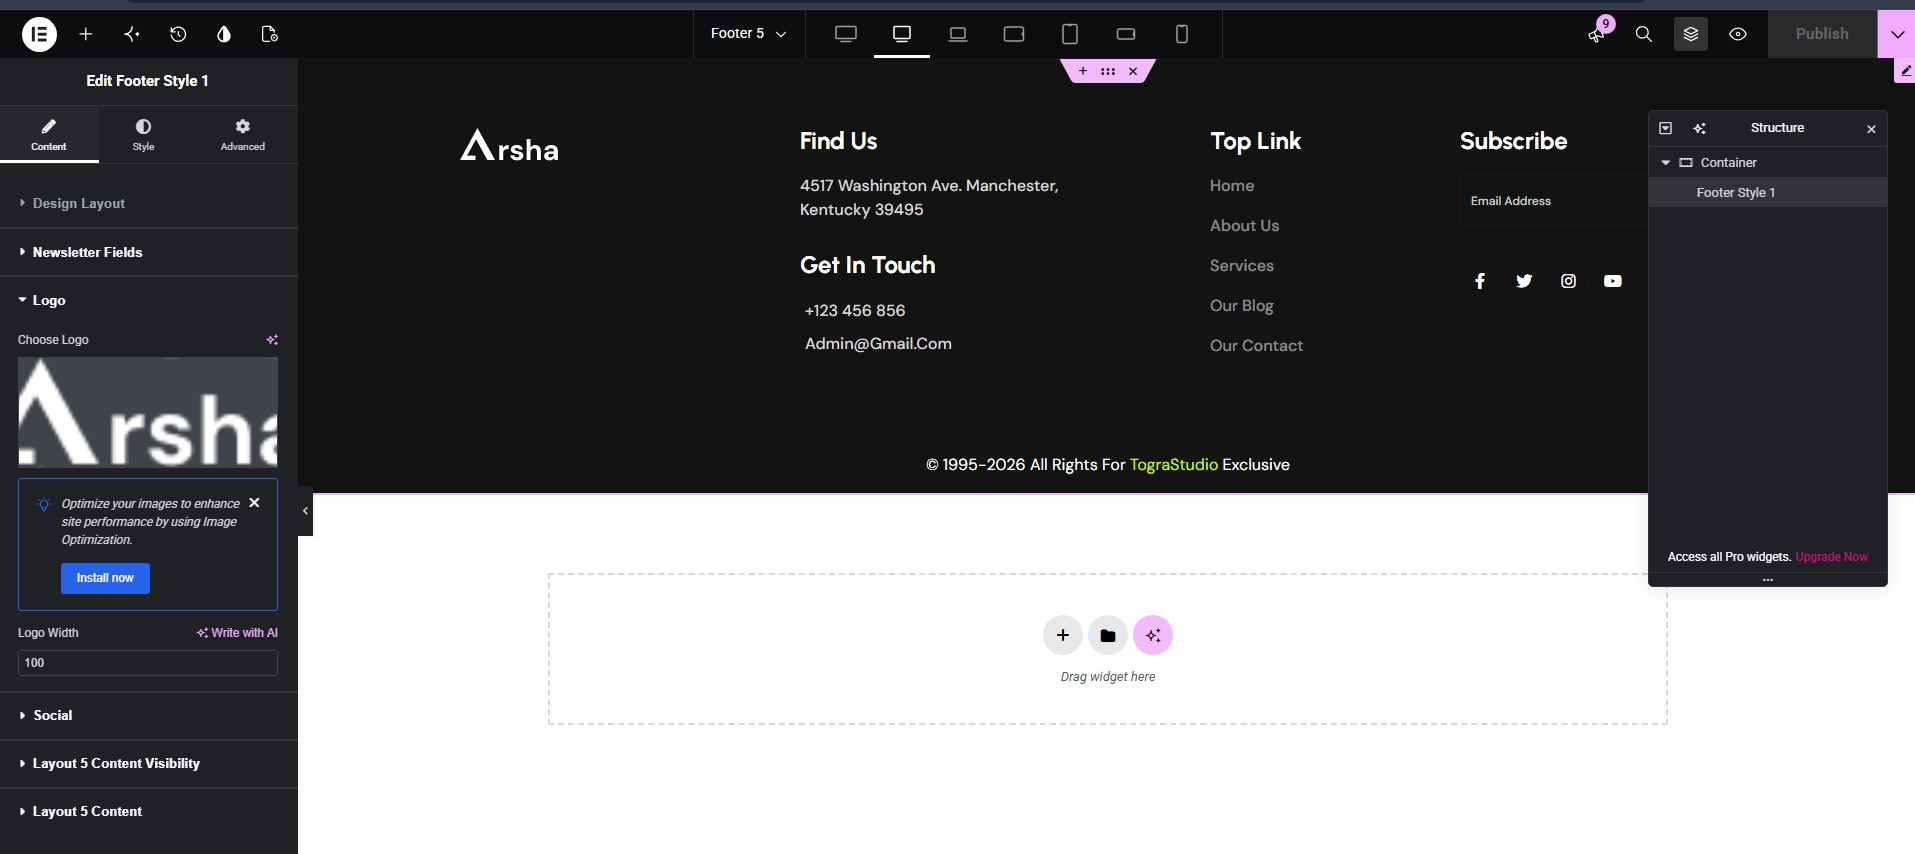
Footer Style Options
To edit a specific page's footer, identify the Elementor Footer used by that page:
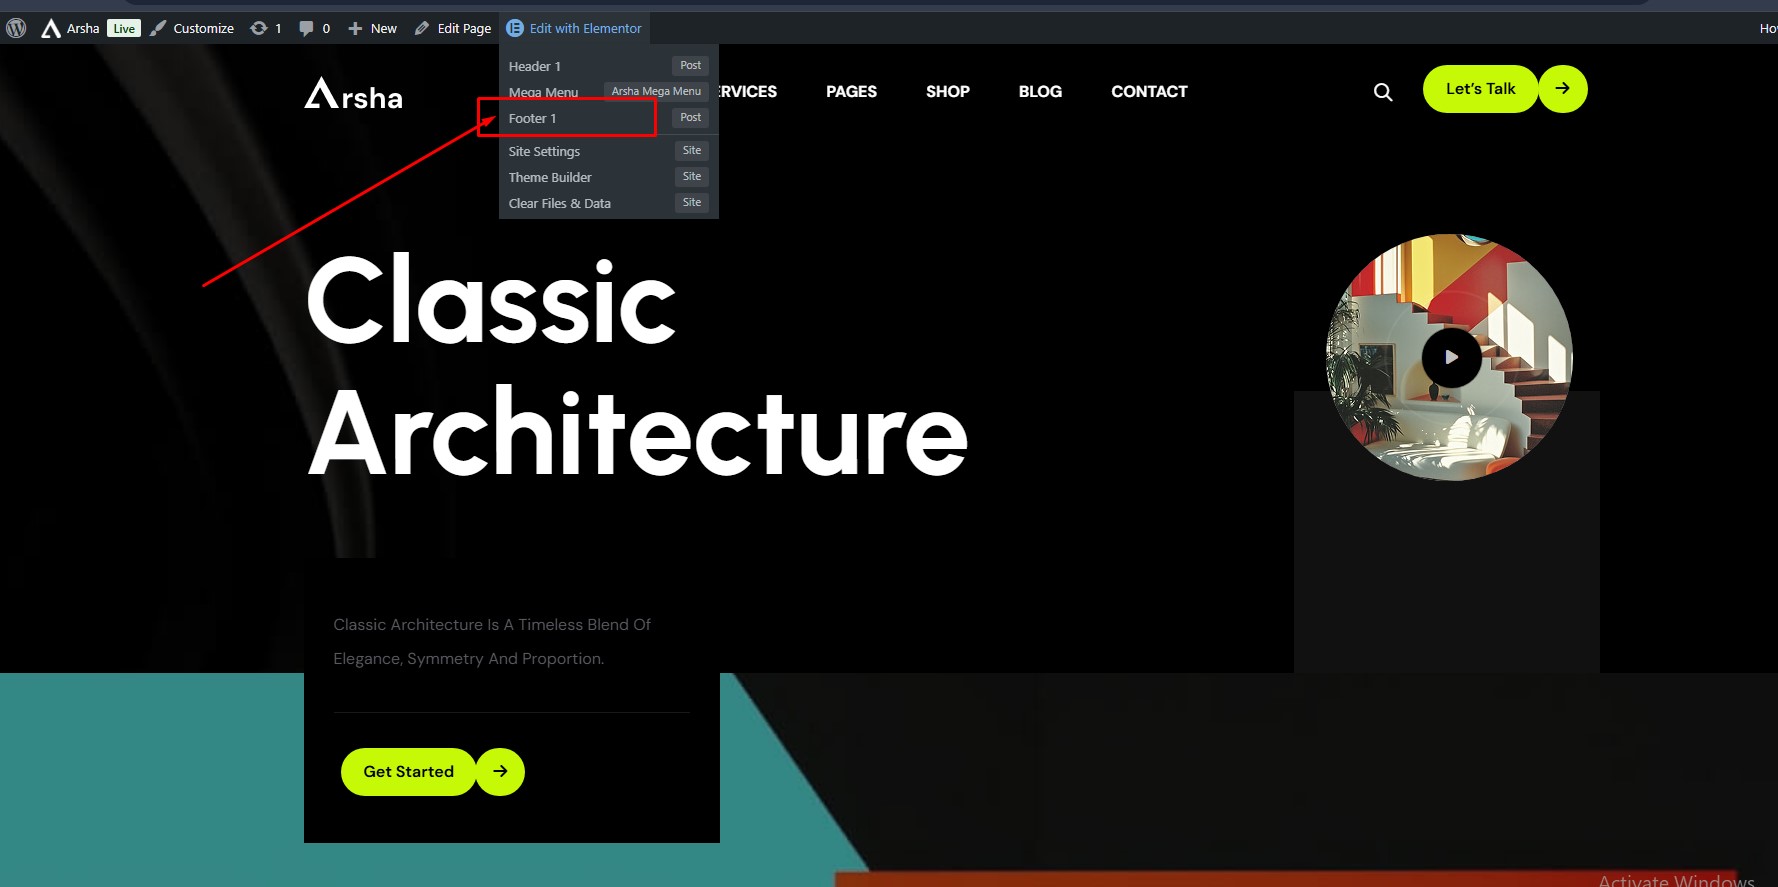
Navigation Menus
Create and assign a menu
Open Dashboard → Appearance → Menus to create or edit a navigation menu. Add pages, product categories or custom links, then assign it to the appropriate theme menu location.
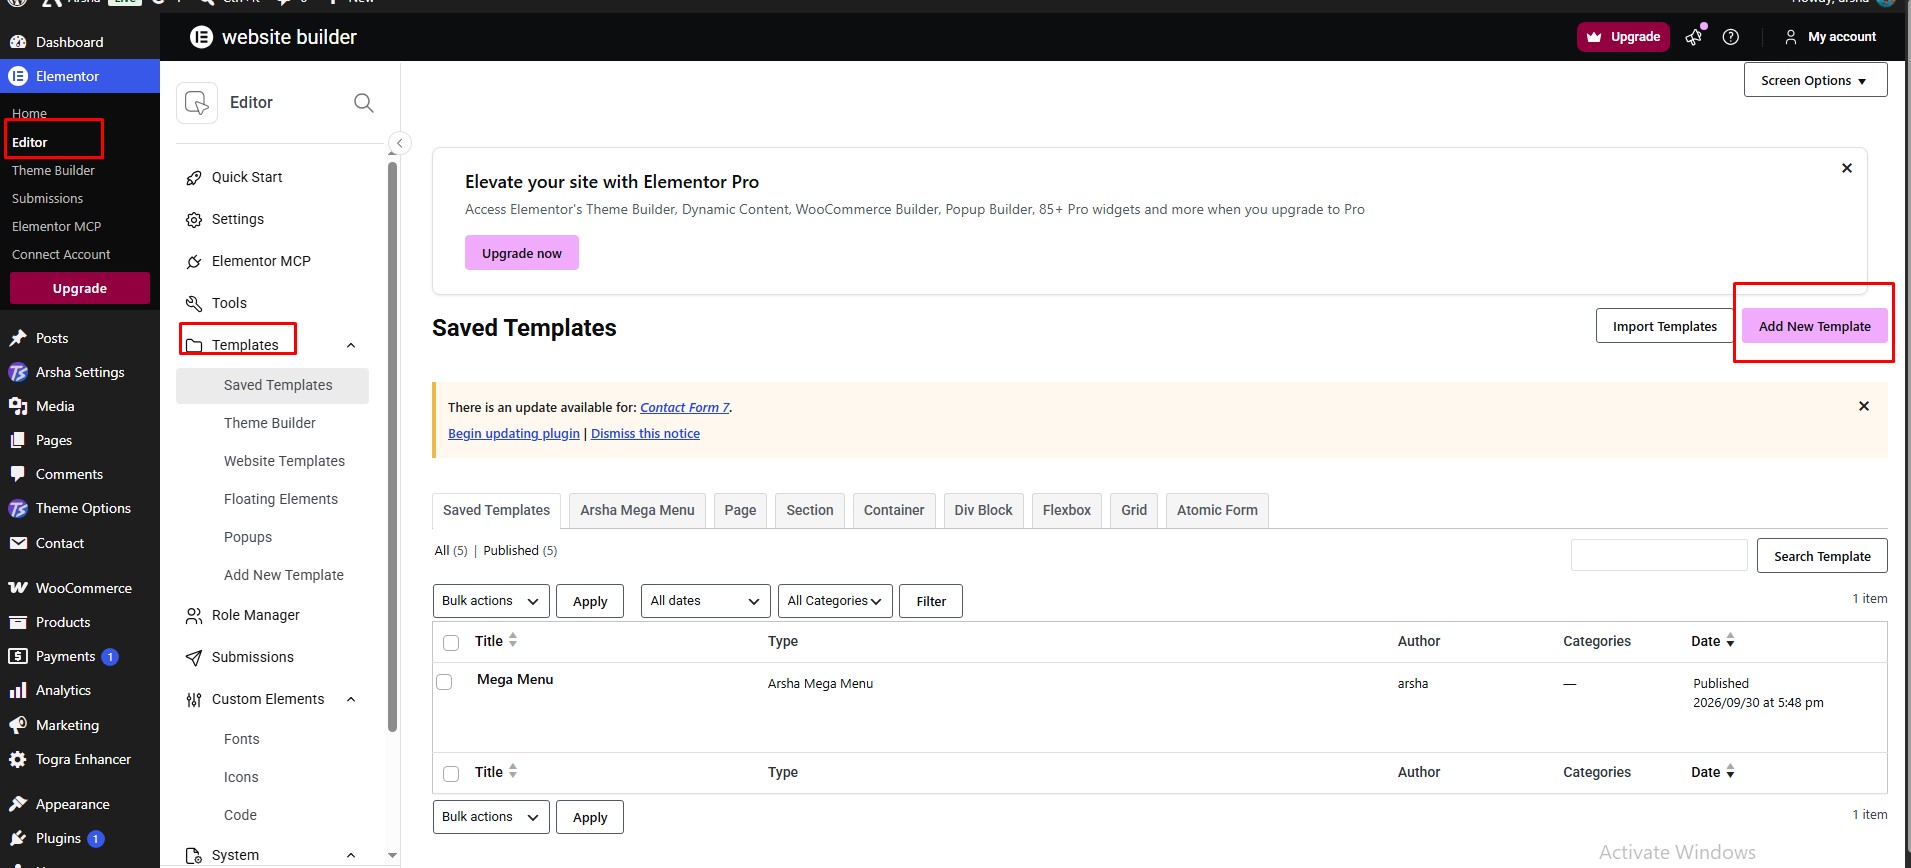
- Use the screen options to enable product categories or other menu item types if needed.
- Drag menu items to arrange their order and nesting.
- Save the menu, then preview the site on desktop and mobile.
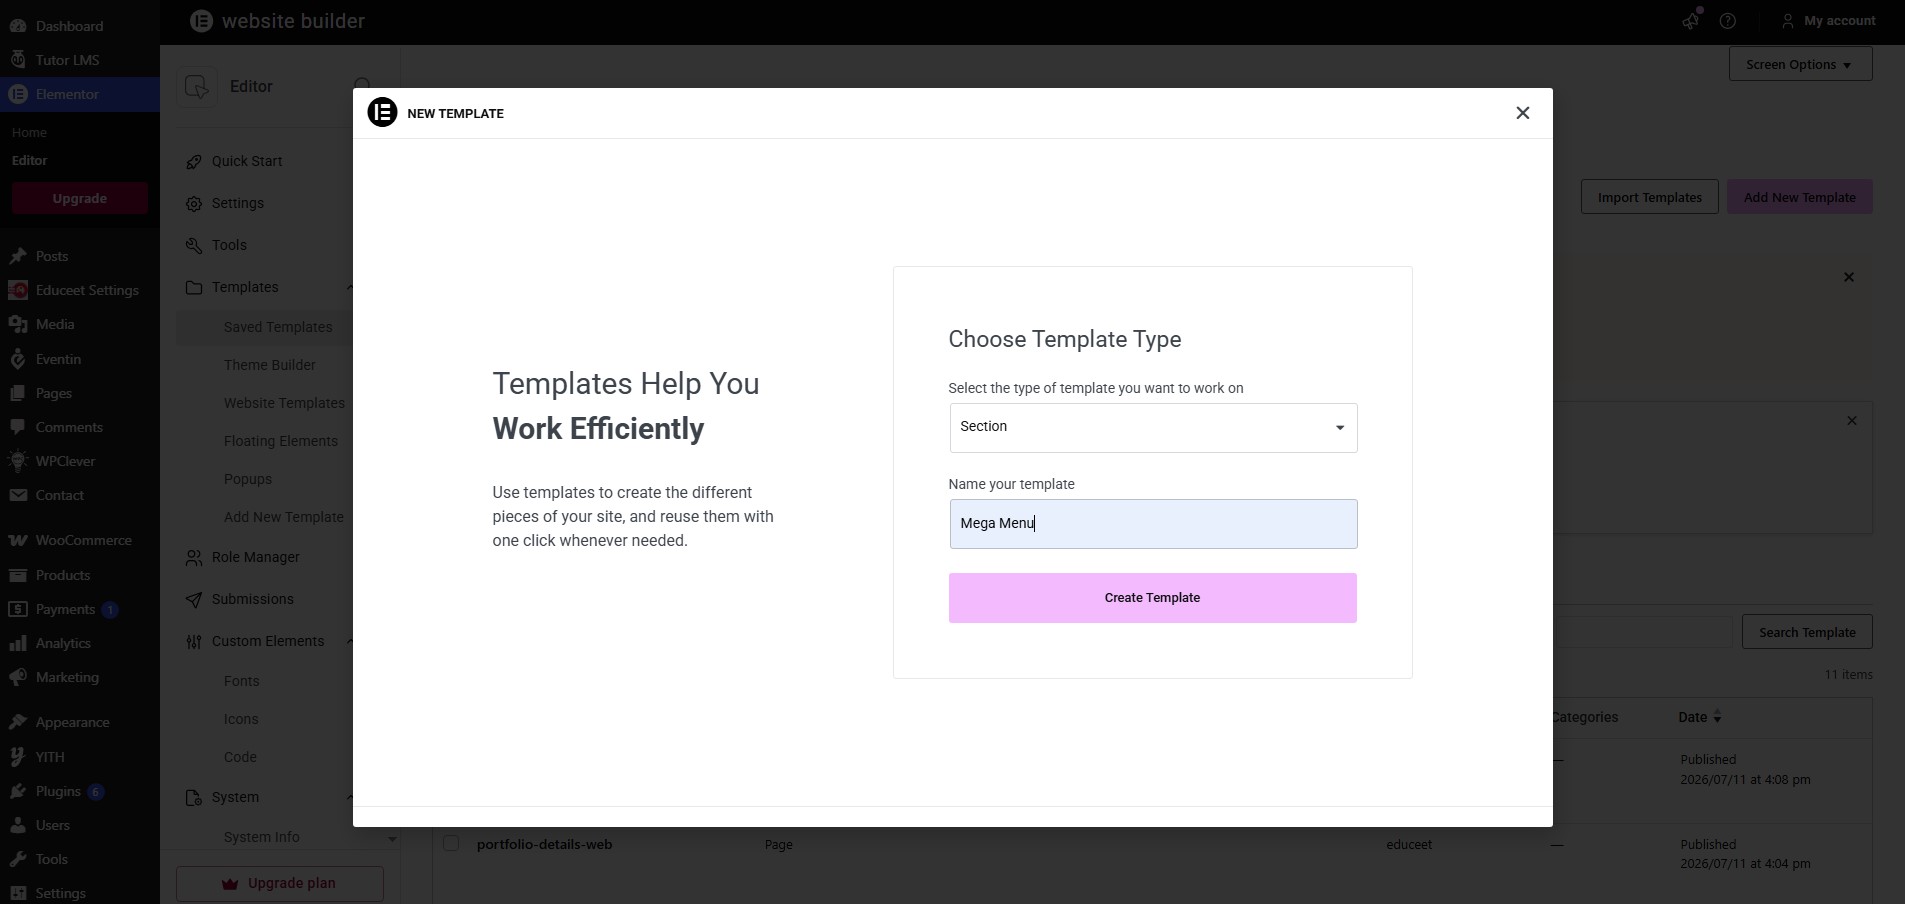
To edit a menu later, return to Appearance → Menus, select it from the menu selector and save your changes.
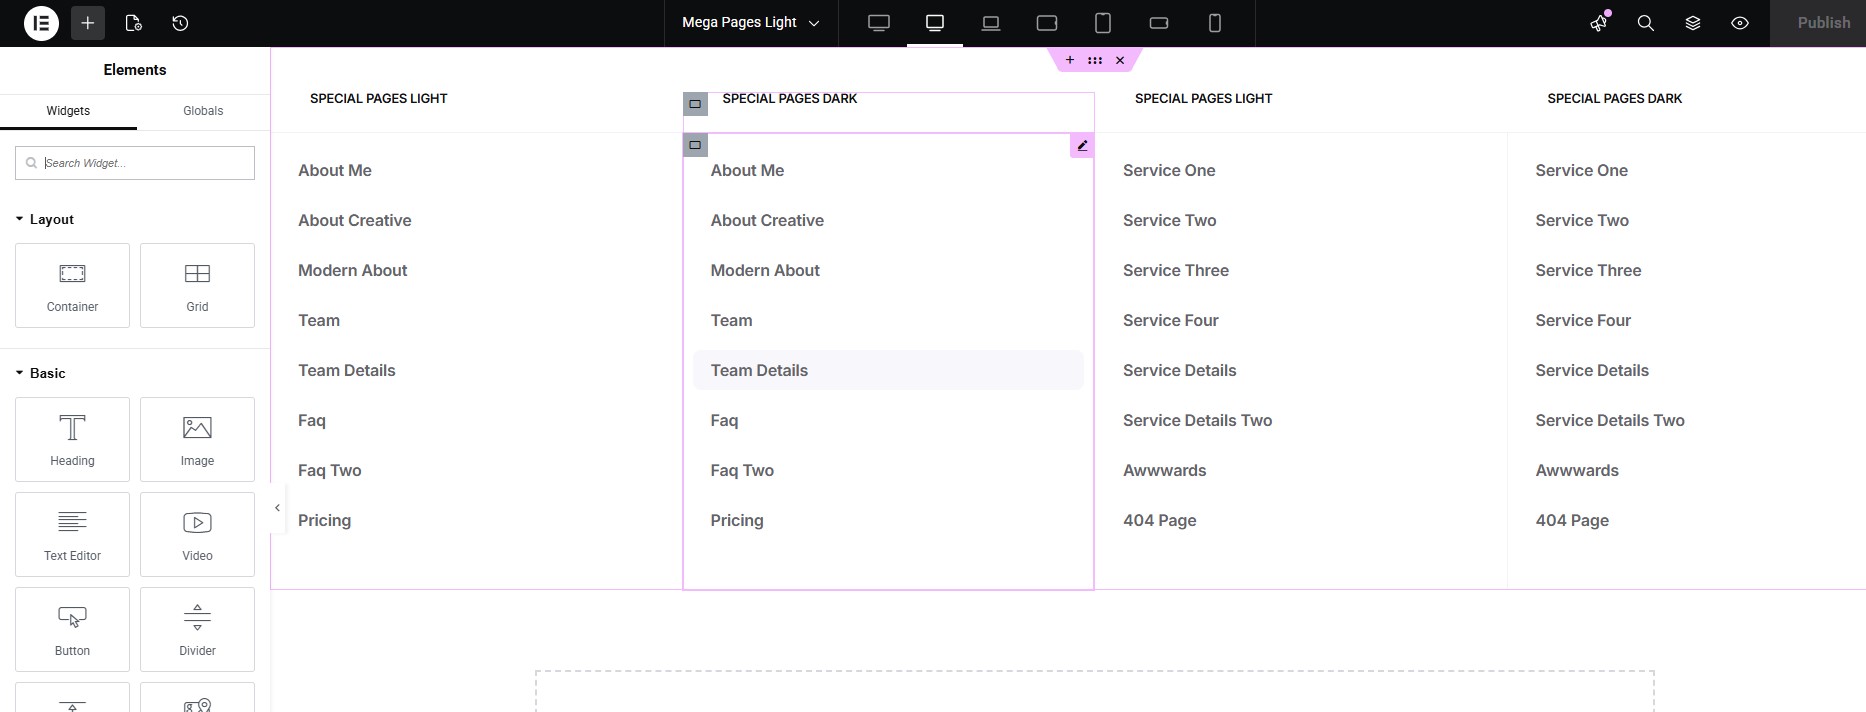
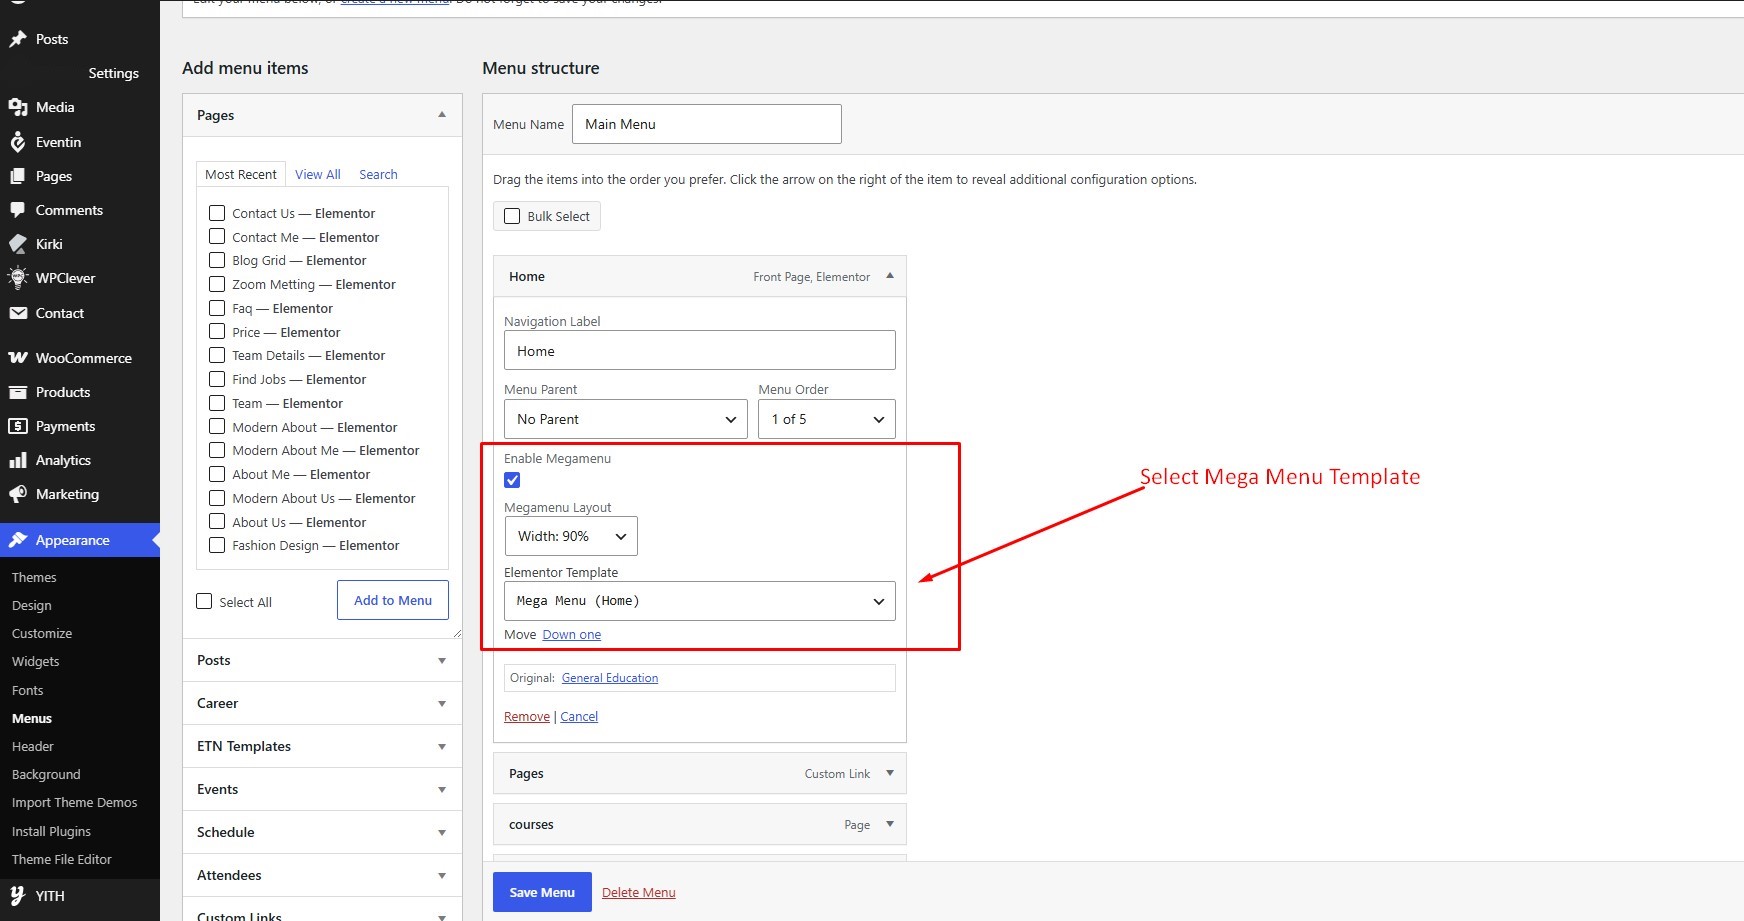
Assign menu locations in the Menu Settings area. Available locations depend on the active theme layout.
Breadcrumb Settings
To change Breadcrumb settings, navigate to Dashboard → Theme Options → Breadcrumb.
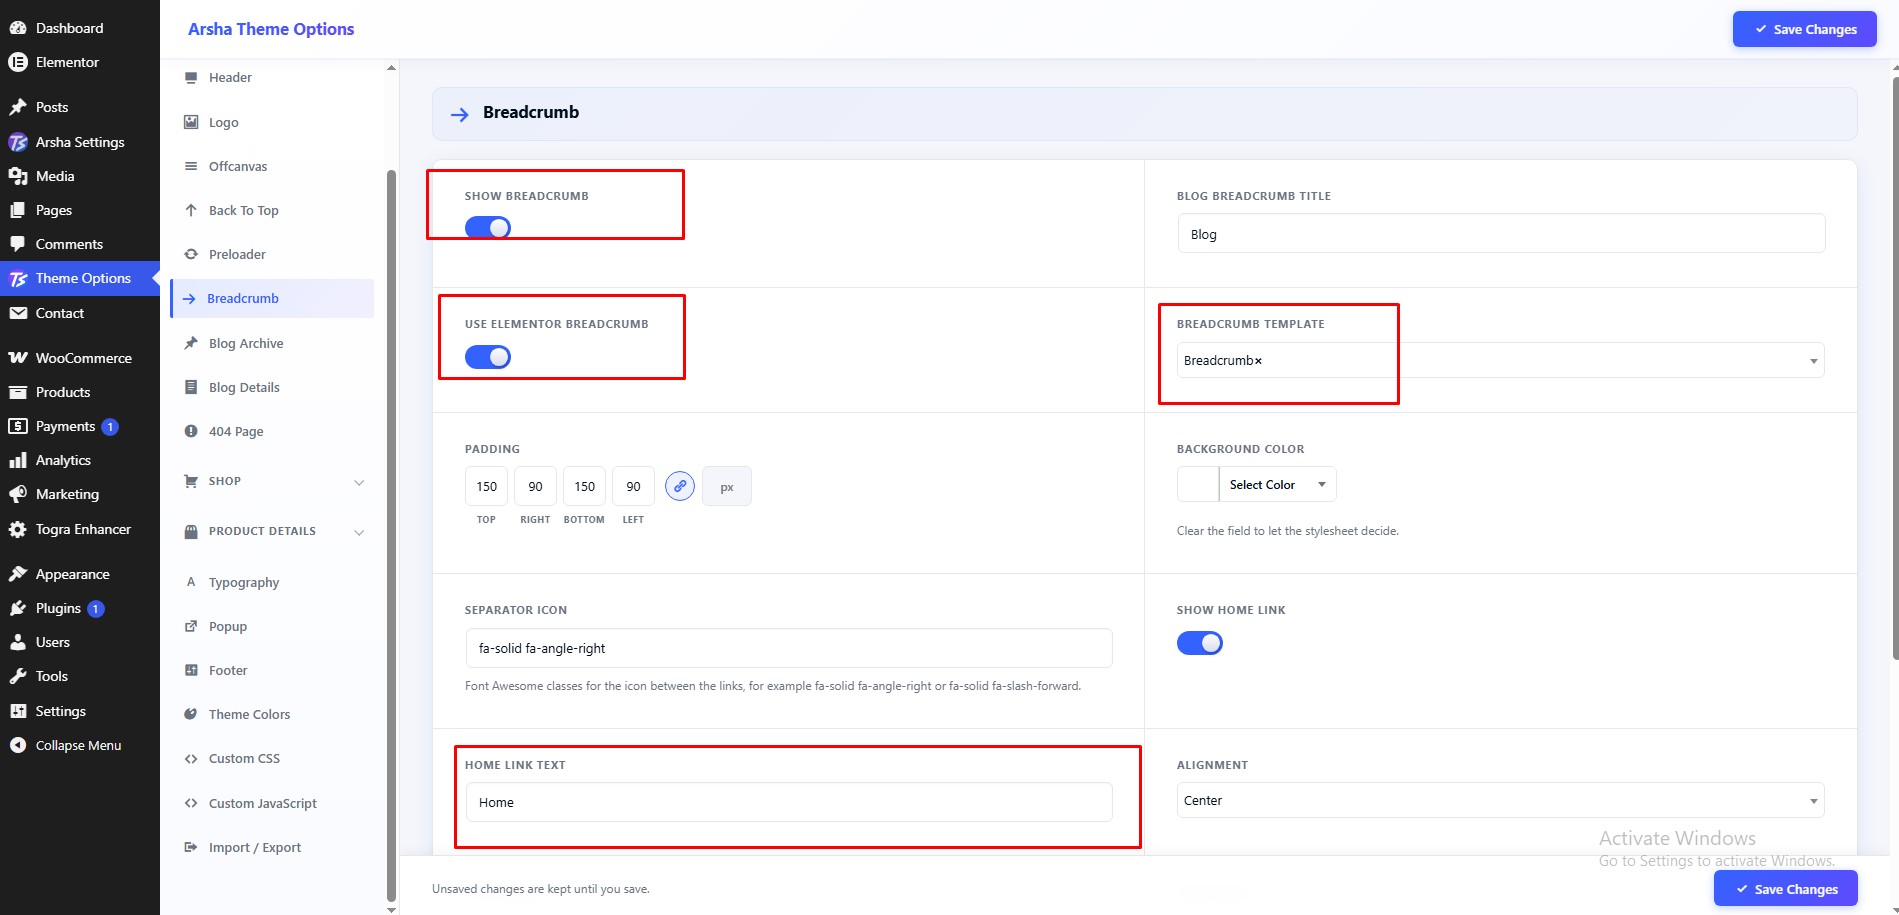
Features available in this section:
- Open Theme Options from the dashboard menu
- Select Breadcrumb
- Global Breadcrumb Switcher
- Breadcrumb Elementor Switcher
- Breadcrumb Elementor Template
Offcanvas Settings
Create Offcanvas with Elementor
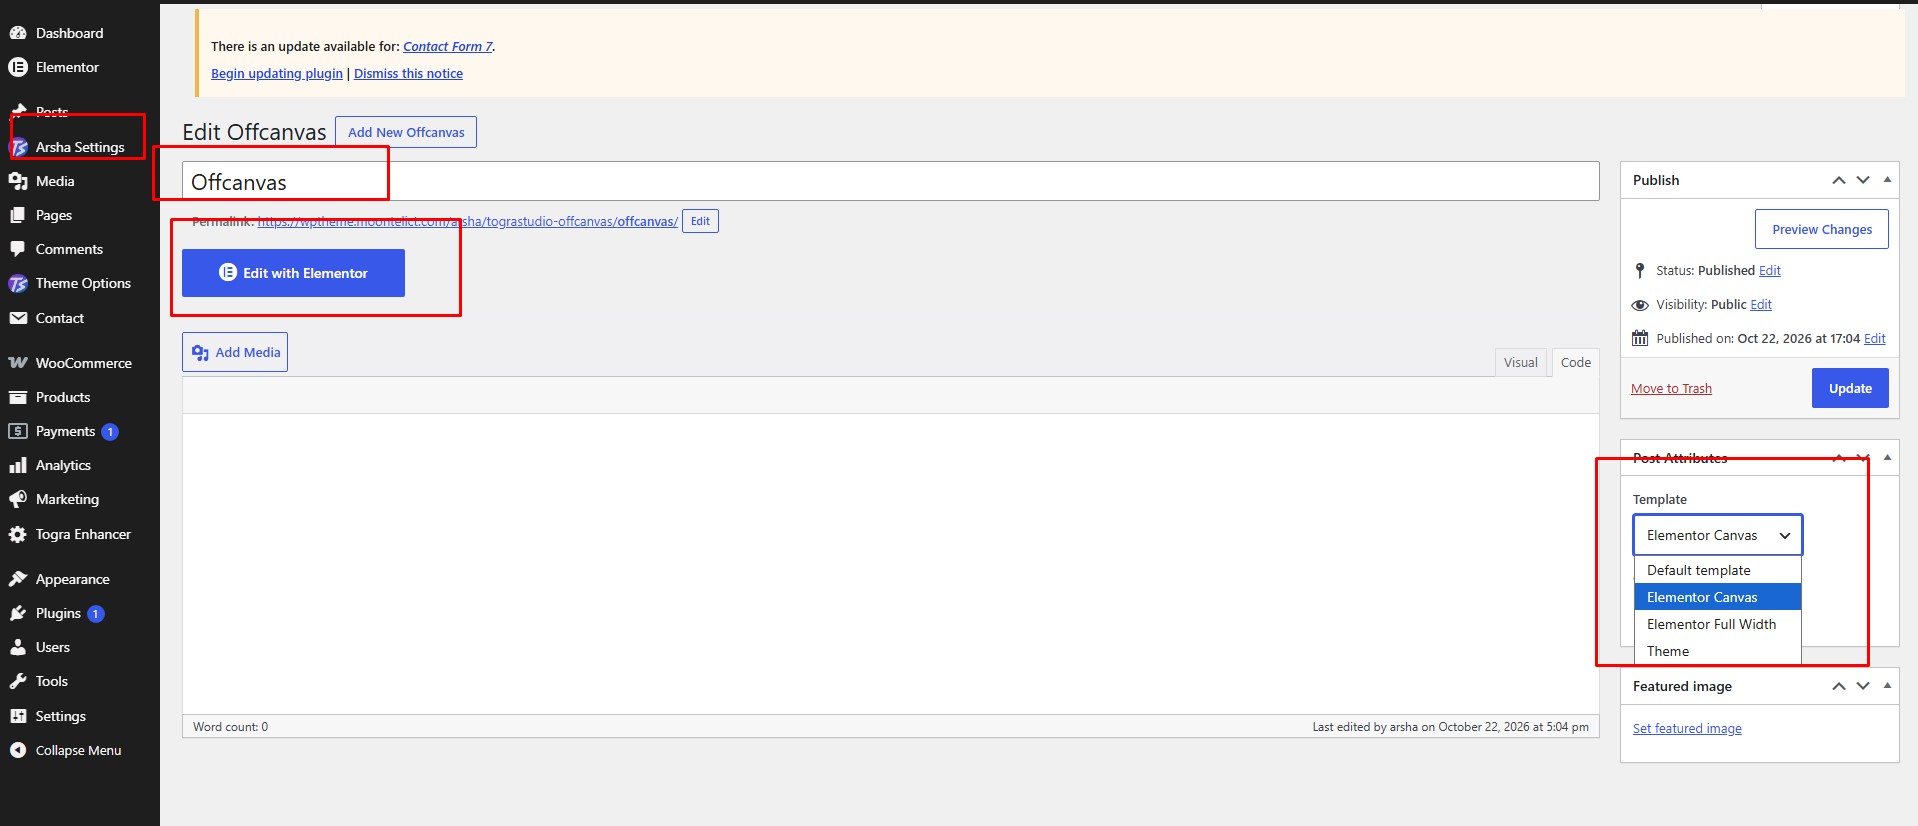
To create an Offcanvas, navigate to Dashboard → Rosun Settings → Offcanvas → Add New Offcanvas.
Create Offcanvas Post
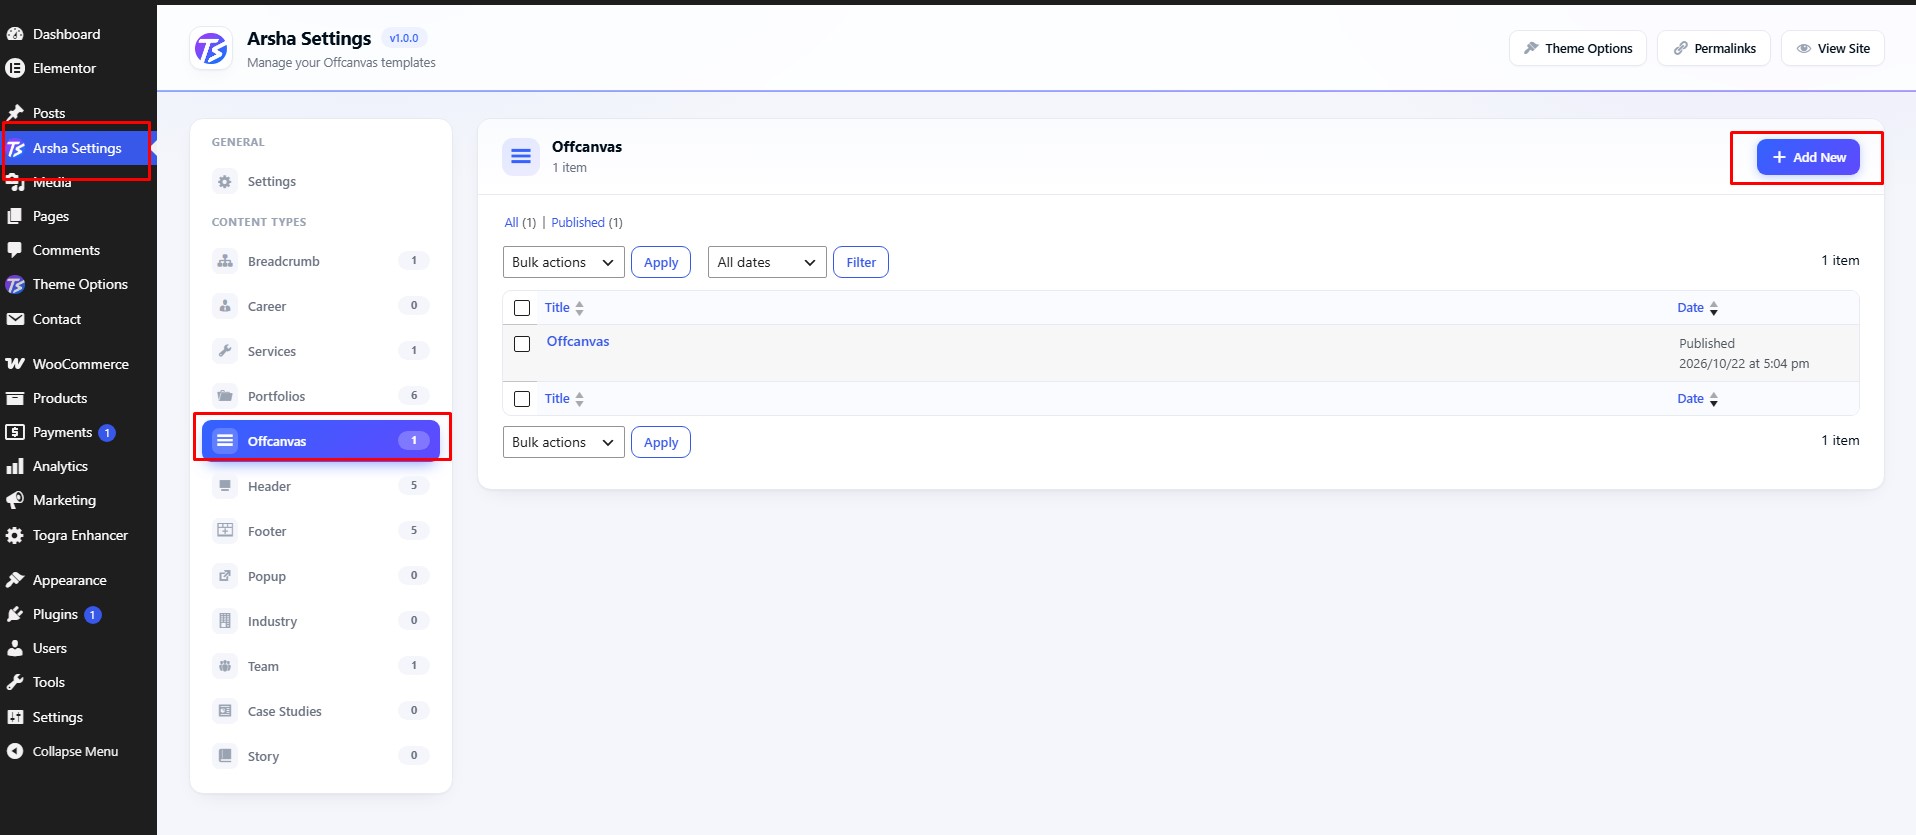
- Insert Offcanvas Title
- Select Page Template as Elementor Canvas
- Click Publish
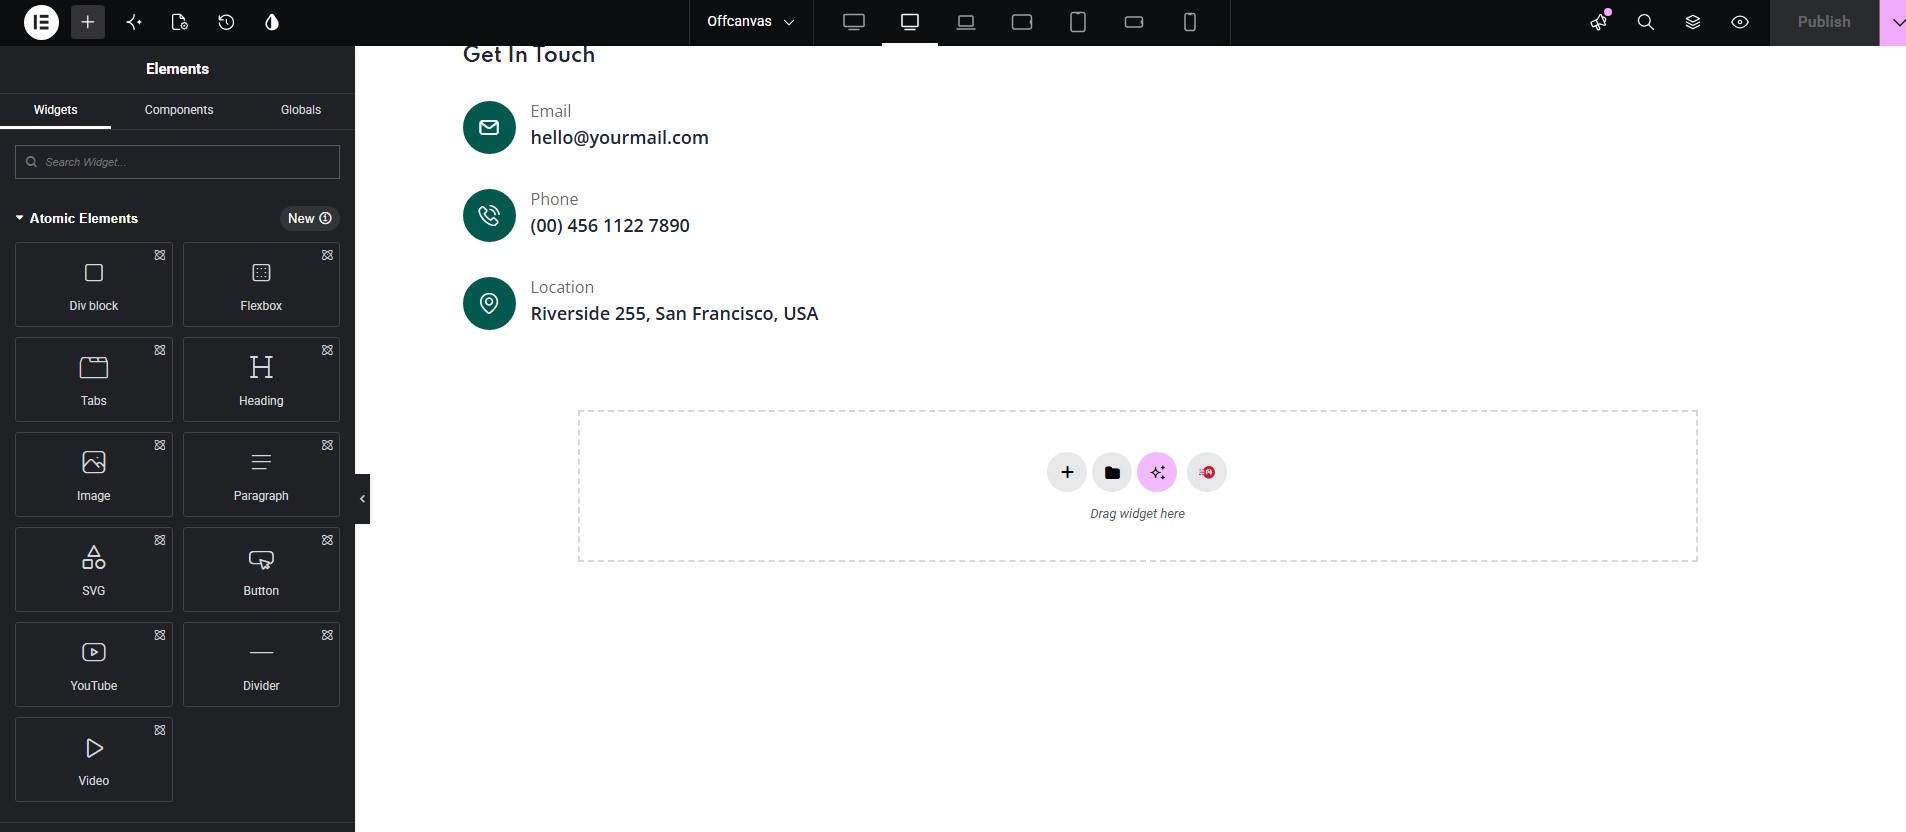
Build with Elementor
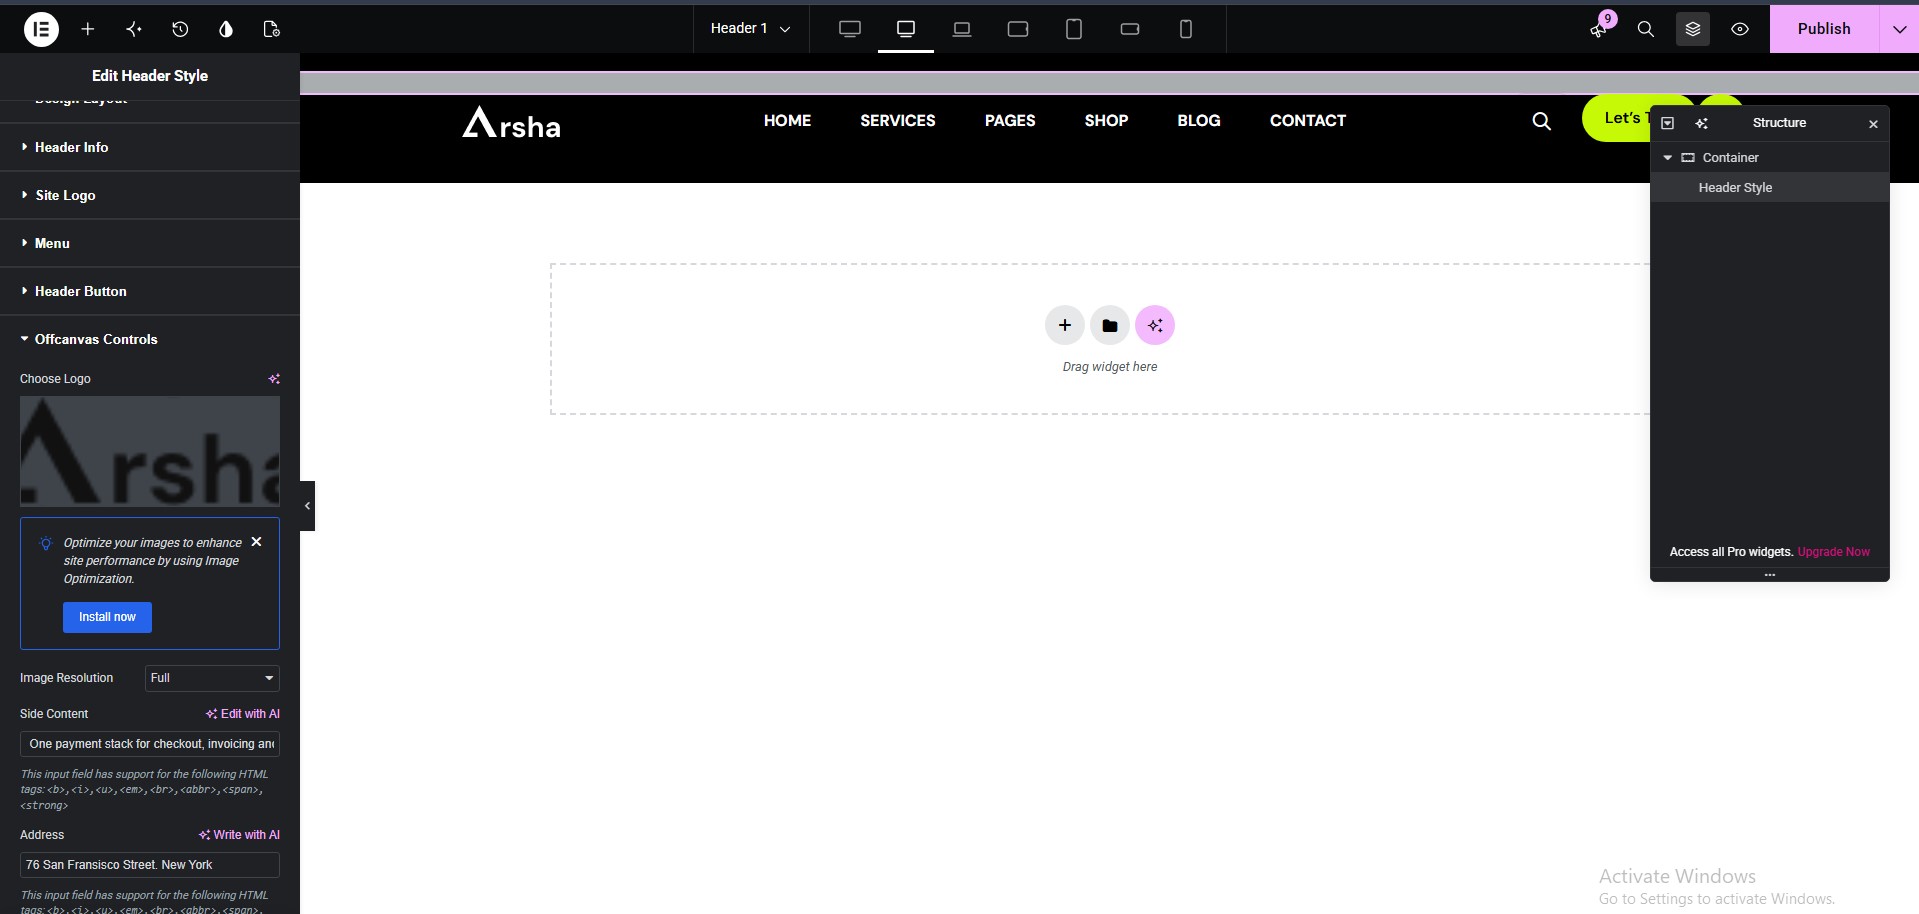
Select the Offcanvas in Header
Site Design Options
Every Theme Options setting for the parts of the site covered above.
Open Dashboard → Theme Options, pick a section on the left, change what you need and click Save Changes. Some settings only appear after the setting they depend on is turned on. Options may vary depending on the active theme and installed plugins.
Theme Settings
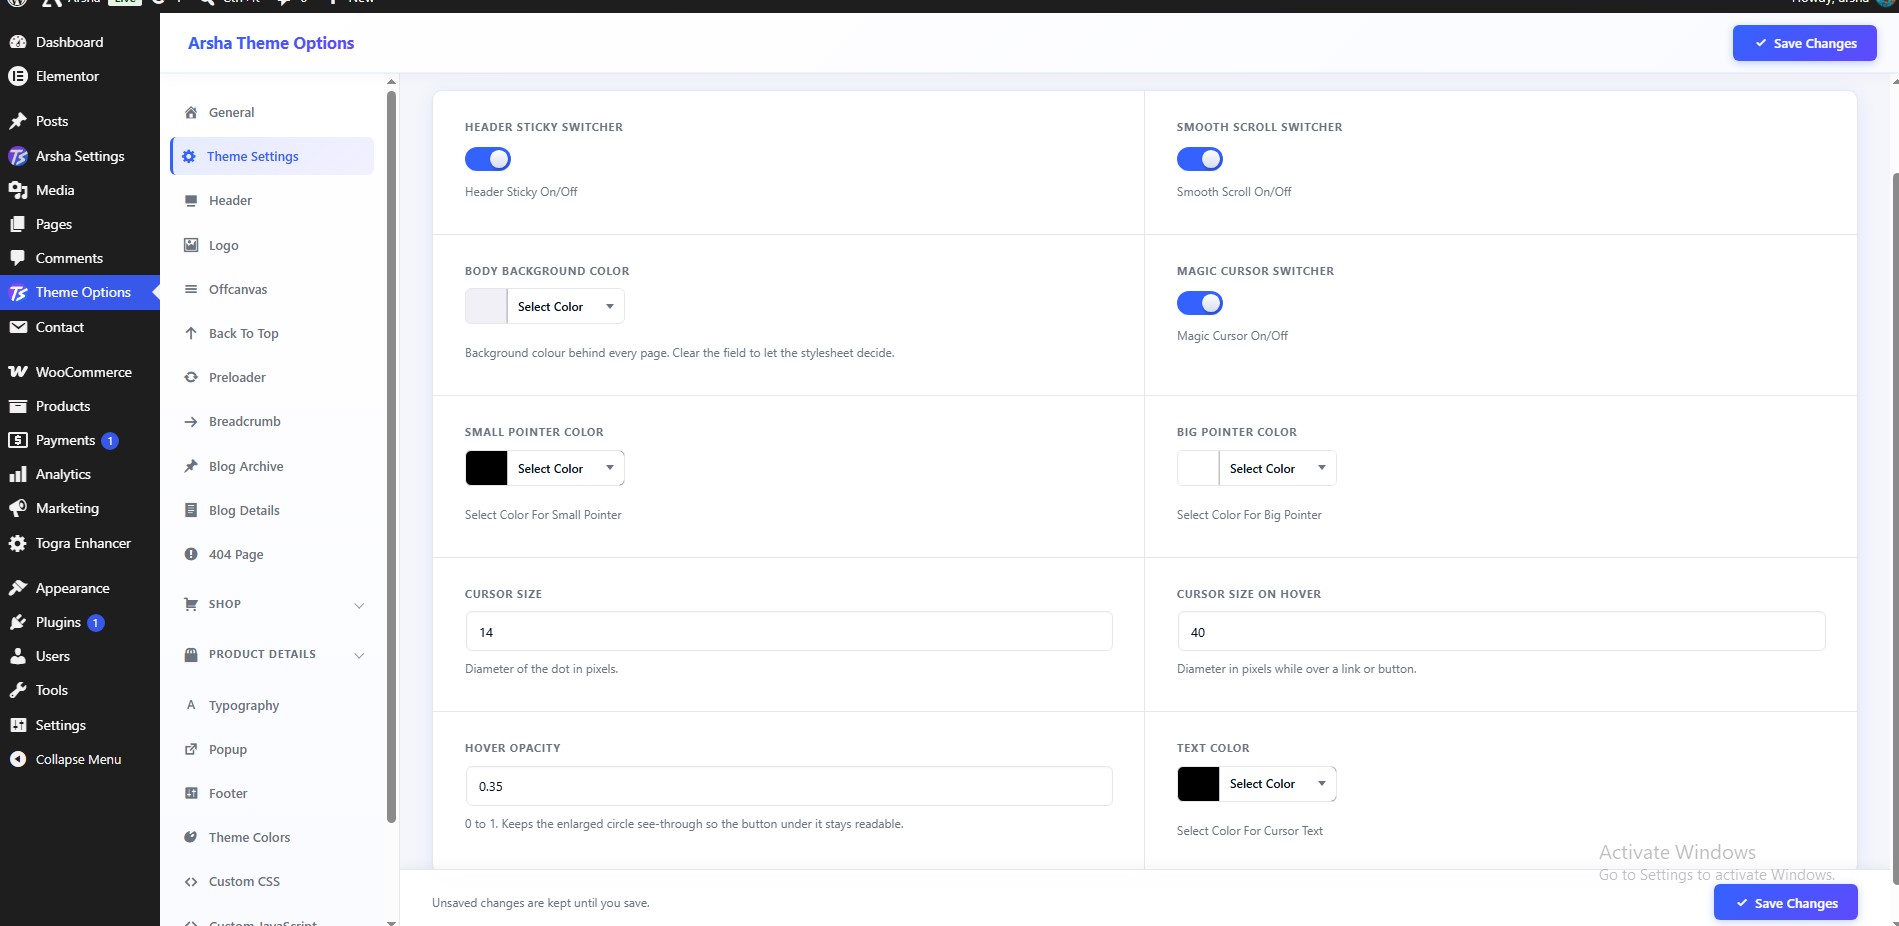
To configure Theme Settings, navigate to Dashboard → Theme Options → Theme Settings.
Theme Controls.
Features available:
- Header Sticky Switcher — Header Sticky On/Off
- Smooth Scroll Switcher — Smooth Scroll On/Off
- Magic Cursor Switcher — Magic Cursor On/Off
- Small Pointer Color — Select Color For Small Pointer
- Big Pointer Color — Select Color For Big Pointer
- Text Color — Select Color For Cursor Text
Logo
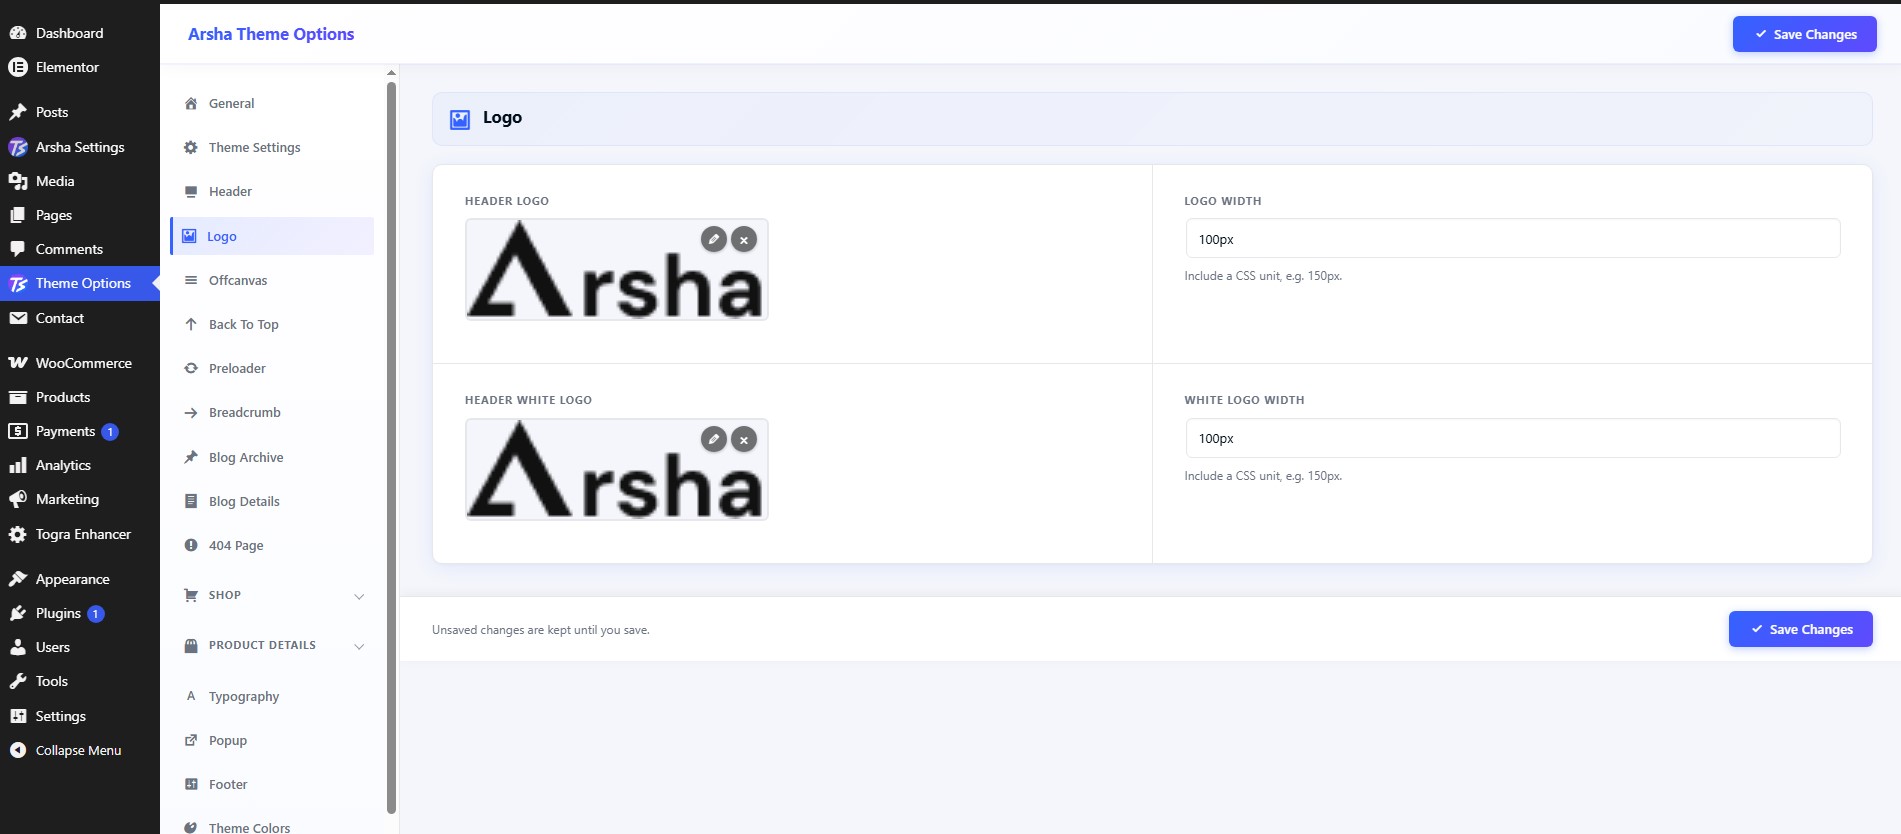
To configure Logo, navigate to Dashboard → Theme Options → Logo.
Features available:
- Header Logo
- Logo Width — Include a CSS unit, e.g. 150px.
- Header White Logo
- White Logo Width — Include a CSS unit, e.g. 150px.
Header
To configure Header, navigate to Dashboard → Theme Options → Header.
Features available:
- Use Elementor Header — Render a global Elementor header template instead of the default header.
- Header Template
- Show Header Search
- Header Search Placeholder
- Search Form Logo
- Show Header Button
- Header Button Text
- Header Button URL
Offcanvas
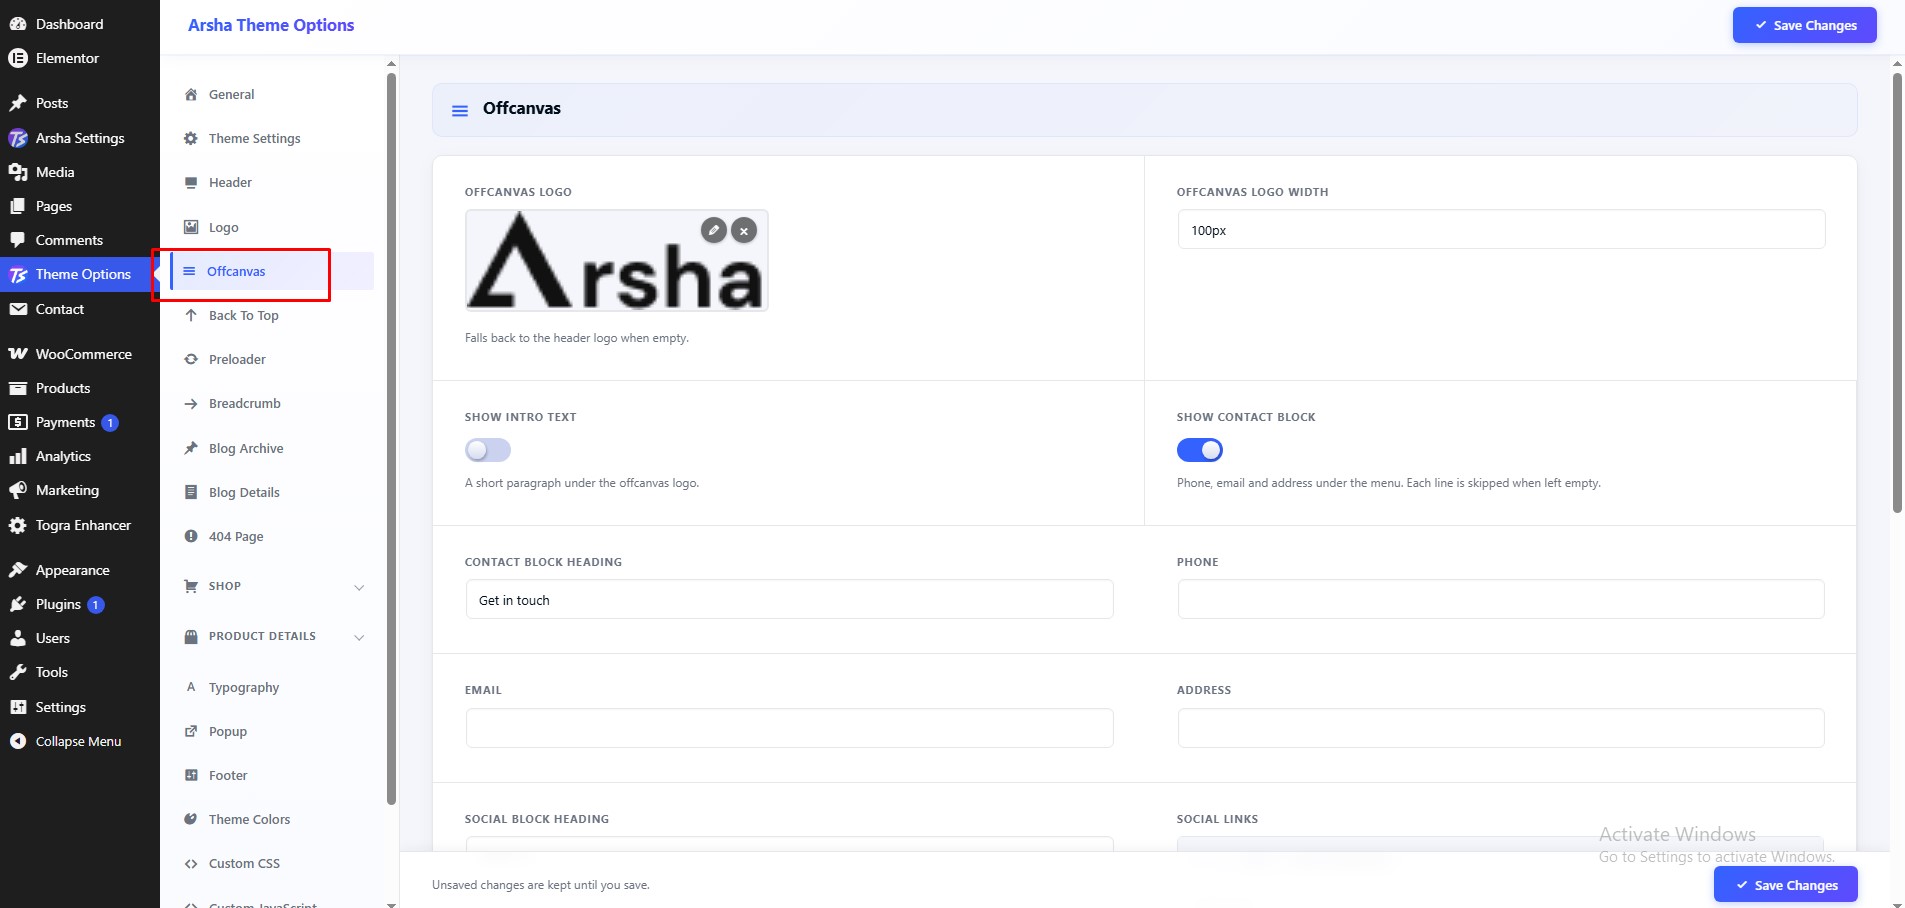
To configure Offcanvas, navigate to Dashboard → Theme Options → Offcanvas.
Features available:
- Offcanvas Logo — Falls back to the header logo when empty.
- Offcanvas Logo Width
- Show Intro Text — A short paragraph under the offcanvas logo.
- Intro Text
Breadcrumb
To configure Breadcrumb, navigate to Dashboard → Theme Options → Breadcrumb.
Features available:
- Show Breadcrumb
- Blog Breadcrumb Title
- Use Elementor Breadcrumb
- Breadcrumb Template
- Padding
- Background Color
Footer
To configure Footer, navigate to Dashboard → Theme Options → Footer.
Features available:
- Use Elementor Footer
- Footer Template
- Copyright Text
Typography
To configure Typography, navigate to Dashboard → Theme Options → Typography.
Set fonts for the body, headings, menu and buttons. Supports Google Fonts and custom uploaded fonts (WOFF, WOFF2, TTF, OTF).
Features available:
- Body Typography
- Heading H1
- Heading H2
- Heading H3
- Heading H4
- Heading H5
- Heading H6
- Menu Typography
- Button Typography
Theme Colors
To configure Theme Colors, navigate to Dashboard → Theme Options → Theme Colors.
Features available:
- Theme Color 1 — Overrides the theme primary accent (--oit-clr-green). Leave empty to keep the default.
- Theme Color 2 — Overrides the theme secondary accent (--oit-clr-yellow).
- Theme Color 3 — Overrides the theme secondary accent (--oit-clr-teal-2).
- Theme Color 4 — Overrides the theme secondary accent (--oit-clr-blue).
- Theme Color 5 — Overrides the theme secondary accent (--oit-clr-green-dark).
- Theme Color 6 — Overrides the theme secondary accent (--oit-clr-green-soft).
- Theme Color 7 — Overrides the theme secondary accent (--oit-clr-forest-rich).
- Theme Color 8 — Overrides the theme secondary accent (--oit-clr-green-neon).
- Theme Color 9 — Overrides the theme secondary accent (--oit-clr-teal).
- Theme Color 10 — Overrides the theme secondary accent (--oit-clr-deep-teal).
- Theme Color 11 — Overrides the theme secondary accent (--oit-clr-olive).
- Theme Color 12 — Overrides the theme secondary accent (--oit-clr-purple).
- Theme Color 13 — Overrides the theme secondary accent (--oit-clr-dark-navy).
- Theme Color 14 — Overrides the theme secondary accent (--oit-gray-1).
- Theme Color 15 — Overrides the theme secondary accent (--oit-gray-2).
- Theme Color 16 — Overrides the theme secondary accent (--oit-text-body).
- Theme Color 17 — Overrides the theme secondary accent (--oit-clr-white).
- Theme Color 18 — Overrides the theme secondary accent (--oit-clr-black).
Popup
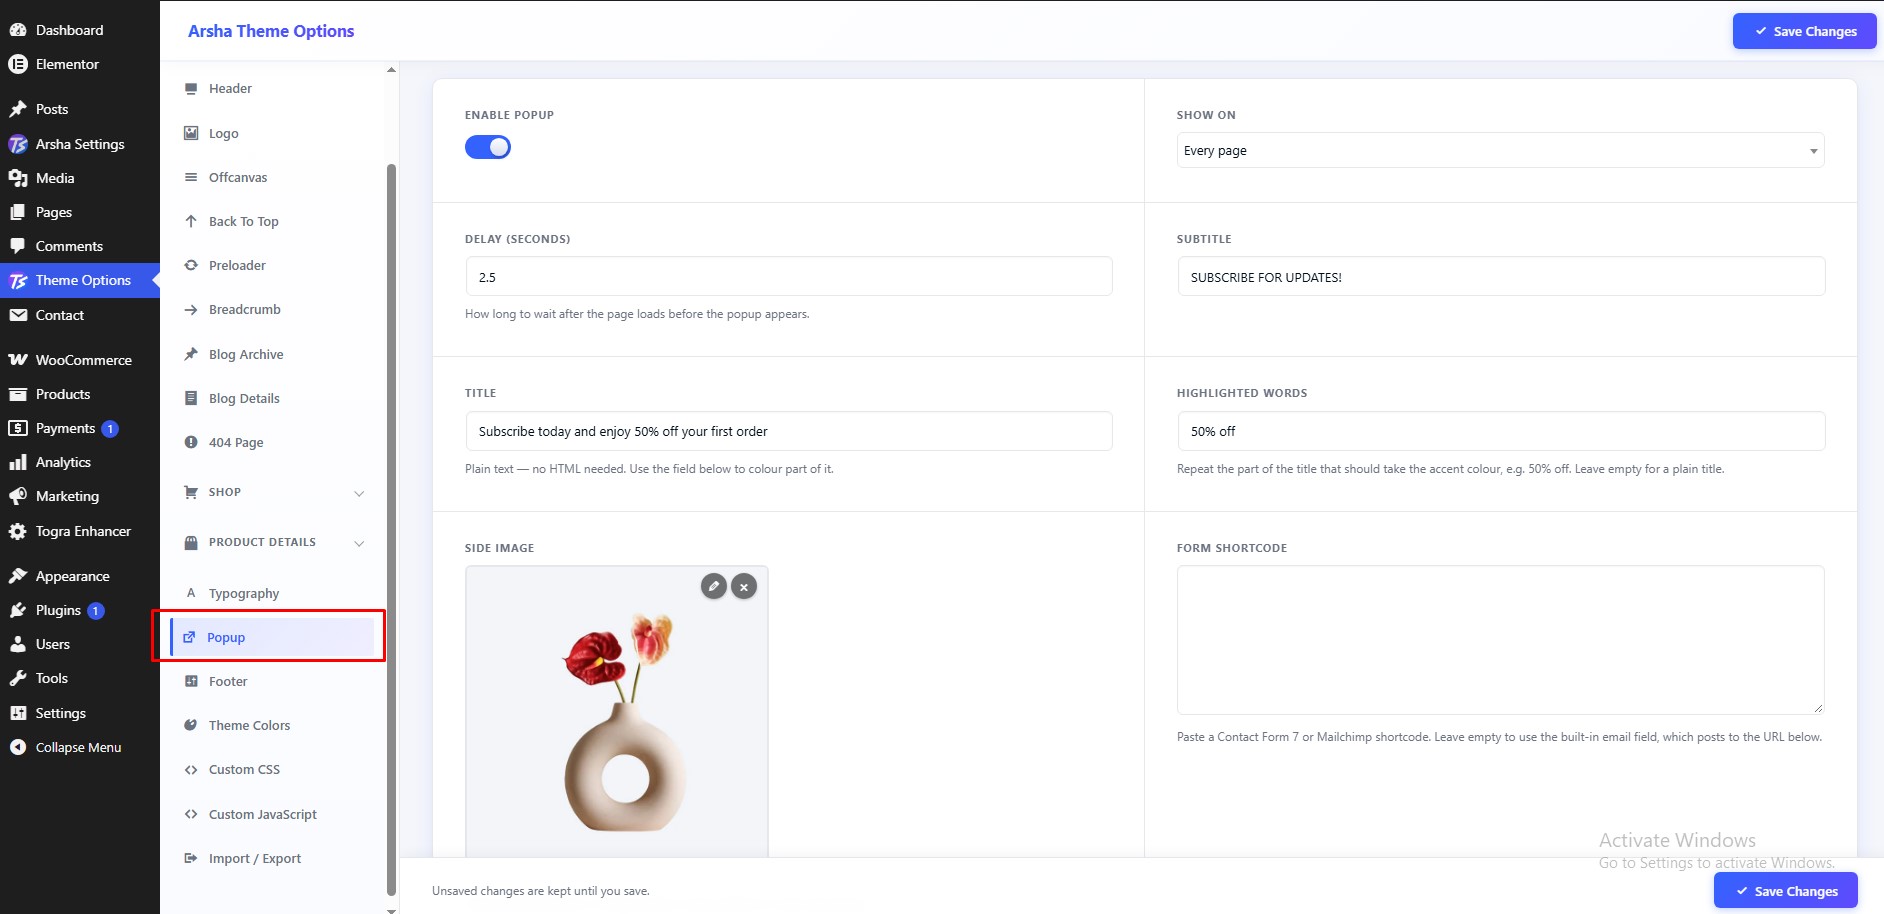
To configure Popup, navigate to Dashboard → Theme Options → Popup.
The newsletter modal that slides in a few seconds after the page loads.
Features available:
- Enable Popup
- Show On
- Delay (seconds) — How long to wait after the page loads before the popup appears.
- Subtitle
- Title — Plain text — no HTML needed. Use the field below to colour part of it.
- Highlighted Words — Repeat the part of the title that should take the accent colour, e.g. 50% off. Leave empty for a plain title.
- Side Image — Shown beside the form on large screens. Leave empty for a text-only popup.
- Form Shortcode — Paste a Contact Form 7 or Mailchimp shortcode. Leave empty to use the built-in email field, which posts to the URL below.
- Built-in Form Action URL — Where the built-in email field submits to — a Mailchimp or Brevo list URL, for example. Only used when no shortcode is set.
- Email Placeholder
- Button Text
- Social Links — Leave empty to hide the row entirely.
- Show "Don't show this again"
- Checkbox Label
- Remember For (days) — How long the popup stays hidden after the visitor ticks the box.
Blog Archive
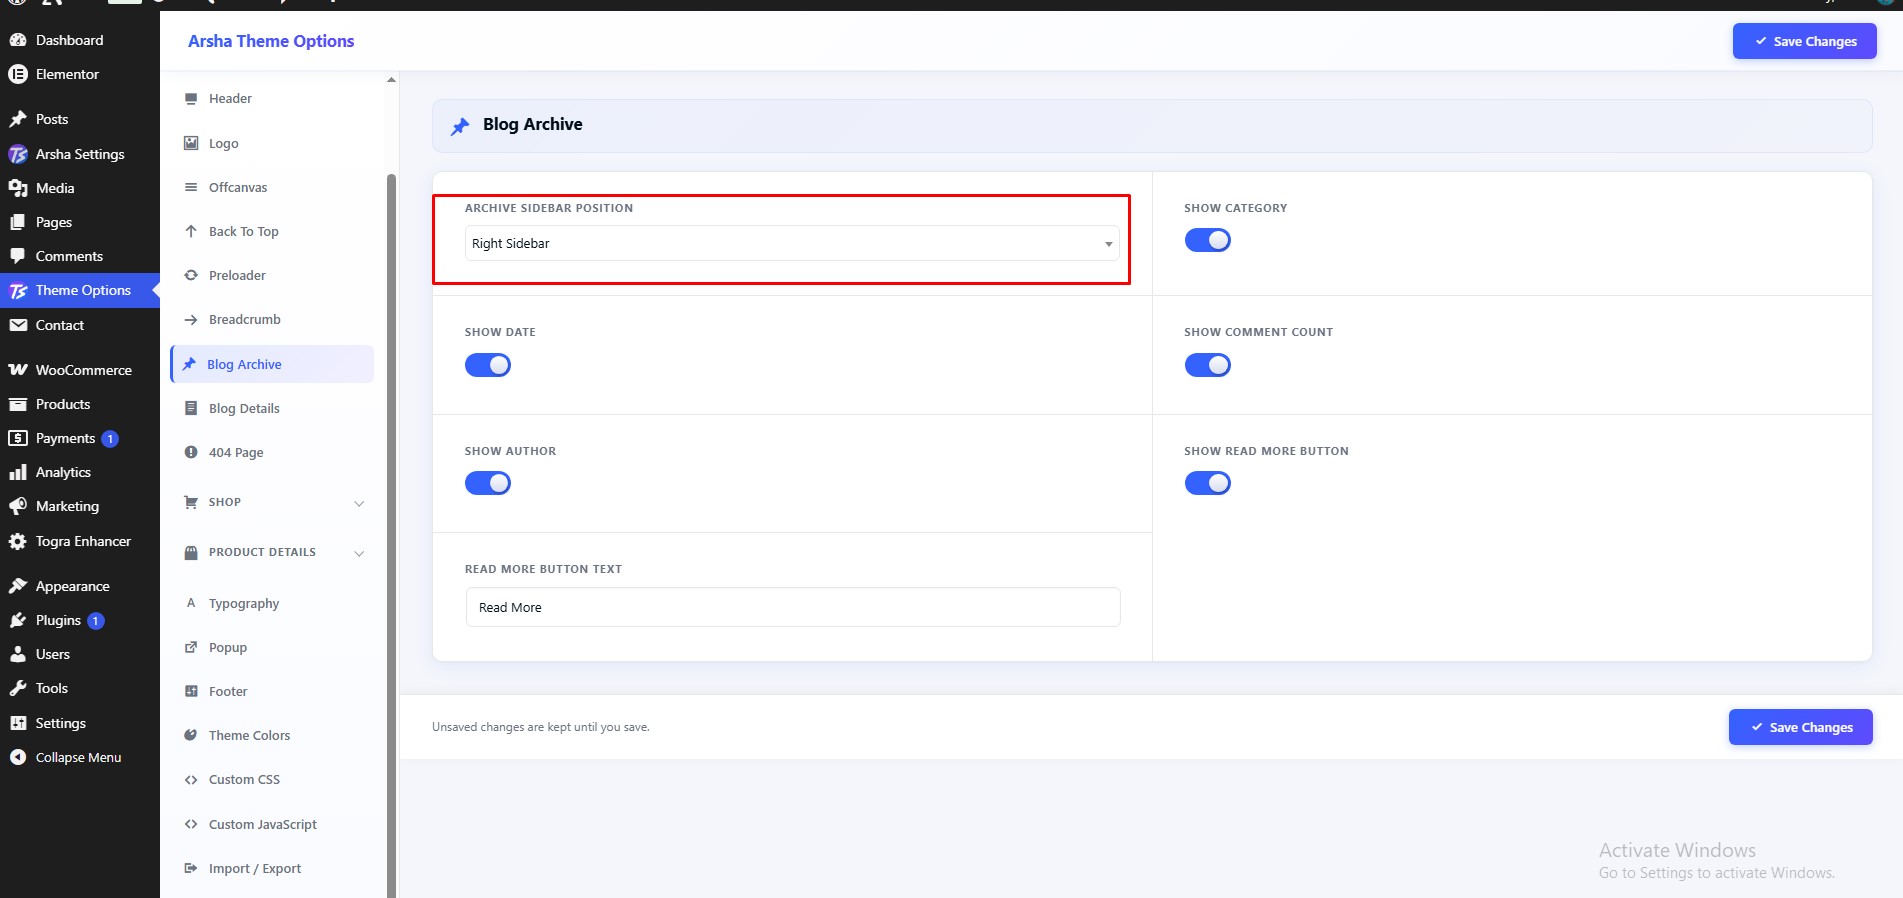
To configure Blog Archive, navigate to Dashboard → Theme Options → Blog Archive.
Features available:
- Archive Sidebar Position
- Show Category
- Show Date
- Show Comment Count
- Show Author
- Show Read More Button
- Read More Button Text
Blog Details
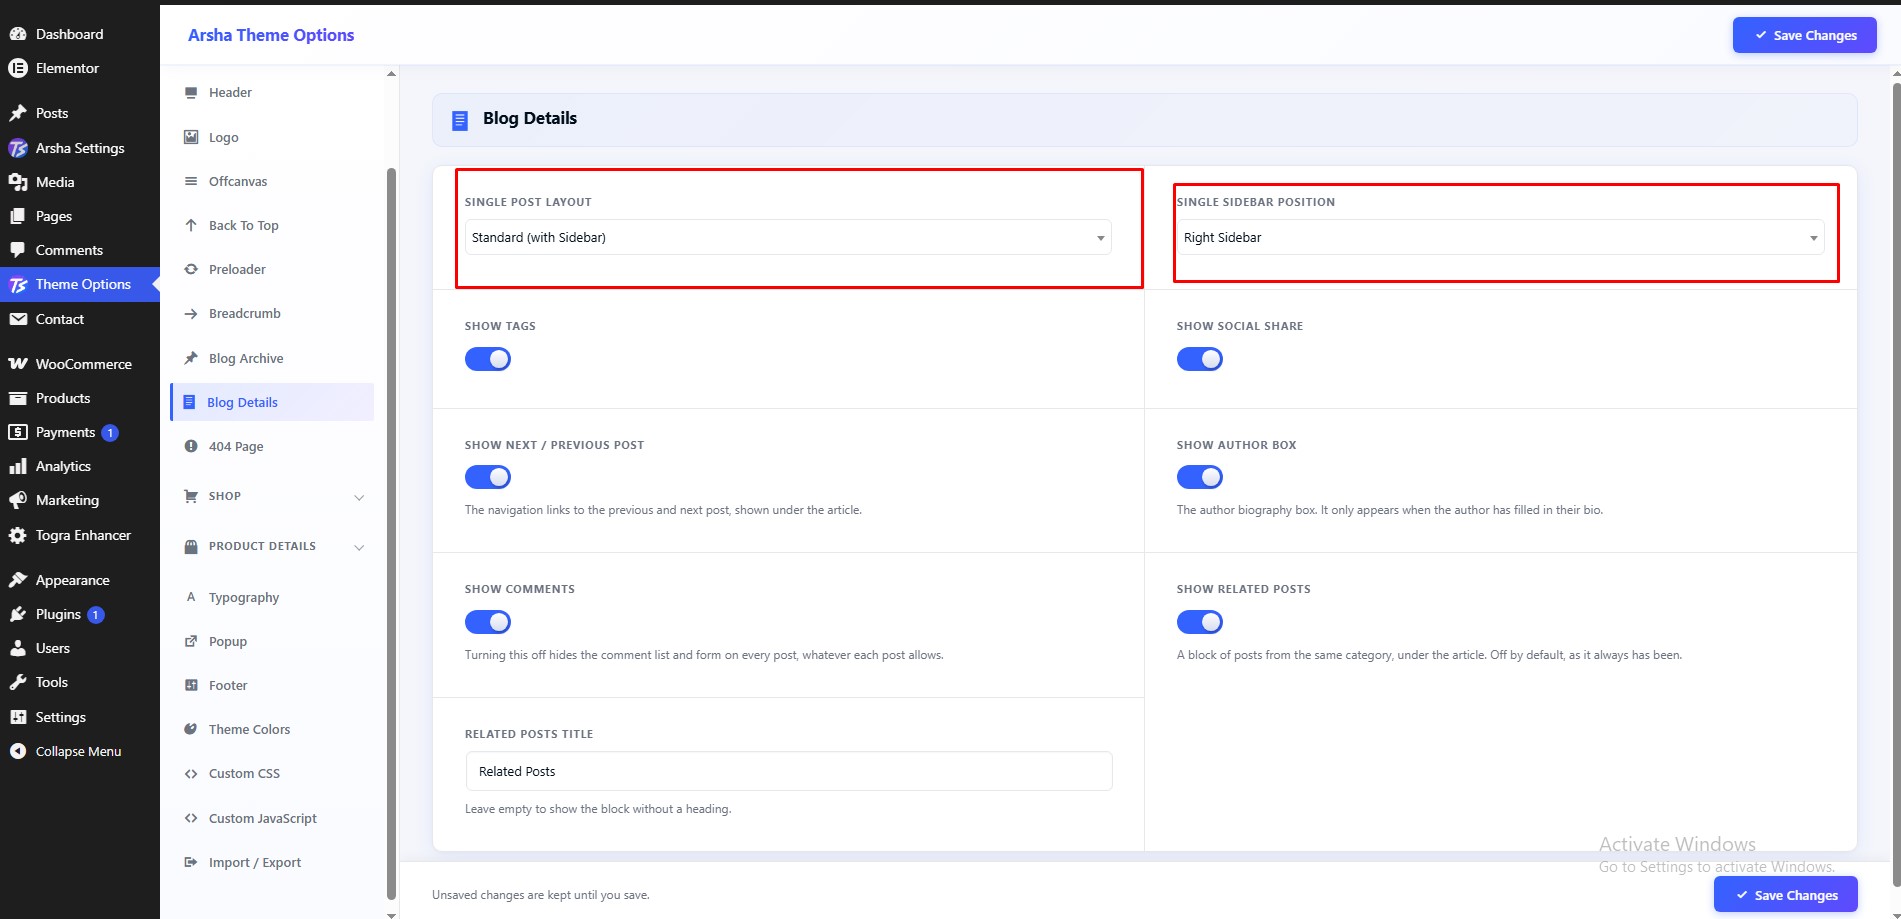
To configure Blog Details, navigate to Dashboard → Theme Options → Blog Details.
Features available:
- Single Post Layout
- Single Sidebar Position
- Show Tags
- Show Social Share
- Show Next / Previous Post — The navigation links to the previous and next post, shown under the article.
- Show Author Box — The author biography box. It only appears when the author has filled in their bio.
- Show Comments — Turning this off hides the comment list and form on every post, whatever each post allows.
- Show Related Posts — A block of posts from the same category, under the article. Off by default, as it always has been.
- Related Posts Title — Leave empty to show the block without a heading.
Theme Options
Back to top, preloader, 404 page and slug settings. For every option in the panel, with defaults and choices, see Theme Options reference below.
Back To Top
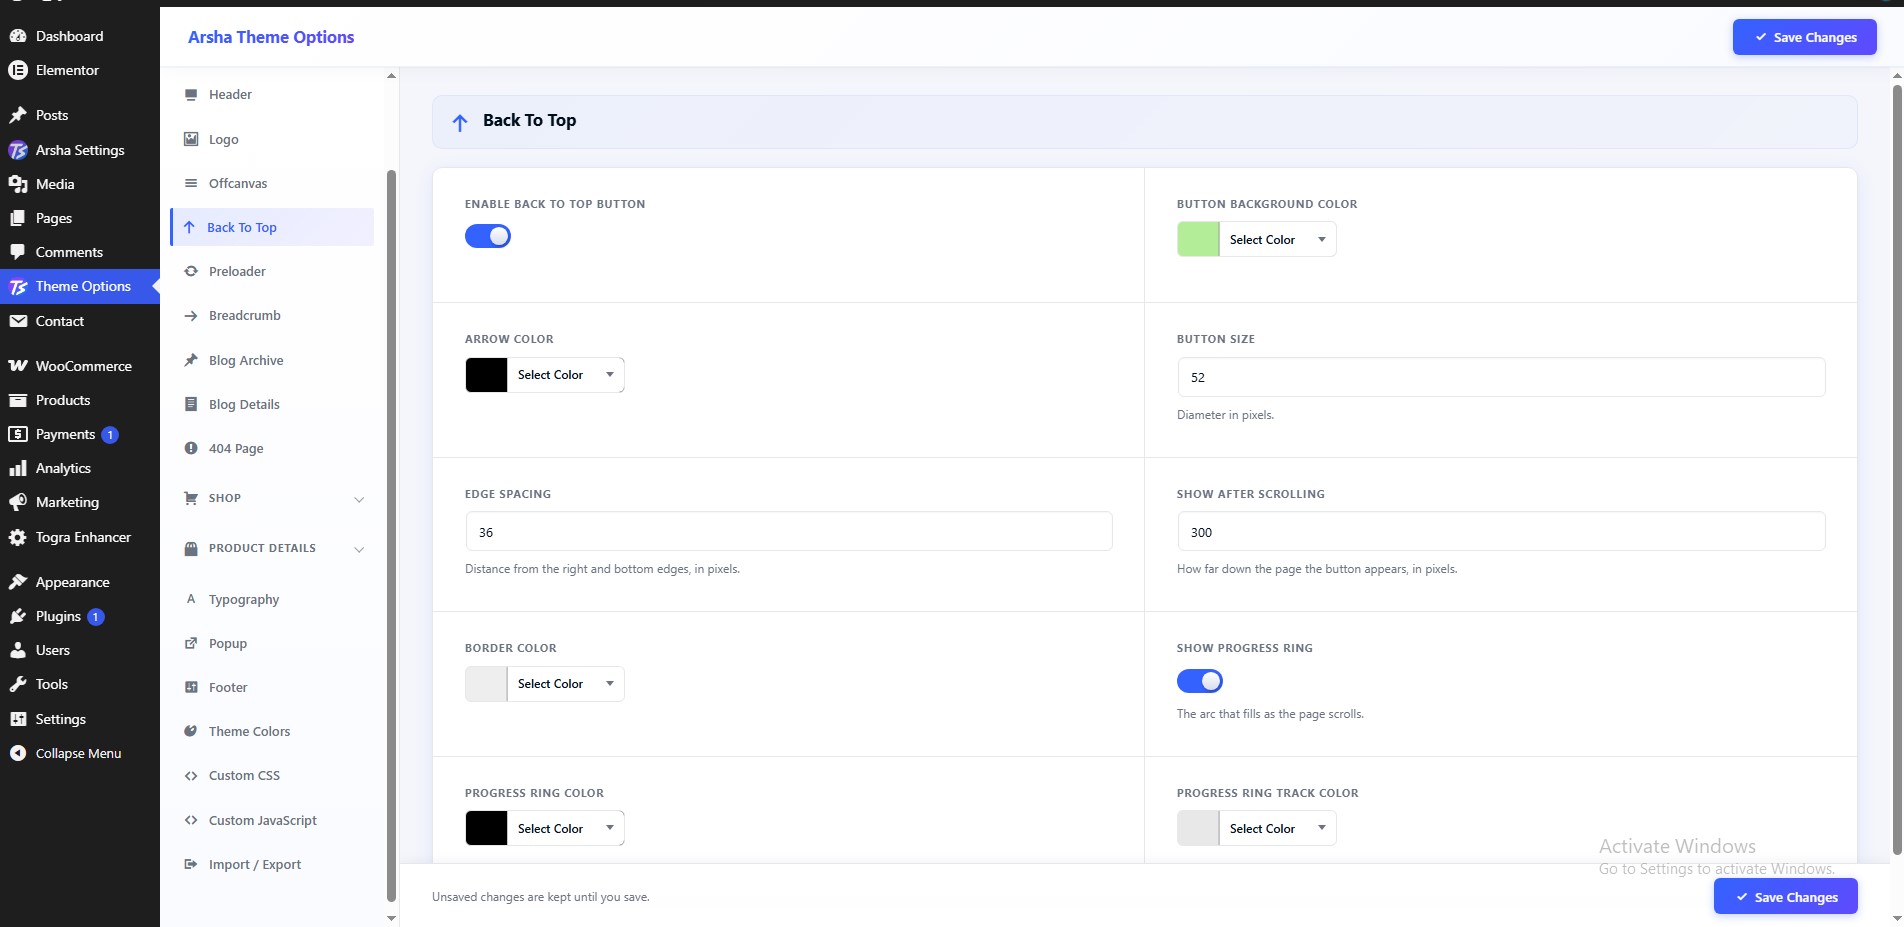
To configure Back To Top, navigate to Dashboard → Theme Options → Back To Top.
Features available:
- Enable Back To Top Button
- Button Background Color
- Arrow Color
Preloader
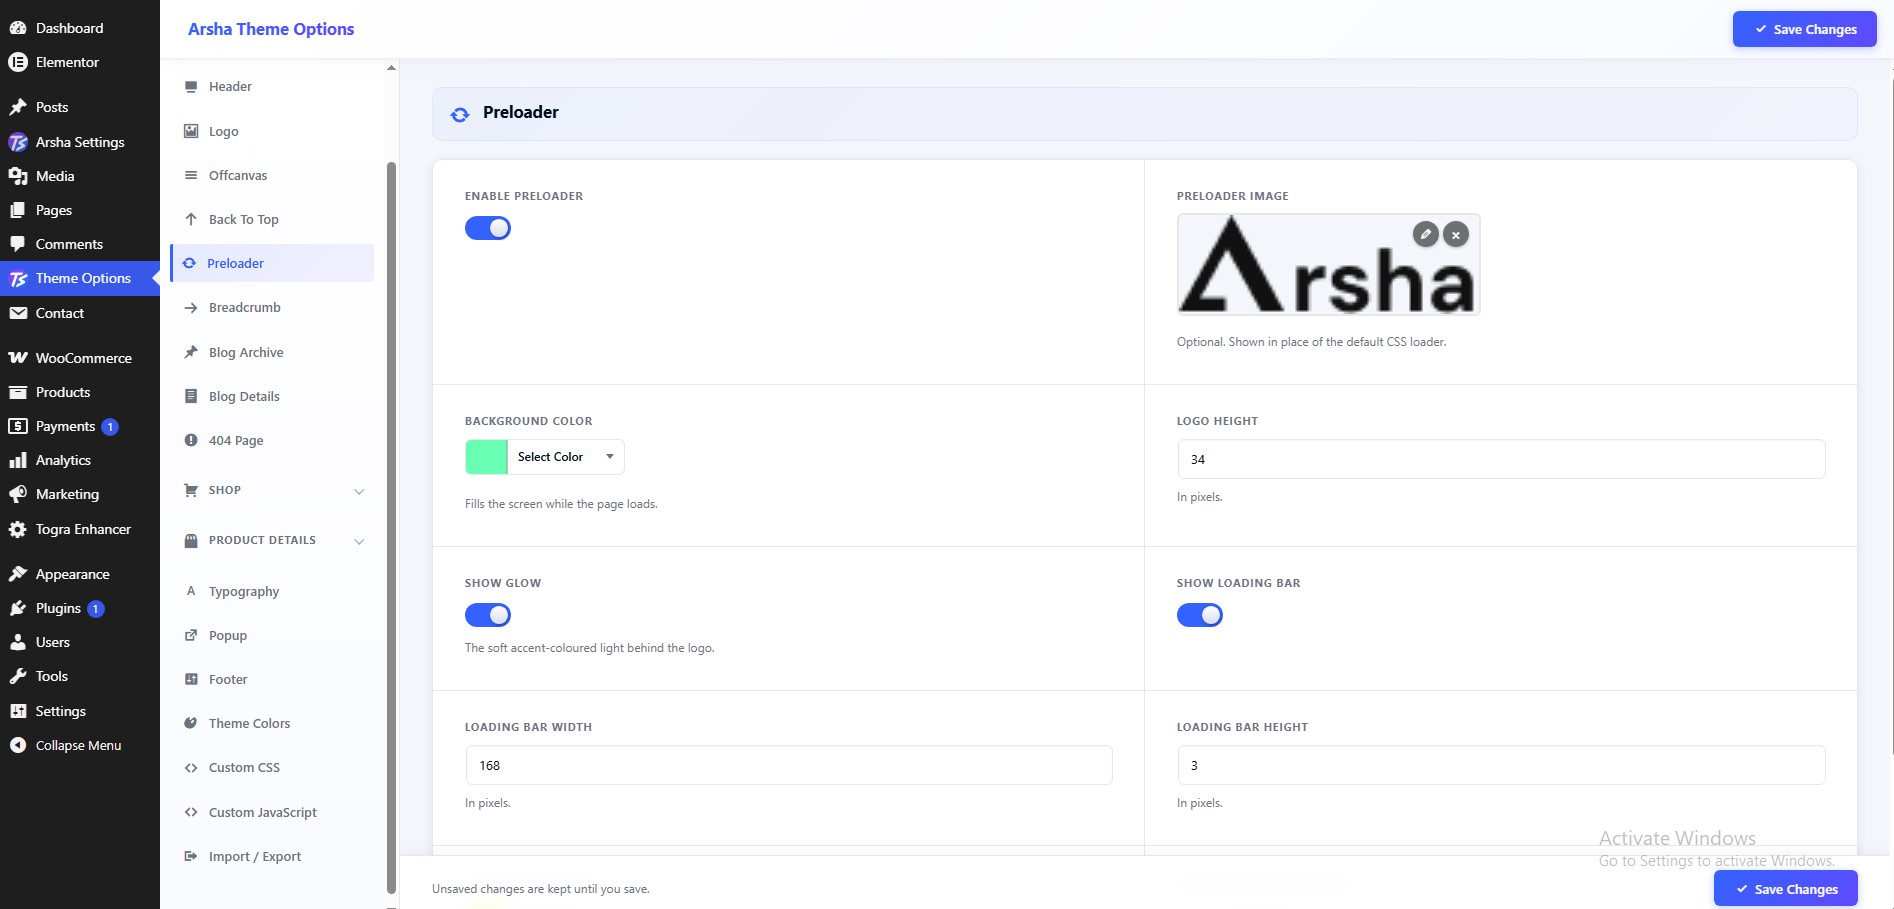
To configure Preloader, navigate to Dashboard → Theme Options → Preloader.
Features available:
- Enable Preloader
- Preloader Image — Optional. Shown in place of the default CSS loader.
- Preloader Image — Optional. Shown in place of the default CSS loader.
- Preloader Title
404 Page
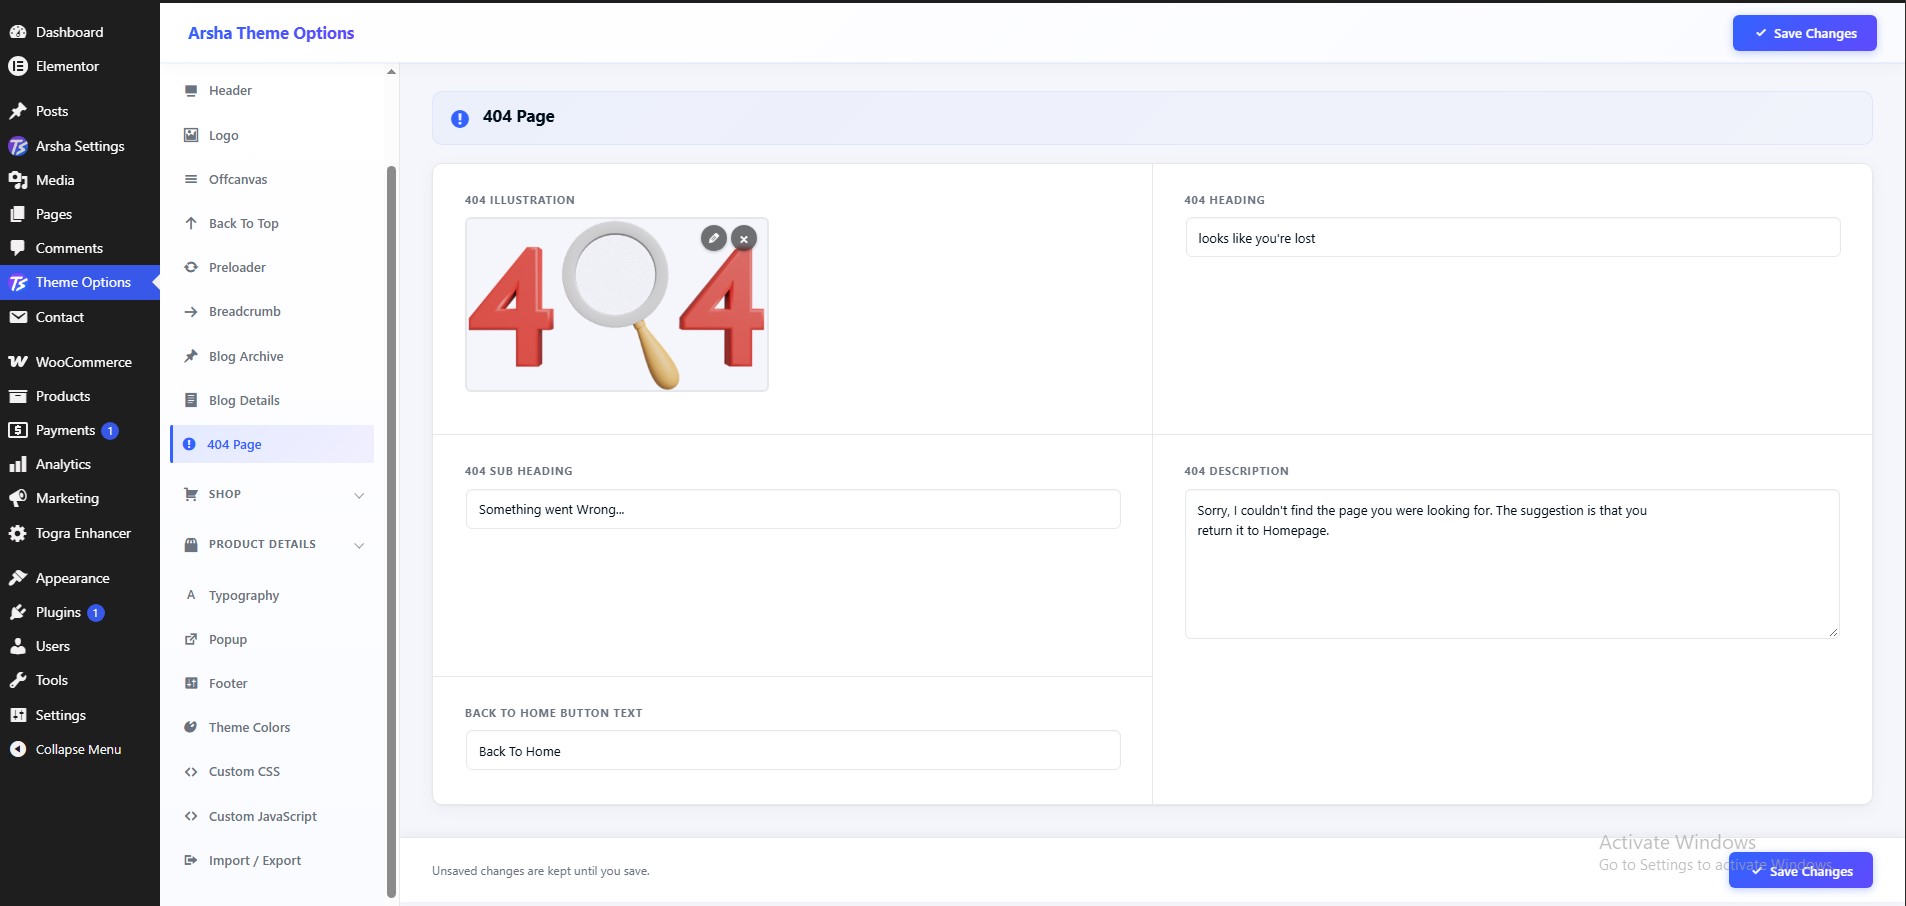
To configure 404 Page, navigate to Dashboard → Theme Options → 404 Page.
Features available:
- 404 Illustration
- 404 Heading
- 404 Sub Heading
- 404 Description
- Back To Home Button Text
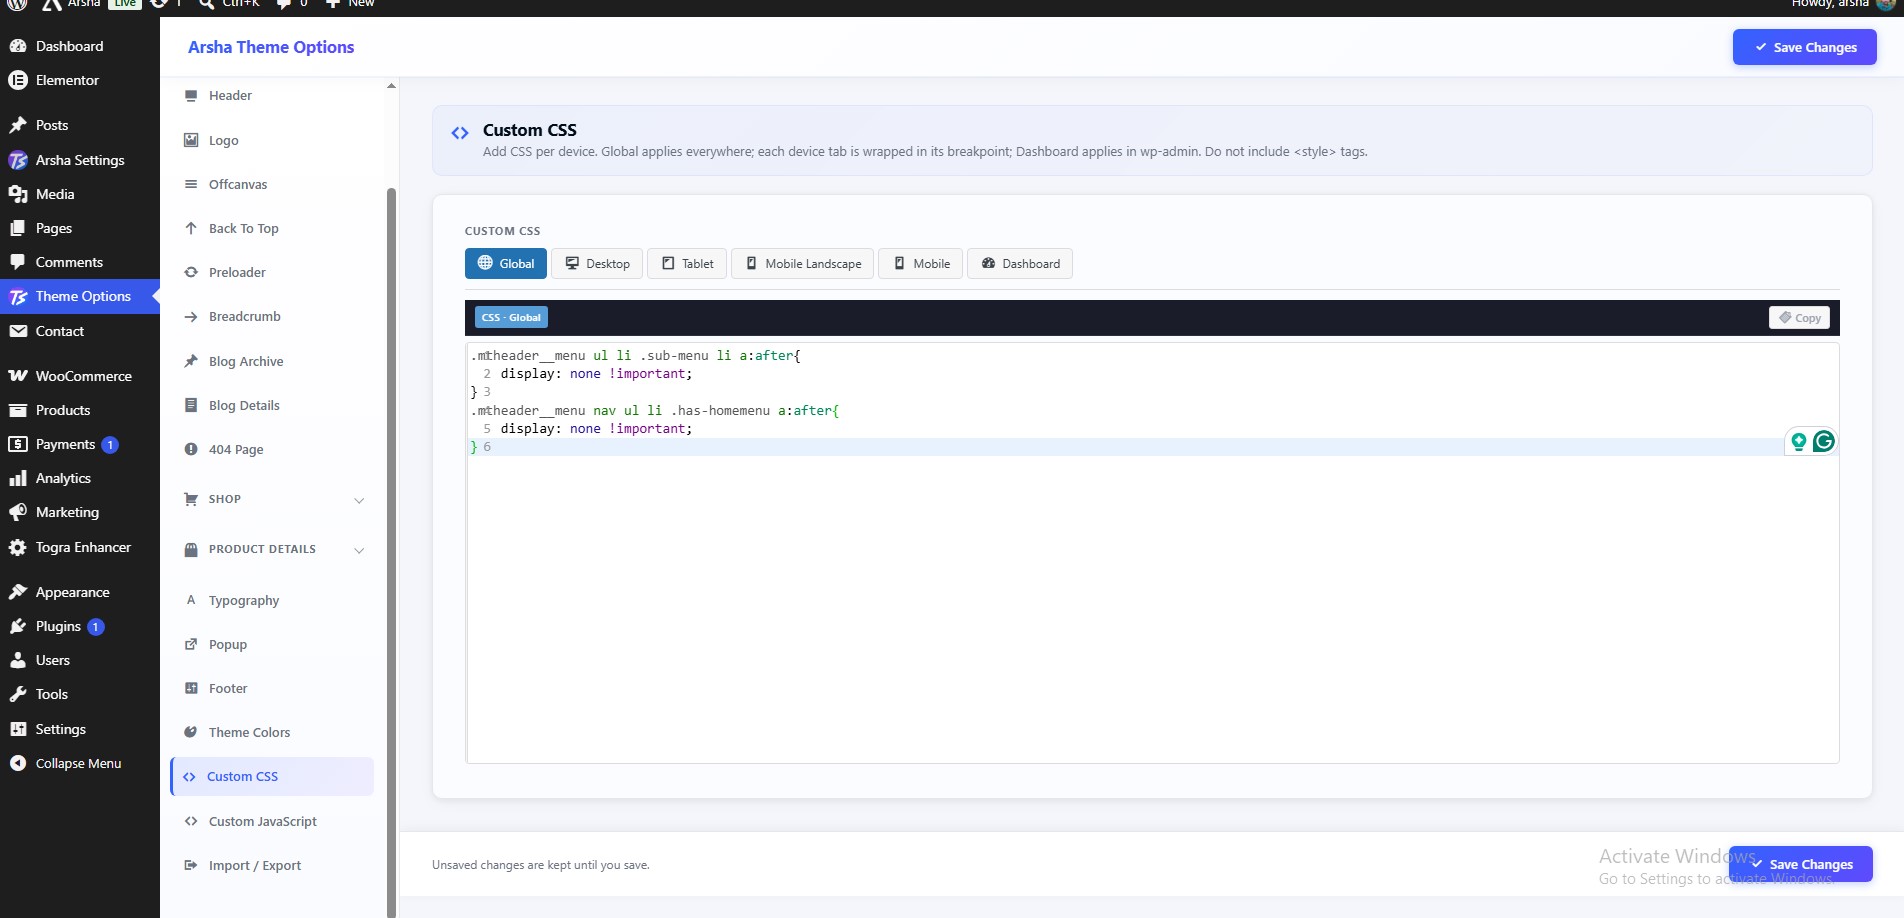
Custom CSS
To configure Custom CSS, navigate to Dashboard → Theme Options → Custom CSS.
Add CSS per device. Global applies everywhere; each device tab is wrapped in its breakpoint; Dashboard applies in wp-admin. Do not include <style> tags.
Features available:
- Custom CSS
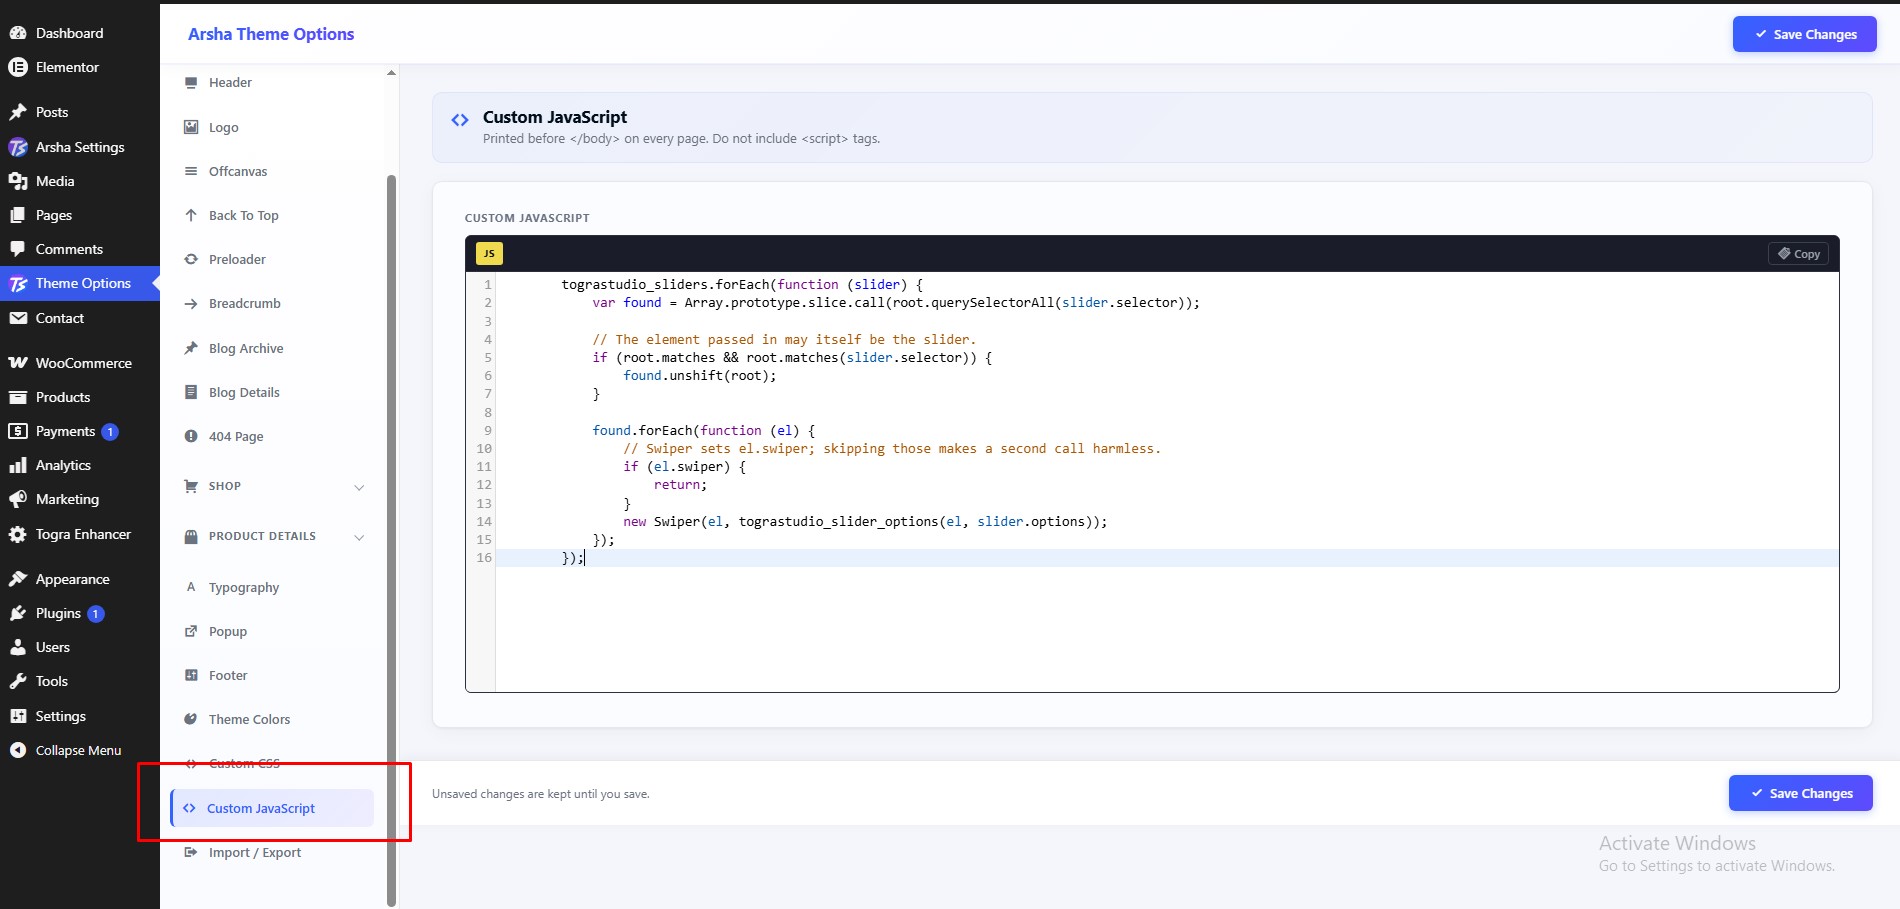
Custom JavaScript
To configure Custom JavaScript, navigate to Dashboard → Theme Options → Custom JavaScript.
Printed before </body> on every page. Do not include <script> tags.
Features available:
- Custom JavaScript
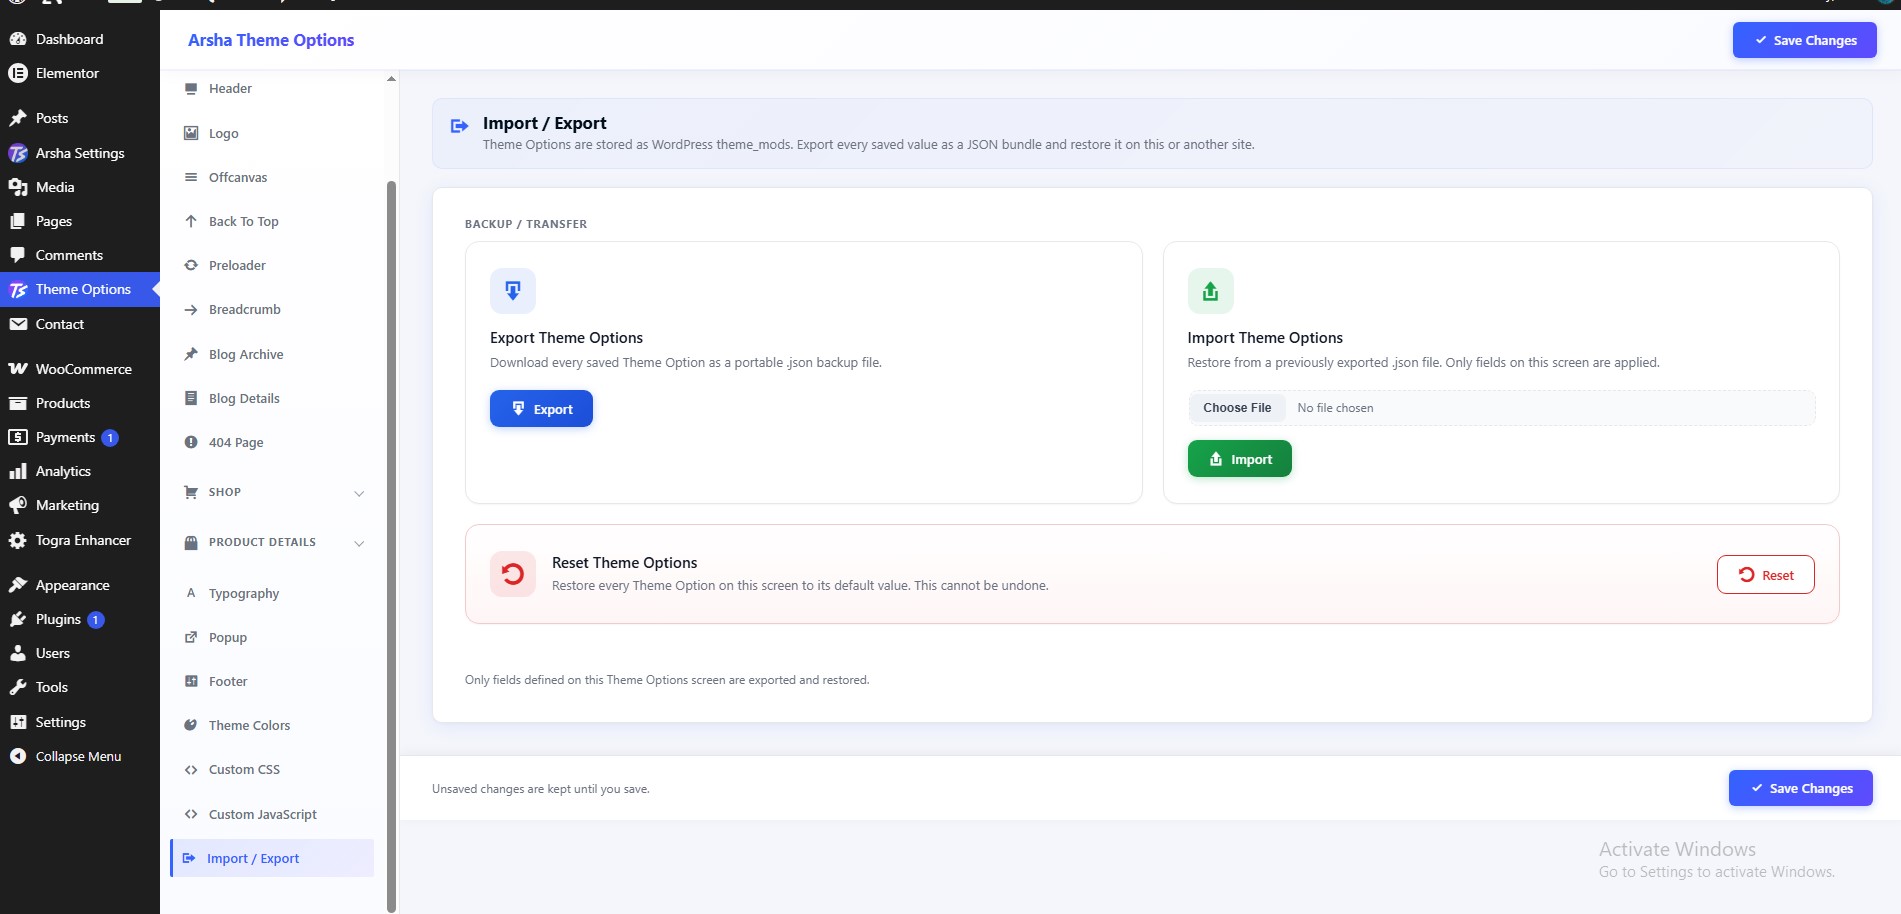
Import / Export
To configure Import / Export, navigate to Dashboard → Theme Options → Import / Export.
Theme Options are stored as WordPress theme_mods. Export every saved value as a JSON bundle and restore it on this or another site.
Features available:
- Backup / Transfer — Only fields defined on this Theme Options screen are exported and restored.
WooCommerce Store
Add products and organize your grocery, food delivery or organic shop with WooCommerce. Product cards and shop layouts are styled to match Rosun.
Adding Products
- From the dashboard, open Products → Add New.
- Enter the product name and description, set its price and inventory, choose a product category, and add product images.
- For variable products, add attributes and variations before publishing.
- Preview the product page and confirm the price, stock, images and shipping information.
WooCommerce manages products, categories, inventory, cart and checkout. Configure payment, tax, shipping and store emails in WooCommerce → Settings before accepting orders. See the WooCommerce documentation for store-specific setup.
Shop pages and product widgets
- WooCommerce creates the Shop, Cart, Checkout and My Account pages during setup. Check their assignments in WooCommerce → Settings → Advanced.
- Use Products → Categories to organize products. Add a category image if you want it to appear in category widgets.
- Build landing pages with Elementor. Search the widget panel for Rosun product, category, sale, featured, recent or tab widgets.
- Change product-card and single-product features in Theme Options → Shop.
Use a staging site to test payment and delivery settings. A test order helps confirm the full customer checkout flow before launch.
Rosun Core
Rosun Core adds the theme's Elementor widgets and custom content screens. Use its settings page to manage template and content URL slugs.
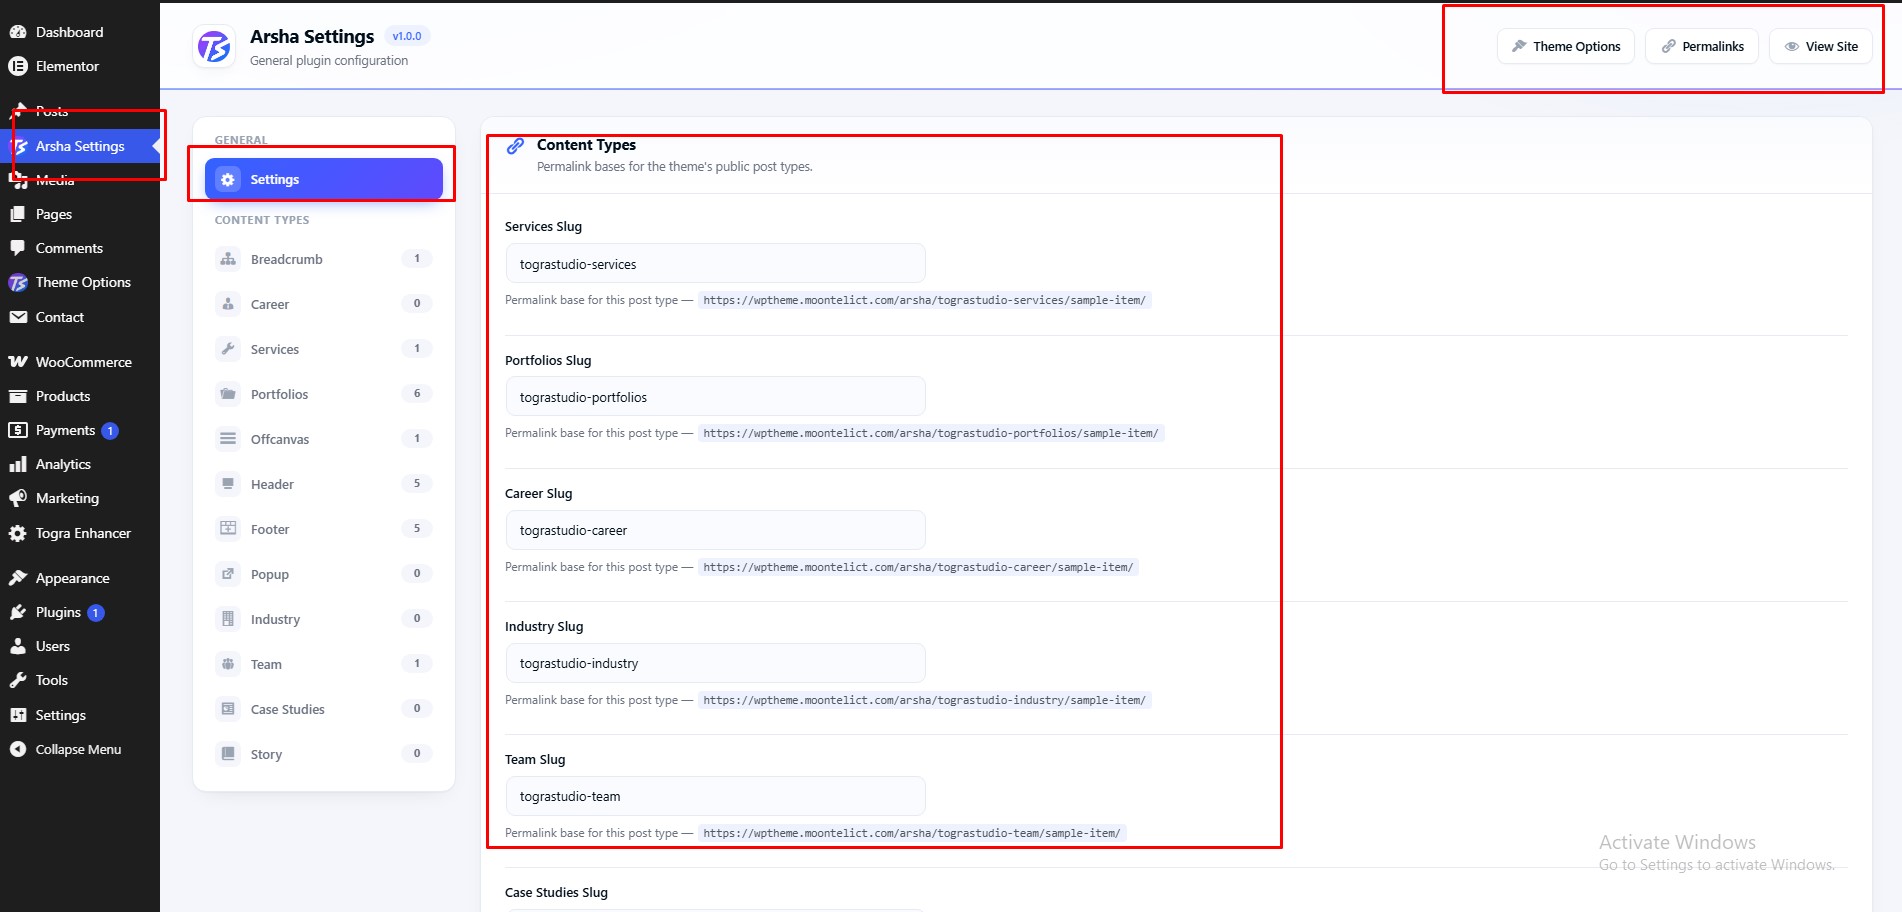
Settings Screen Overview
To open the screen, navigate to Dashboard → Rosun Settings. It is available to administrators when the Rosun Core plugin is active.
Features available:
- Settings — the URL slugs for the theme's content types and Elementor templates.
- Content Types — manage Header, Footer, Offcanvas, Breadcrumb, Popup, Services, Portfolios, Team, Story, Industry, Career and Case Studies.
- Theme Options button — opens Dashboard → Theme Options.
- Permalinks button — opens Settings → Permalinks.
- View Site button — opens your website in a new tab.
General Settings
To change URL slugs, navigate to Dashboard → Rosun Settings → Settings.
A slug is the part of the web address in front of an item's name, for example
yoursite.com/tograstudio-services/sample-service/. Under each field the screen
shows the full address with the slug you entered.
Content Types:
- Services Slug — web address base for Services items.
- Portfolios Slug — web address base for Portfolios items.
- Career Slug — web address base for Career items.
Template Types:
- Header Slug — web address base for Elementor header templates.
- Footer Slug — web address base for Elementor footer templates.
- Offcanvas Slug — web address base for Elementor offcanvas templates.
- Breadcrumb Slug — web address base for Elementor breadcrumb templates.
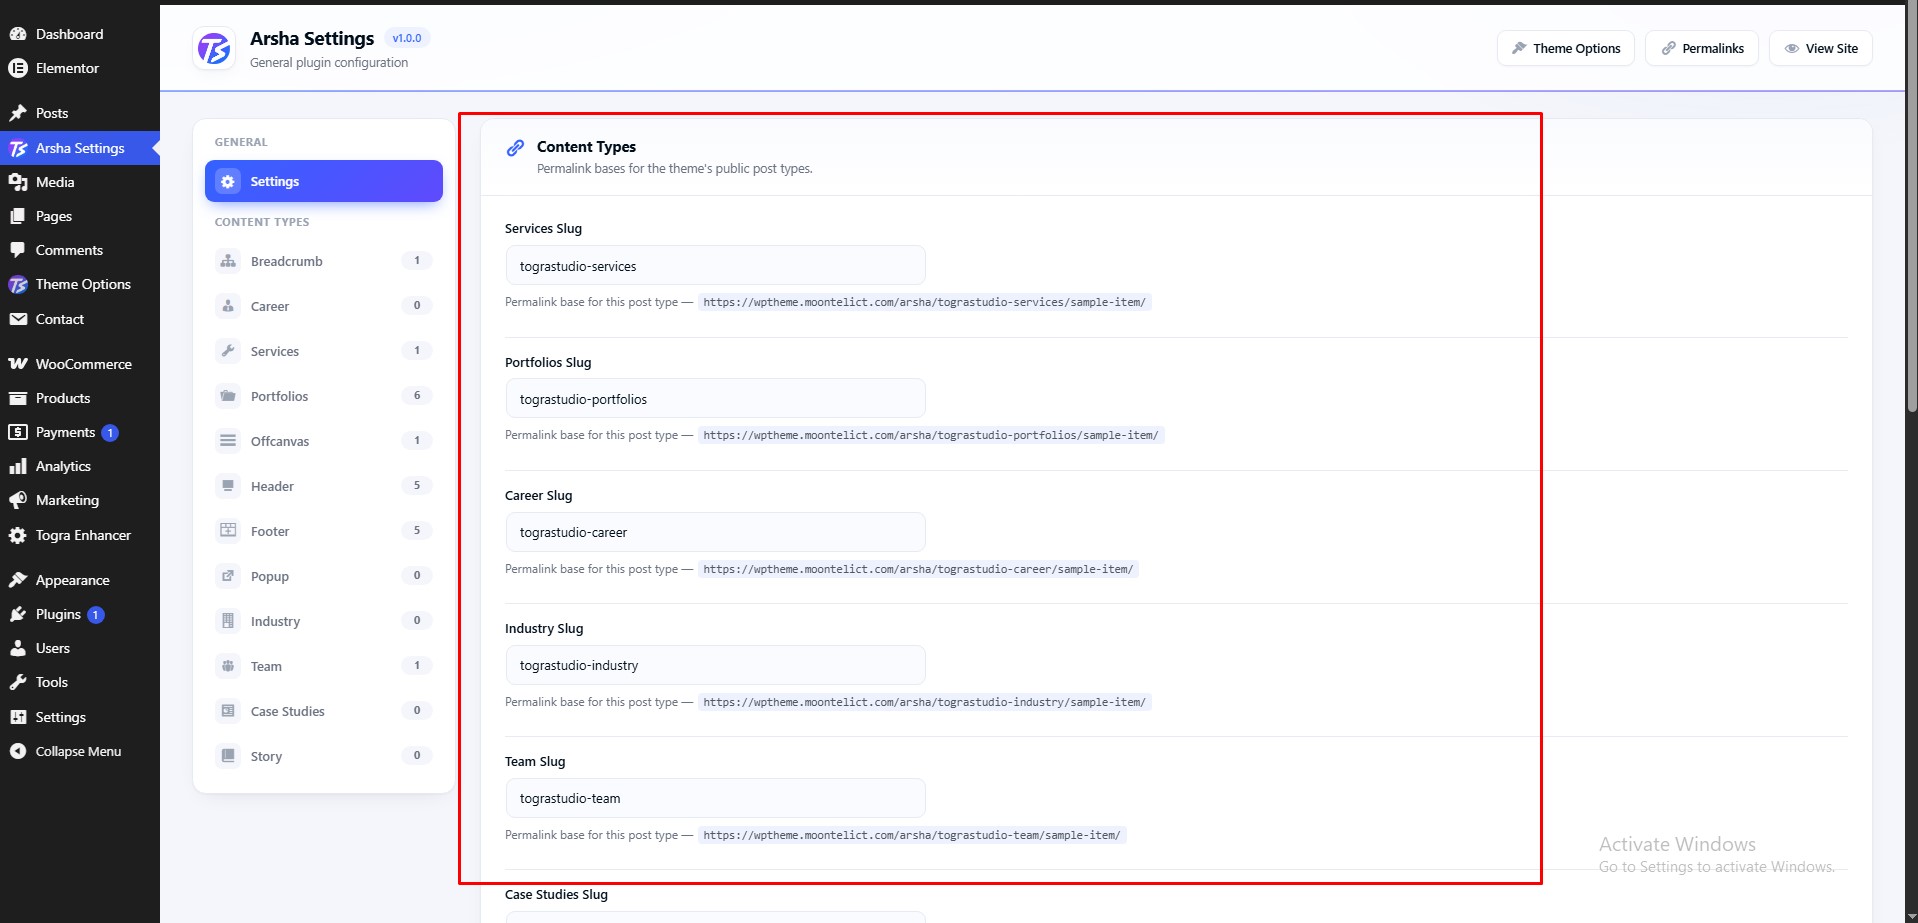
Click Save Settings to apply your changes.
Leave a field empty to go back to its default slug. Two types cannot share the same slug — if you try, that field keeps its previous value and a message tells you which type already uses it. If an address shows a 404 after a change, open Settings → Permalinks and click Save Changes.
Content Types
Each tab lists the items of one type and lets you add new ones. Templates are designed with Elementor, then chosen in Theme Options or on a single page.
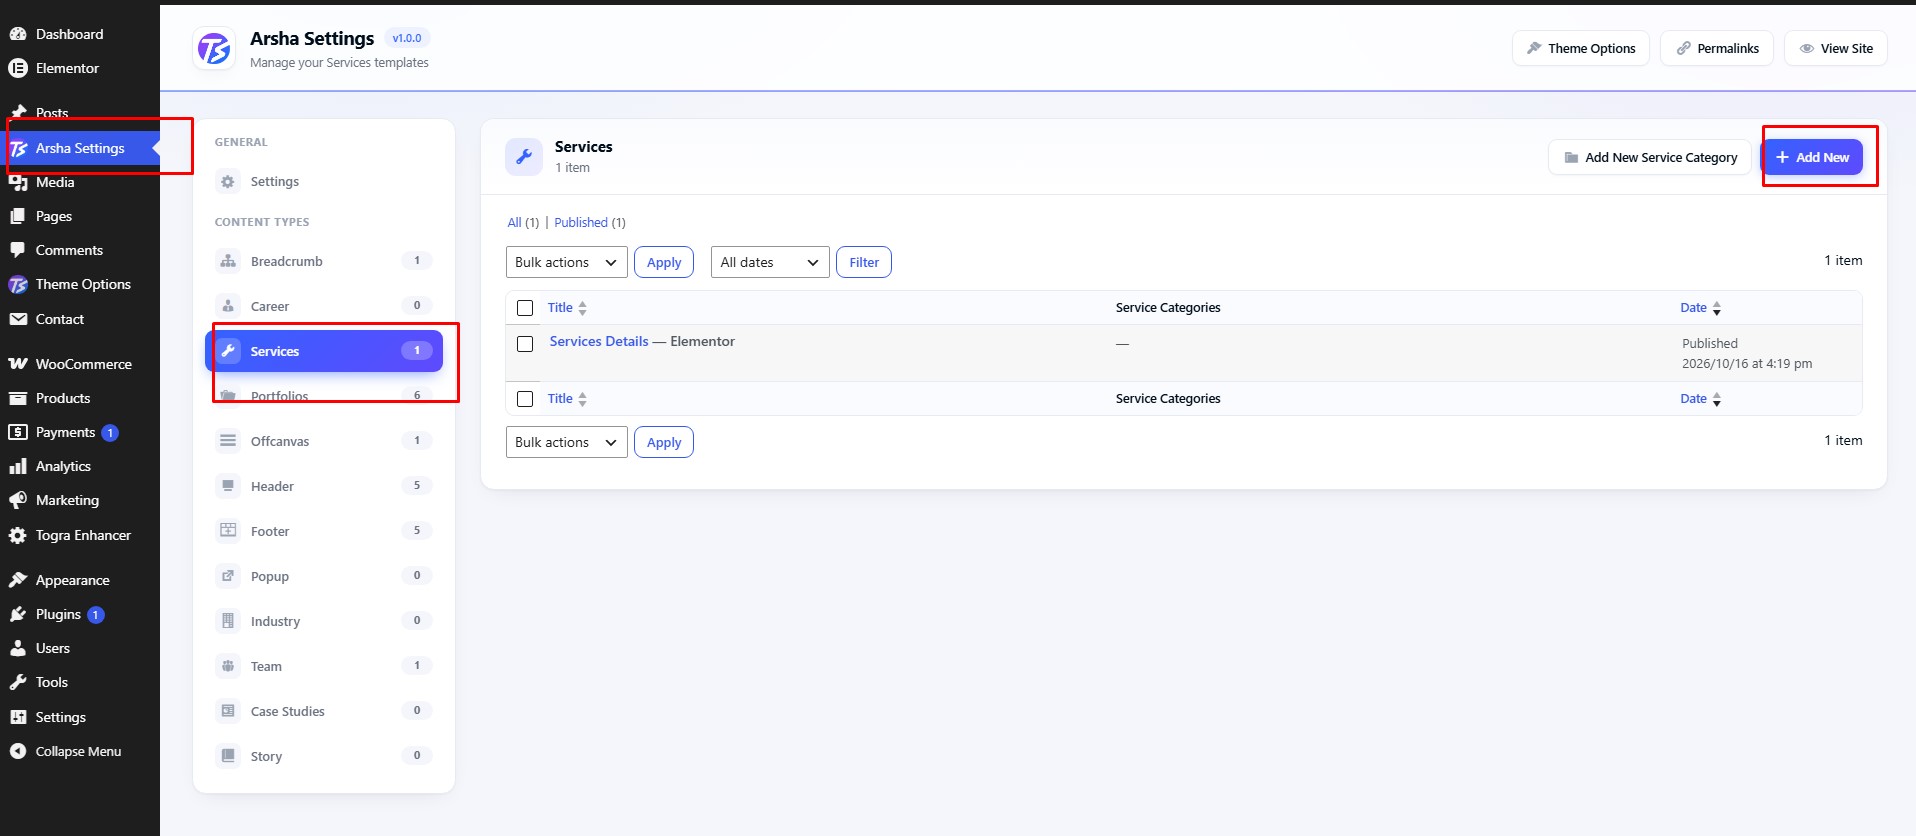
Services
To manage your services, navigate to Dashboard → Rosun Settings → Services.
Features available:
- Add New — create a service with its own page.
- Item list — search, filter by date, and edit, quick edit, trash or restore items, the same way as the WordPress Pages screen.
- Web address — each service lives under the Services slug set in General Settings.
- Page settings — each service has the same Breadcrumb and Header & Footer settings as a page.
Portfolios
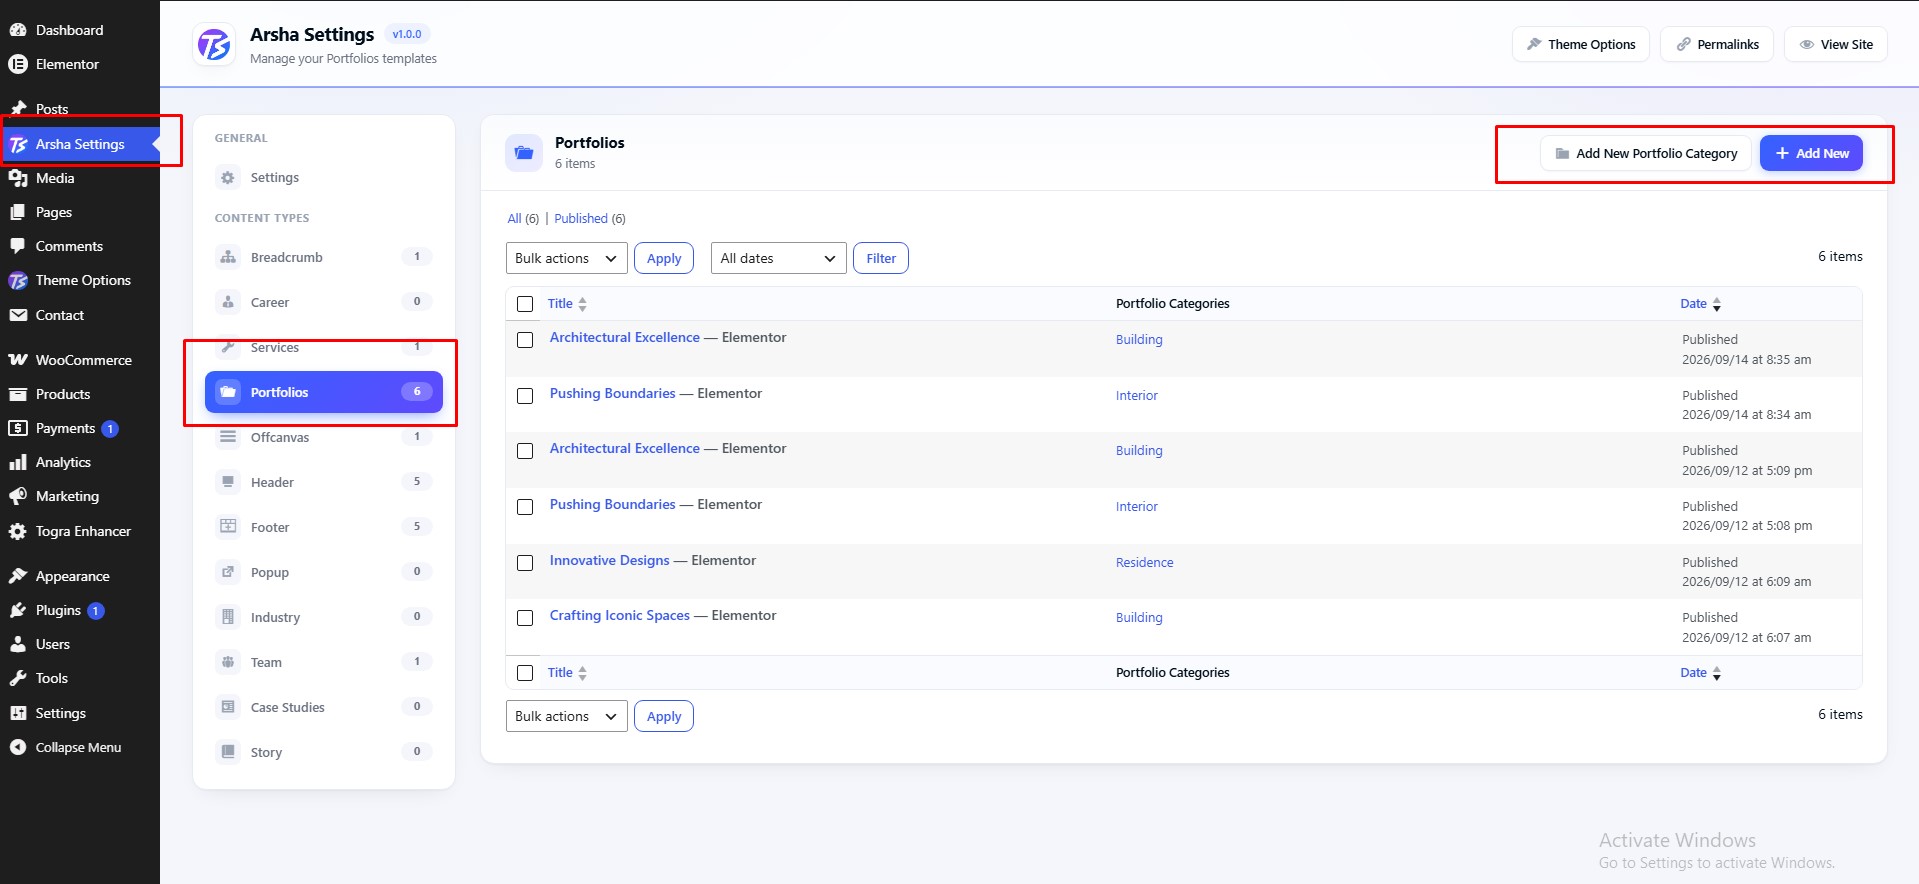
To manage your portfolio items, navigate to Dashboard → Rosun Settings → Portfolios.
Features available:
- Add New — create a portfolio item with its own page.
- Item list — search, filter by date, and edit, quick edit, trash or restore items, the same way as the WordPress Pages screen.
- Web address — each item lives under the Portfolios slug set in General Settings.
- Page settings — each item has the same Breadcrumb and Header & Footer settings as a page.
Career
To manage your career posts, navigate to Dashboard → Rosun Settings → Career.
Features available:
- Add New — create a career or job post with its own page.
- Item list — search, filter by date, and edit, quick edit, trash or restore items, the same way as the WordPress Pages screen.
- Web address — each post lives under the Career slug set in General Settings.
- Page settings — each post has the same Breadcrumb and Header & Footer settings as a page.
Team
Open Dashboard → Rosun Settings → Team to add or edit team profiles. Add a title, profile image and the available team details, then publish the entry. Use the matching Rosun Elementor widget to display team content on a page.
Popup templates
Open Dashboard → Rosun Settings → Popup to manage popup template entries. Popup display and newsletter content are configured separately in Dashboard → Theme Options → Popup. After editing, preview the storefront to confirm the popup's content and display behavior.
Rosun Core also provides Industry, Case Studies and Story content screens. Their available fields and frontend layouts depend on the installed theme features and Elementor widgets.
Elementor Page Builder Options
Rosun Core adds Elementor widgets for building grocery and food-shop pages, product listings and theme templates. The available widgets depend on the active plugins.
Elementor Widgets
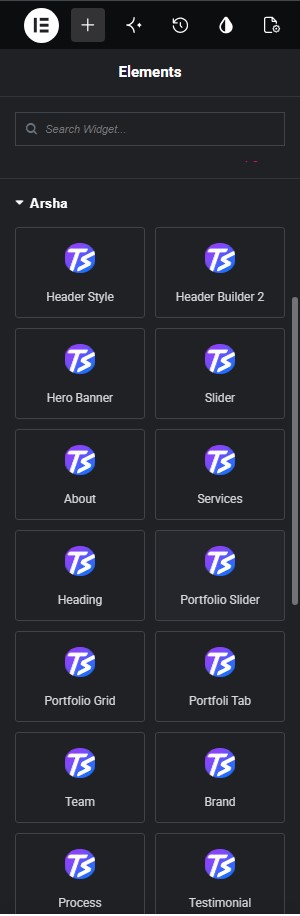
Elementor includes its own general-purpose widgets. Rosun Core adds theme-specific widgets; search the Elementor panel for Rosun or Rosun Core to find them. WooCommerce widgets and product-related Rosun widgets require WooCommerce to be active.
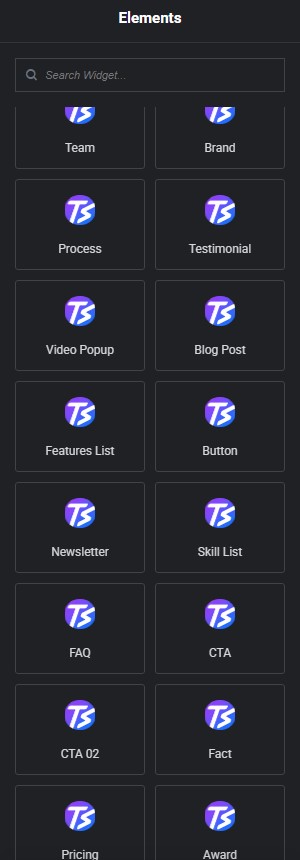
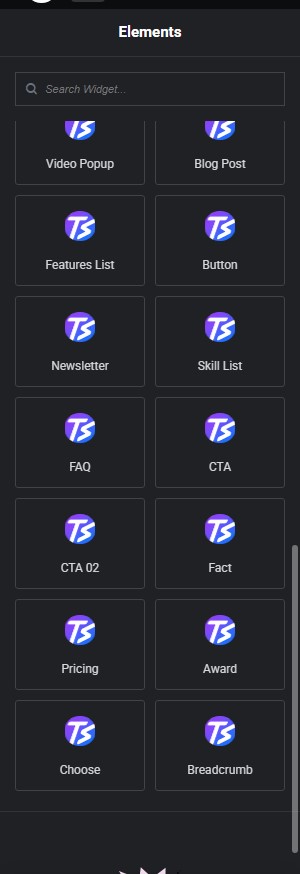
26 general Rosun widgets: Header Builder 1, Header Builder 2, Footer Style 1, Breadcrumb, Mega Menu Links, Mega Menu Demo, Banner, Slider, About, Heading, Team, Team Details, Brand, Testimonial, Blog Post, Features, Button, Newsletter, Skill List, FAQ, CTA, Fact, Choose, Contact Info, Contact Form, and Image.
5 additional WooCommerce widgets: Product Feature, Category Slider, Product Tab, Product Sale, and Product Recent. These appear when WooCommerce is active.
Elementor Big Icon Issue
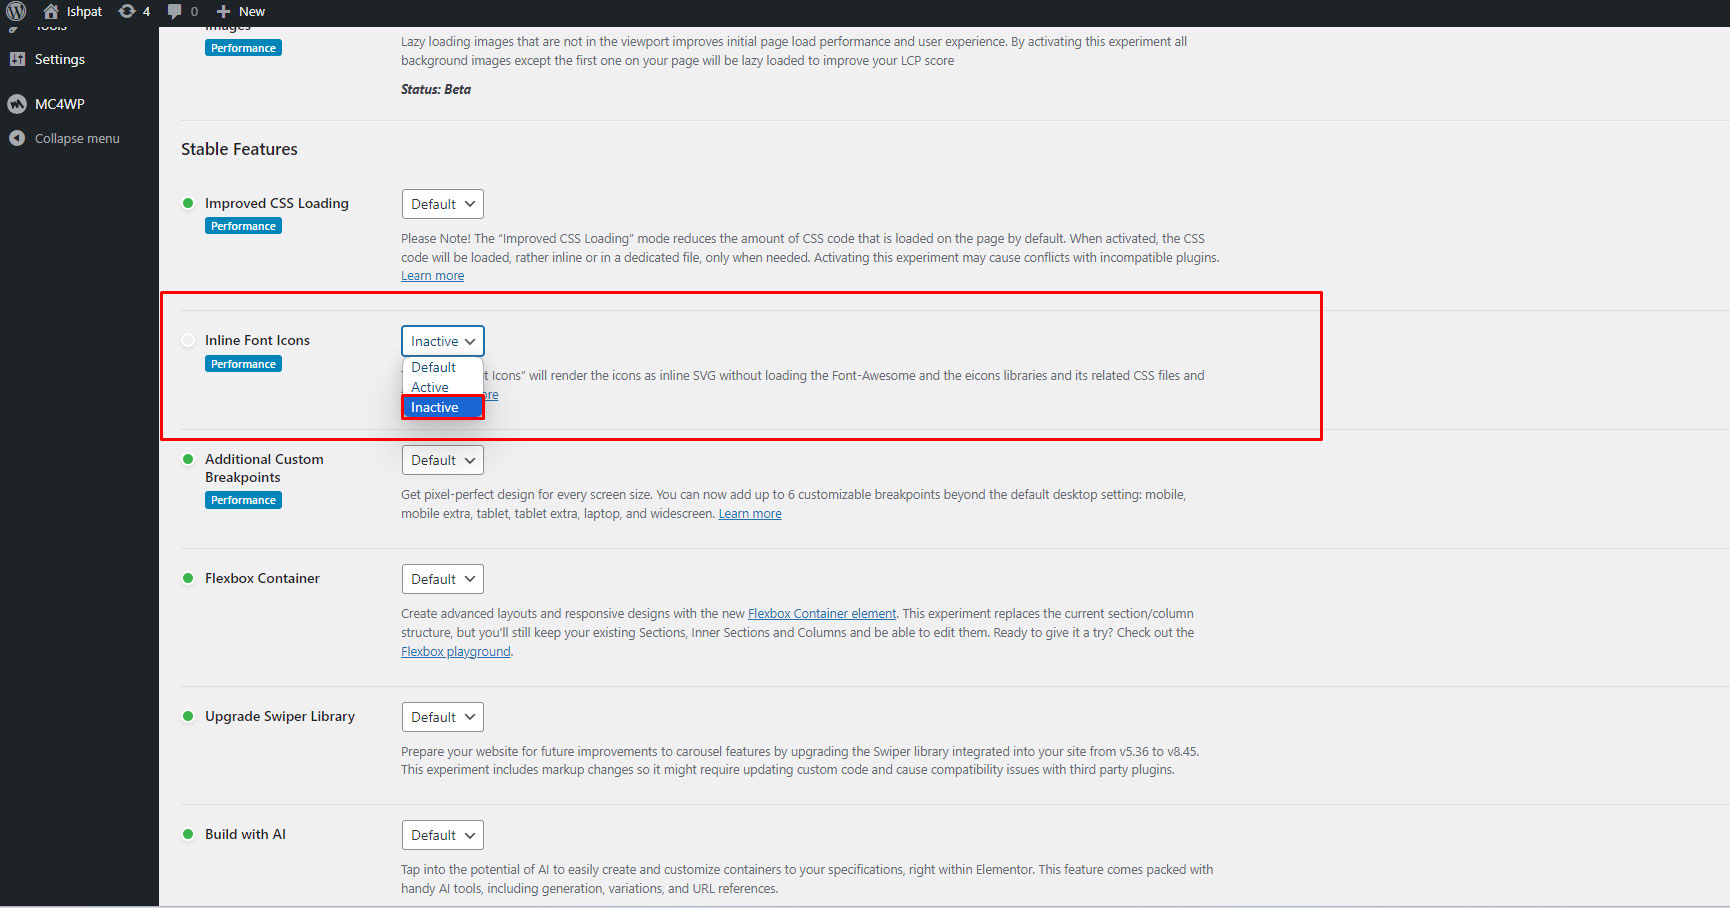
If icons appear unusually large or lose their expected styling after an Elementor update, first clear Elementor's generated files and data from Elementor → Tools, then clear any site or host cache. If the issue remains, check the Elementor experiment settings and test Inline Font Icons as a compatibility option.
Elementor Template Library Usage
The template library offers an extensive collection of versatile and modern templates designed for a variety of projects. Each template is designed with a focus on flexibility, ensuring compatibility with different industries and purposes.
You can follow the video guidline to template library:
Help & Support
Translation guidance, common troubleshooting steps, release information and support resources for the Rosun WordPress theme.
Translating Theme
You can translate Rosun and its companion plugin into your preferred language. Translate both the theme and plugin strings so the complete storefront and widgets are localized.
- Theme: Rosun
- Plugin: Rosun Core
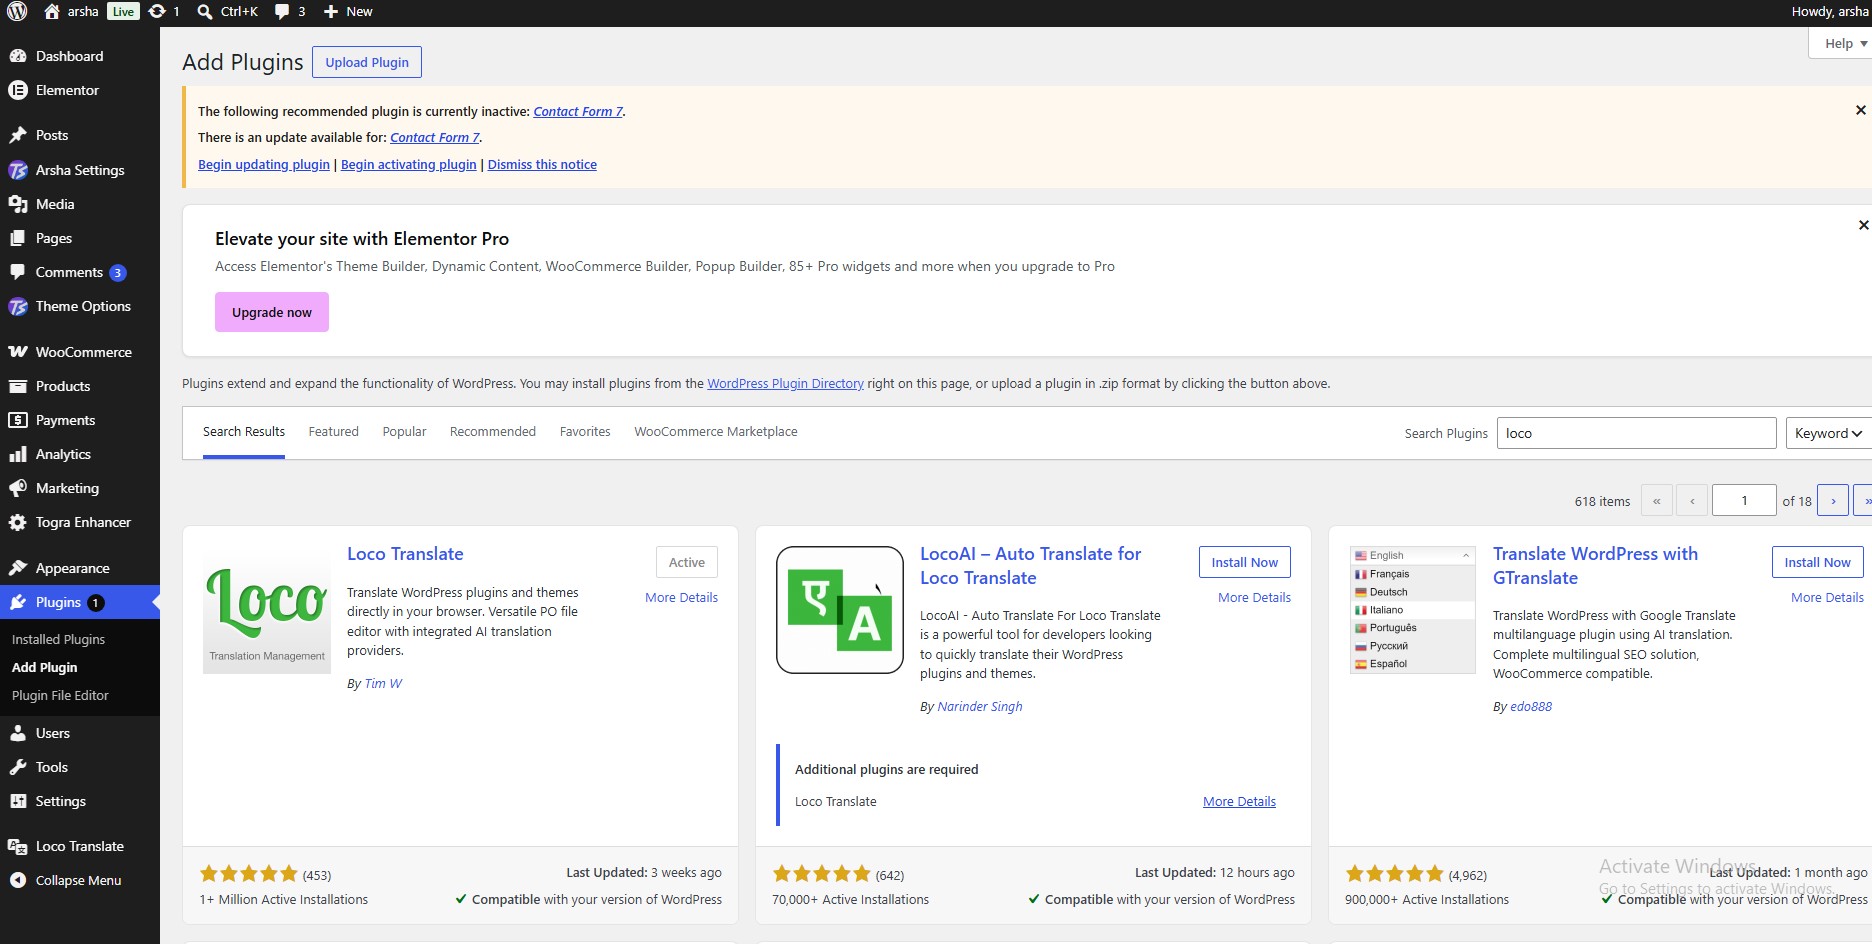
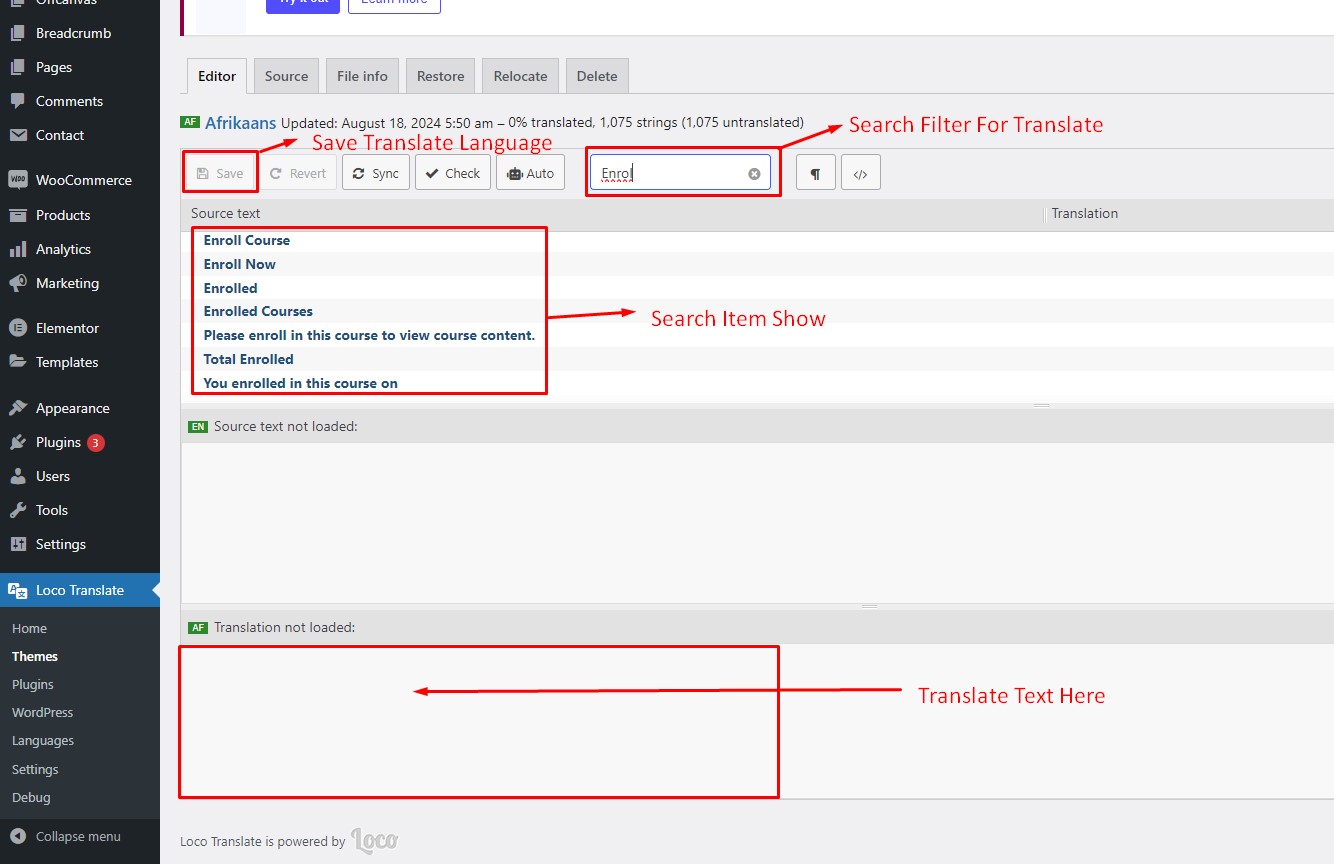
There are many tools available for translation. The easiest way is to use the plugin "Loco Translate". Using this plugin, you can translate any WordPress theme or plugin that supports translation.
Step-by-step using Loco Translate
Step 1: Install and activate "Loco Translate"
Step 2: Select the Theme or Plugin to translate
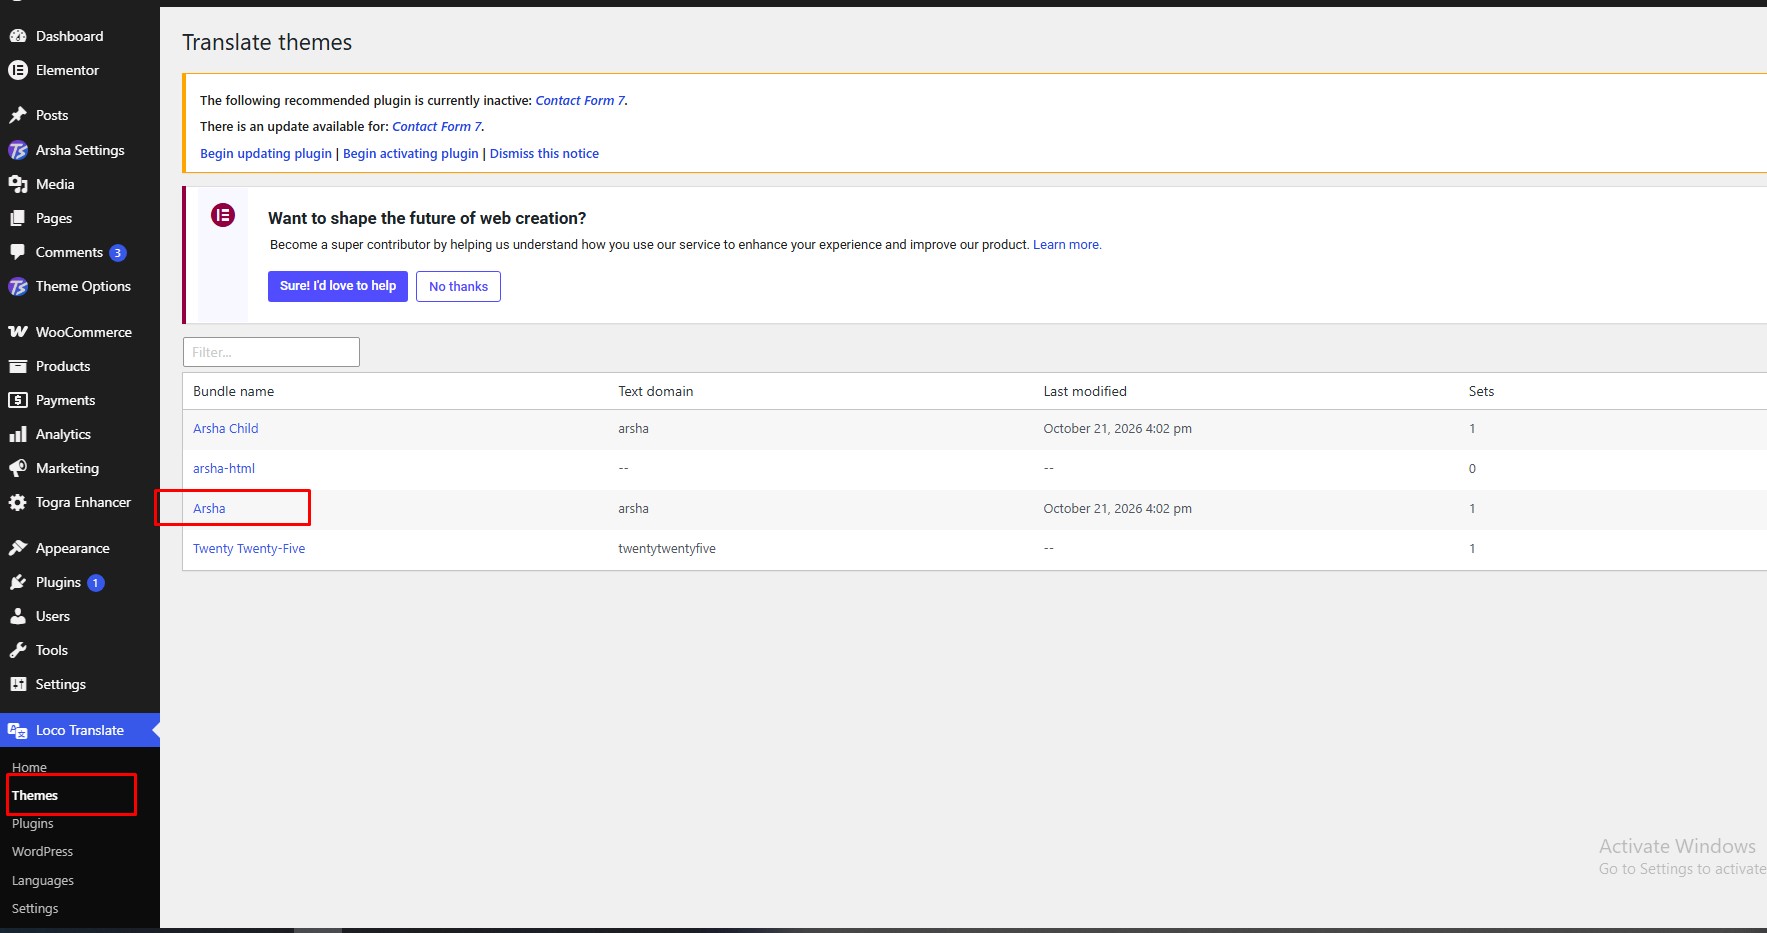
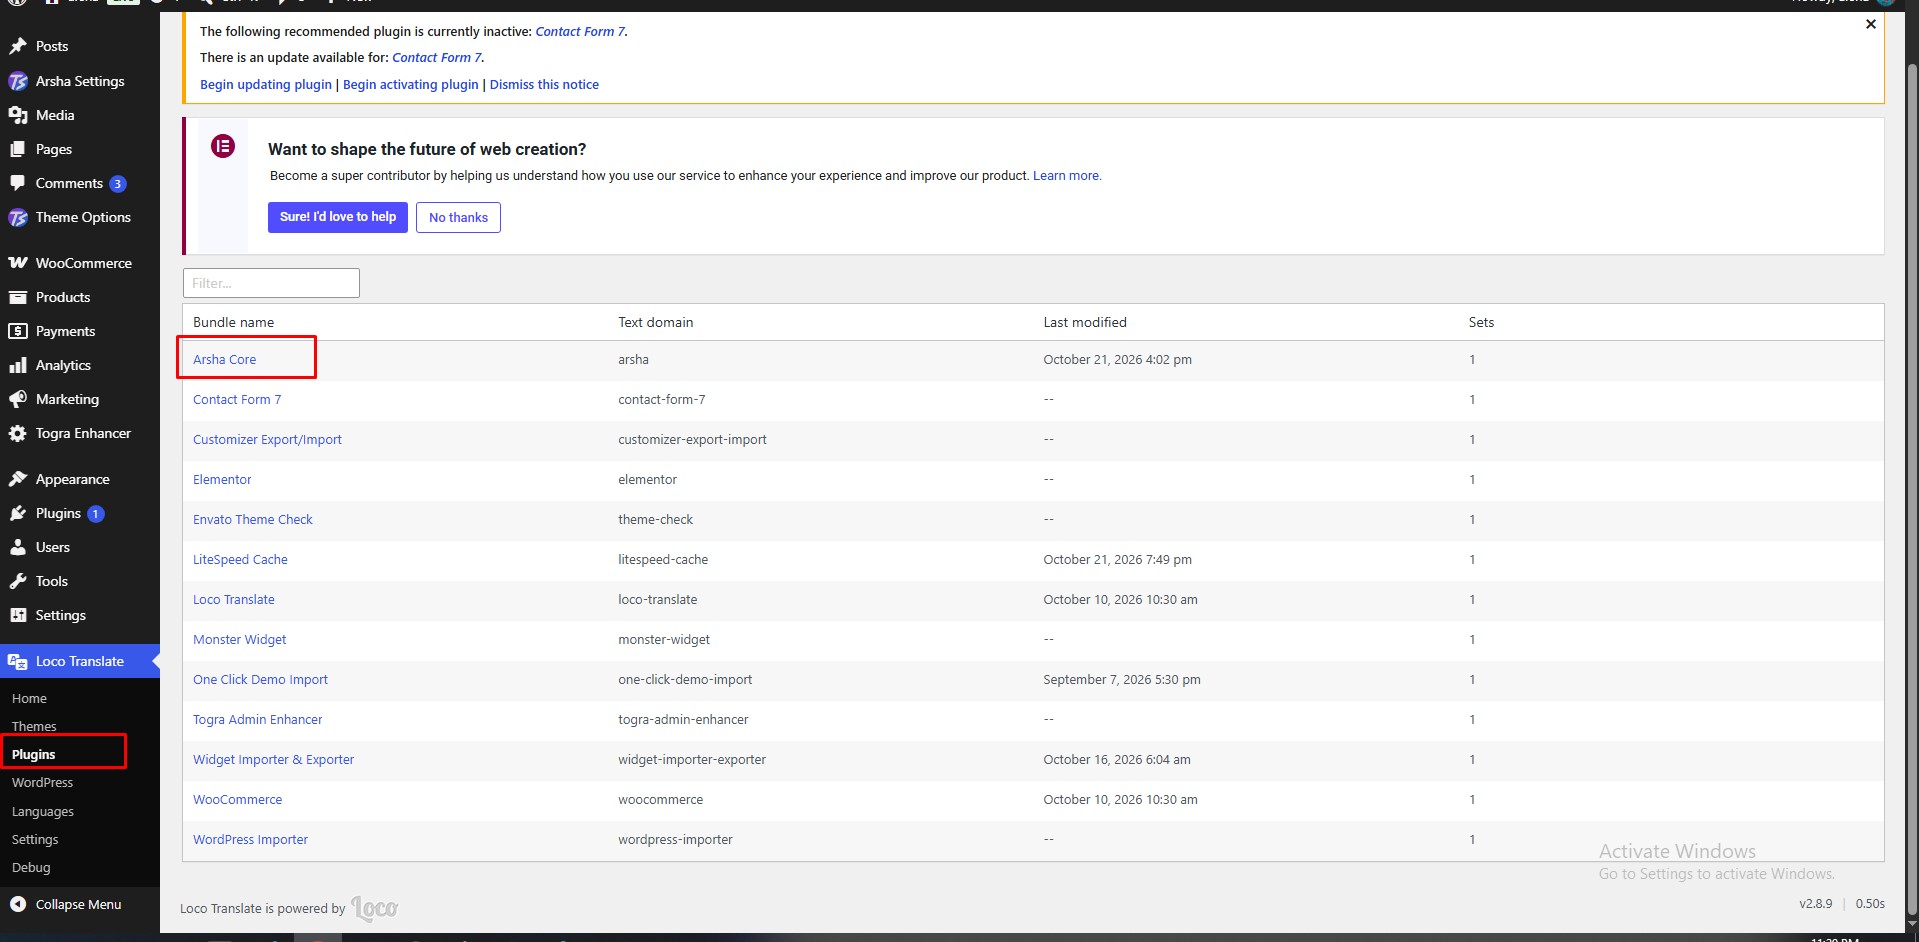
Select the theme or plugin you want to translate from the "Loco Translate" menu.
Step a: Theme Translate
Step b: Plugin Translate
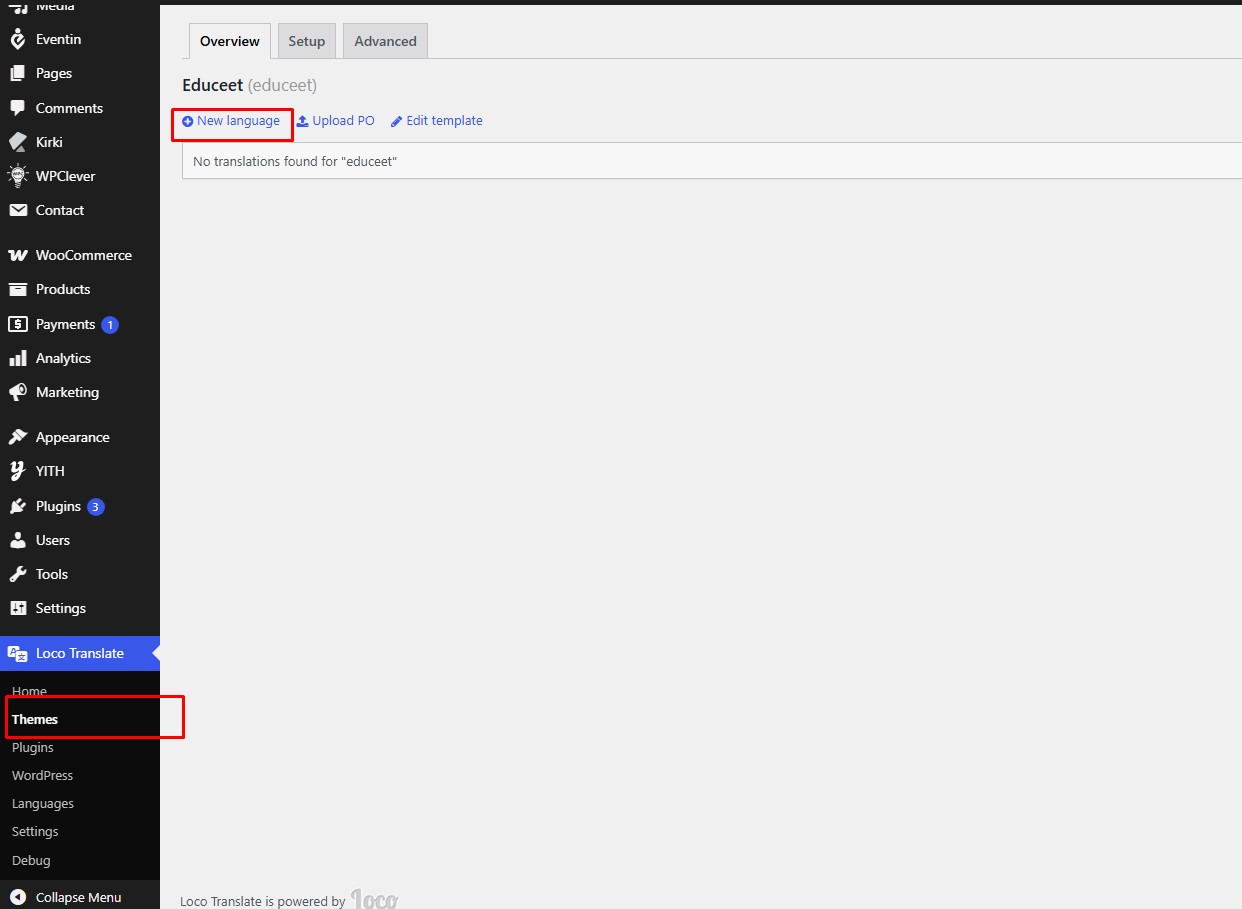
Step 3: Click "New language"
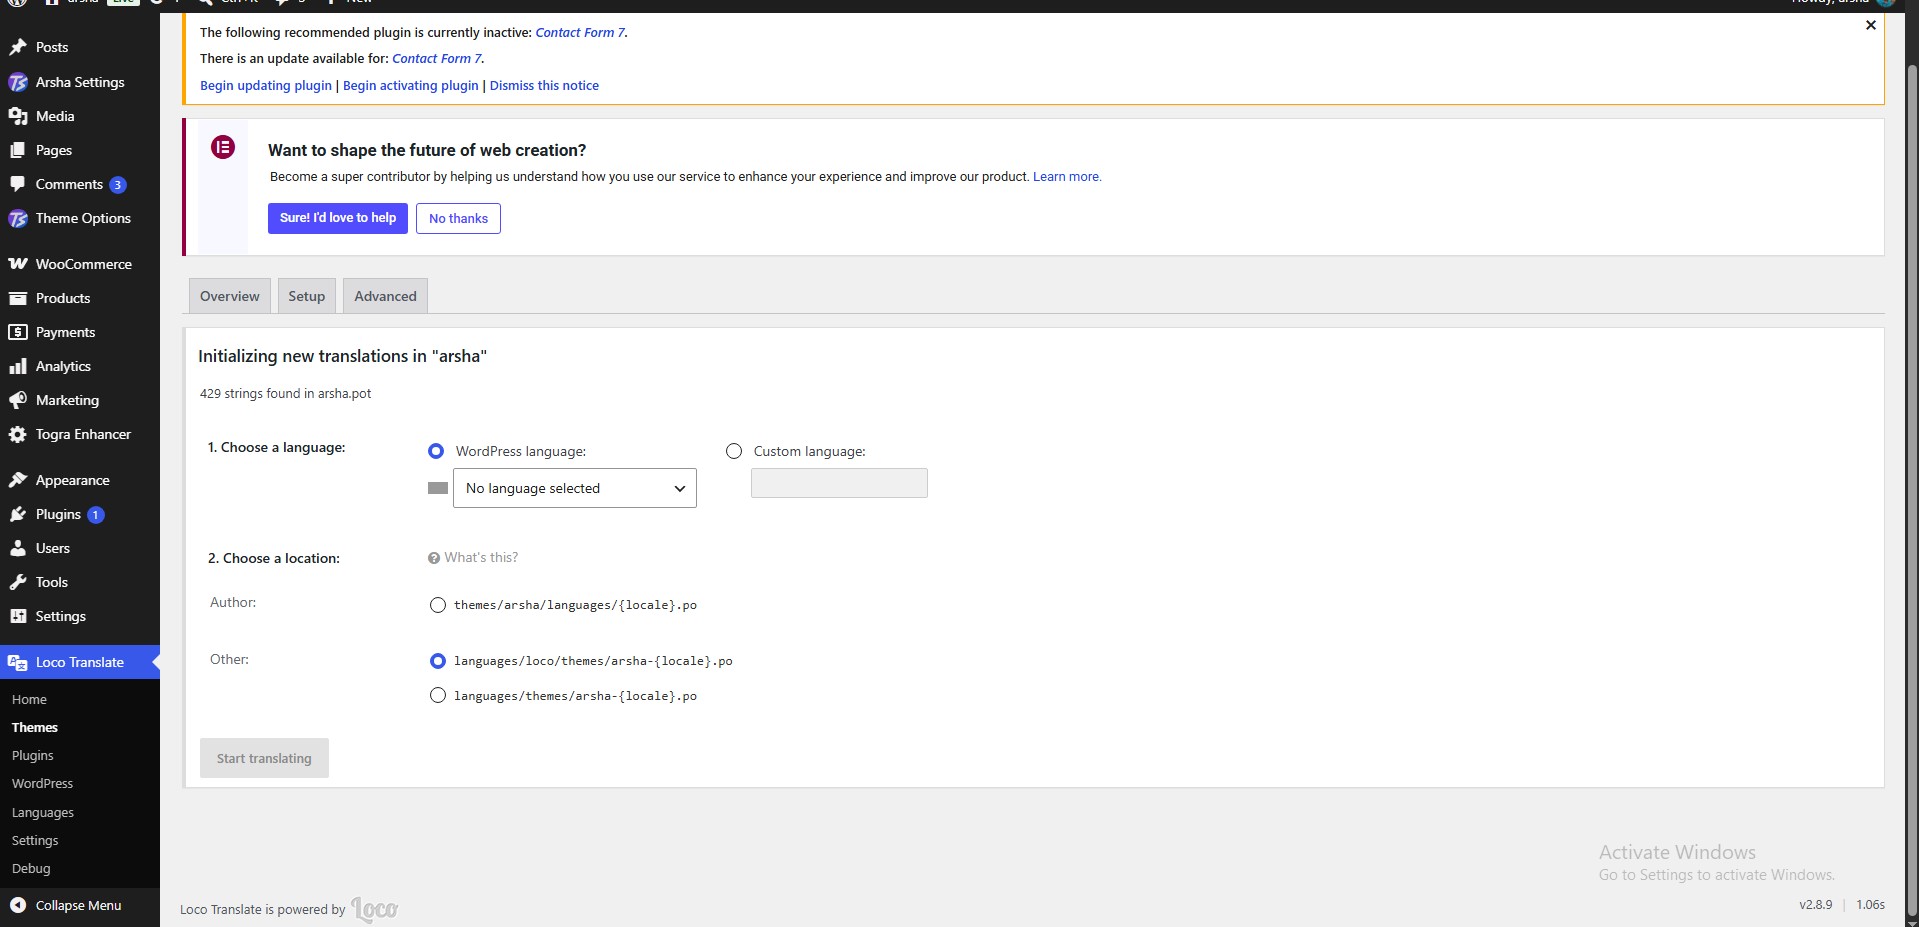
Step 4: Select language and start translating
Select your preferred language, choose location as "System", then click "Start Translating".
Loco Translate — Video Tutorial
Multilingual & Translation with TranslatePress
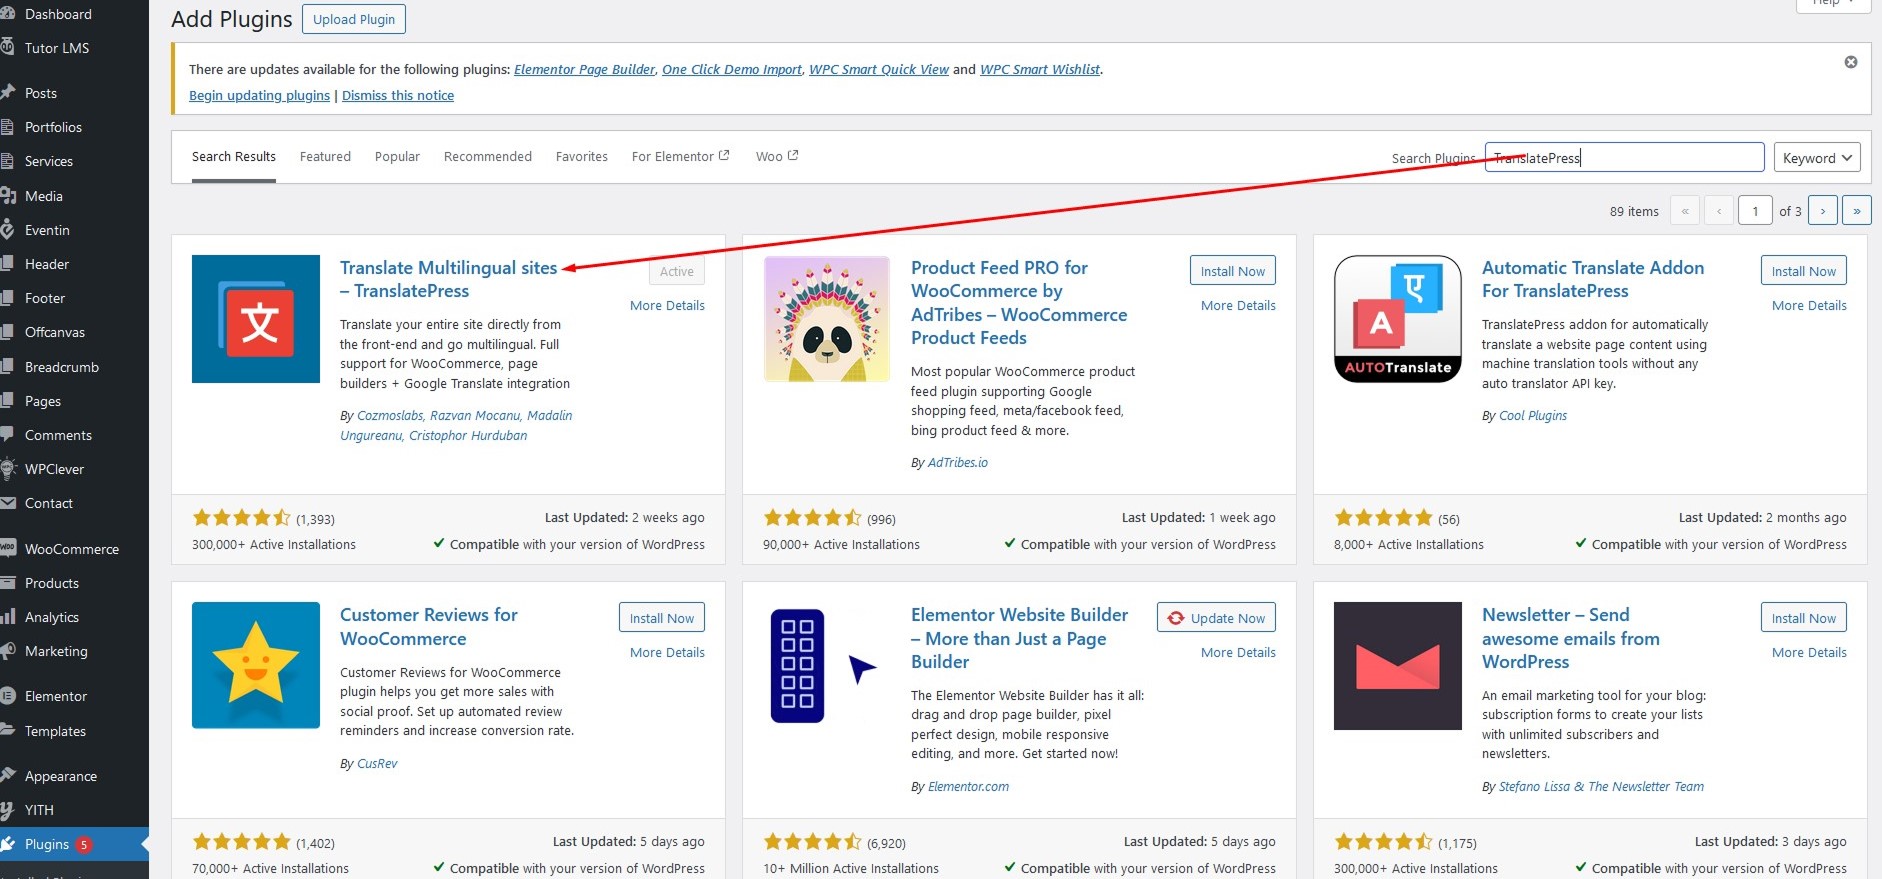
Here is a step-by-step tutorial for translating pages manually using the plugin "TranslatePress Multilingual":
Step 1: Install and activate TranslatePress
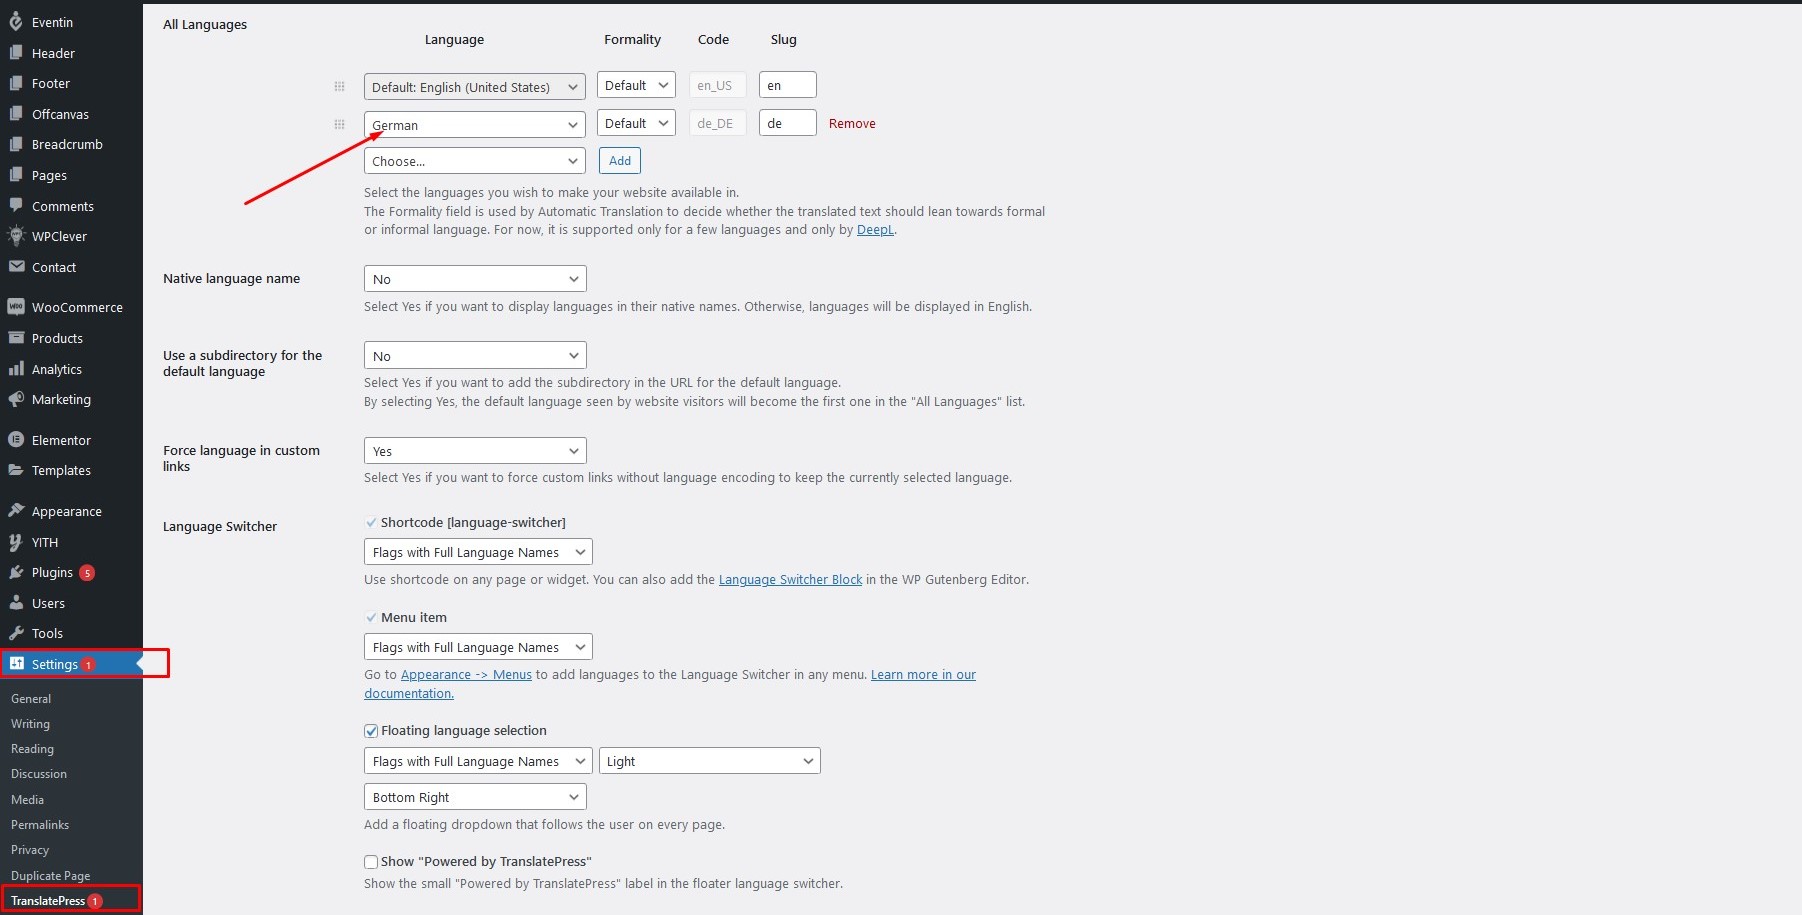
Step 2: Configure TranslatePress Settings
Go to TranslatePress Settings, select another language and click "Save".
TranslatePress — Video Tutorial
404 Error in All Pages
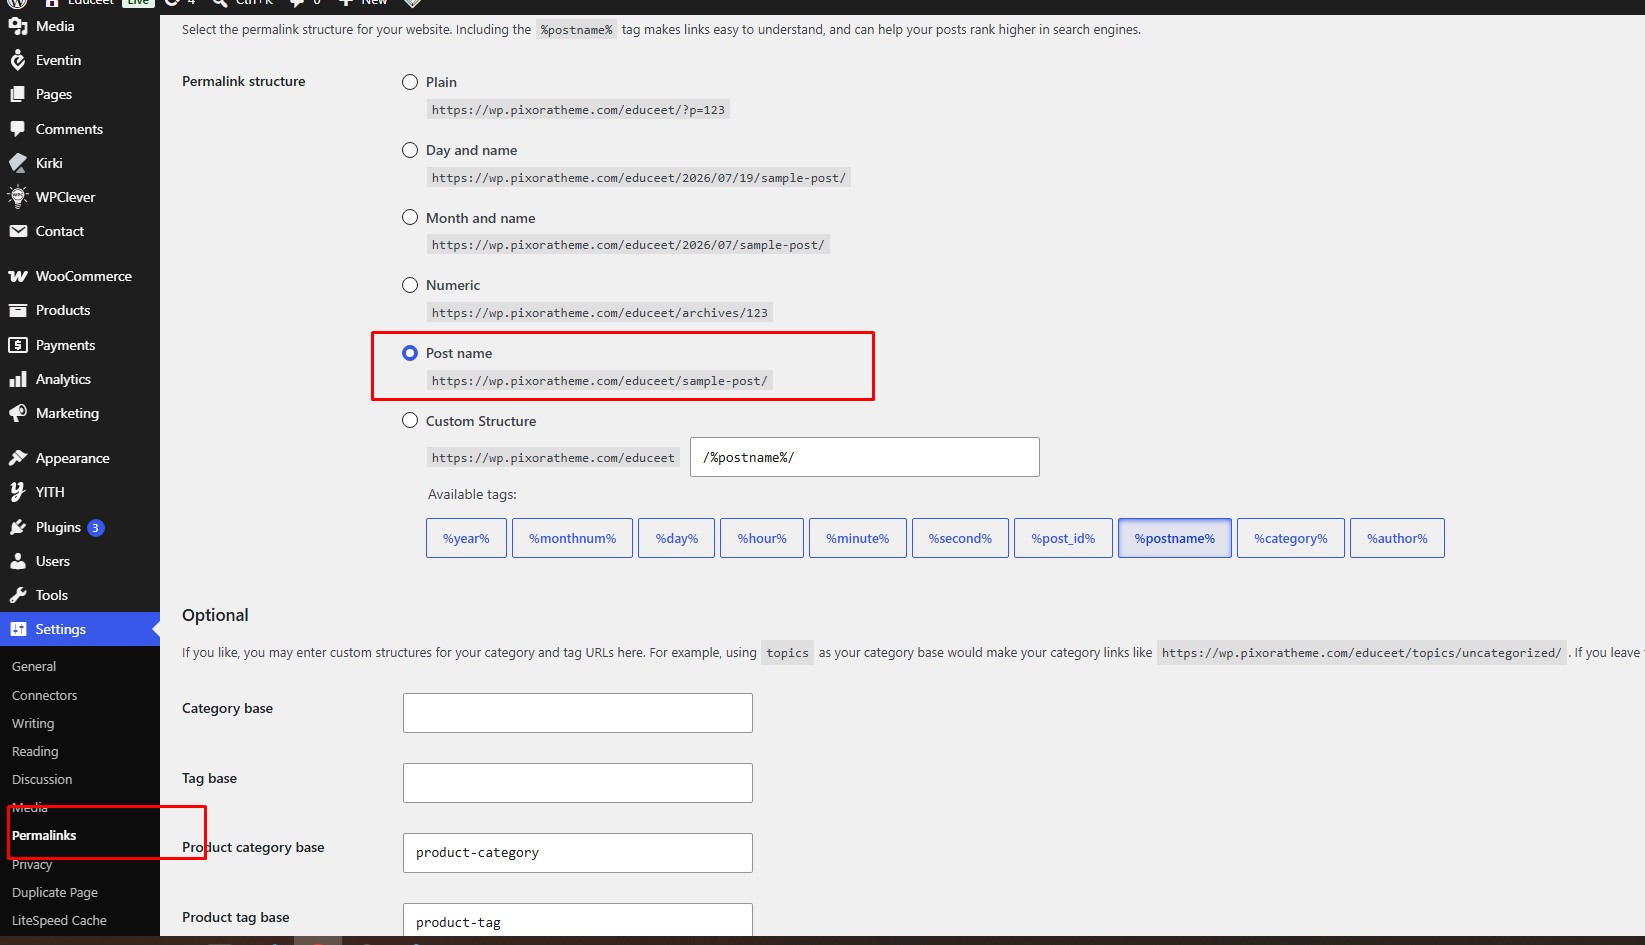
If you face 404 errors across all pages (this is common after demo import), the fix is to update your permalink structure.
Navigate to Settings → Permalink and click the "Save Settings" button. This refreshes your WordPress permalink structure and resolves the 404 issue.
Changelog
Every release in chronological order — newest first.
- UPDATED Corrected package, plugin, and manual demo import instructions
- UPDATED Matched the release version and documented the 26 general and 5 WooCommerce widgets
- UPDATED Added third-party licensing guidance
- Restored registered theme image sizes and large-image scaling.
- Kept existing comments visible when new comments are closed.
- Added an Elementor header fallback and reconciled demo setup behavior.
- Initial release of the Rosun grocery and food delivery theme.
Contact Support
Can't find your answer in this guide? Our support team is available 13 hours a day. Pick the channel that suits you below.